Working with Annotations
Viewing, editing and extracting annotations
Annotations are used to describe and visualize features, such as coding regions, restriction sites and repetitive elements, on sequences and alignments. Annotations can either be annotated directly on a sequence in the sequence viewer, or they can be grouped logically into tracks. A track is a collection of one or more annotation types. Tracks are stacked vertically underneath the sequence in question, with a separate line for each track and its annotations.
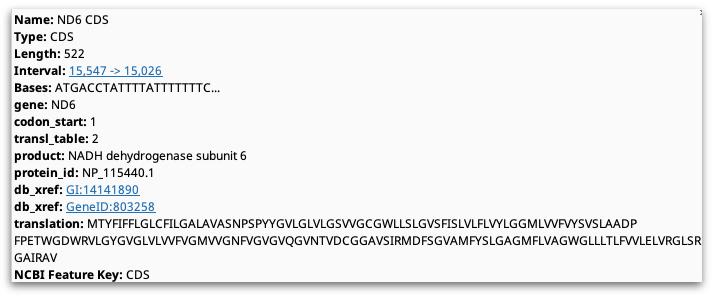
An annotation may have one or more properties or qualifiers associated with them. These can be added at the time an annotation is created, or at a later date by editing the annotation. To view the properties of a given annotation, mouse over it in the sequence viewer. This will display a tooltip, listing the Name, Type, Length, Interval and Sequence for that annotation plus any additional qualifiers.
Viewing and Customizing Annotations: The Annotations and Tracks tab
If a sequence contains annotations, the the annotation types present on the sequence will be listed in the Annotations and Tracks tab to the right of the sequence viewer denoted by the arrow icon  . Annotations that are directly on the sequence are listed first, followed by annotations on tracks underneath. Tracks with only one annotation type will show a single listing, whilst tracks with multiple annotations will show a list of the annotation types.
Individual annotation types can be turned on or off using the checkboxes to the left of the annotation type, or all annotations can be turned off by unchecking Show Annotations at the top of the panel. Note that turning an annotation type off does not remove it from the sequence, it only hides it from view.
Directly beneath the Show Annotations box is a filter text field. Typing a term in this field will highlight any annotations that contain the entered text in their name or qualifiers. To filter for a term in a specific field, click the down arrow to the right of the box and choose the field and term you wish to search for.
To quickly find and move between instances of a particular annotation type on a sequence, click the small left/right buttons to the right of each annotation type. This will move the selection in the sequence view to the next or previous instance of that annotation type. This is useful for navigating large genomes or assemblies.
To customize the way an annotation type is displayed, click on the preview of the annotation arrow in the Annotation and Tracks window ![]() . This will bring up a popup menu containing the following options:
. This will bring up a popup menu containing the following options:
-
Show only [type] annotations: Turns off all other annotation types and shows only this type.
-
Show [type] labels: When this is unchecked, only the annotation arrow is shown on the sequence and not the annotation name.
-
[type] labels >: Allows you to customize which property of the annotation is displayed as the name.
-
Show above/outside sequence: Moves the annotation so that it is sitting above or outside the sequence, rather than on or below it.
-
Edit Color: Allows you to change the color of the annotation arrow.
-
Edit all [type] annotations: Allows you to change the name, type or properties of a given annotation type, or move the annotation to or from a track. This applies the change to all annotations of this type.
-
Delete all [type] annotations: Deletes all annotations of a particular type.
The popup menu for individual tracks has an additional option Color by / Heatmap. This will color annotations on that track according to the contents of a qualifier field, enabling the creation of annotation heatmaps by using a score value (or some other metric) stored in the qualifier of an annotation.
The way annotations are drawn on the sequence can be further customized in the Advanced tab of the sequence viewer.
The Annotations Table
The Annotations tab appears above the sequence viewer whenever sequences containing annotations are selected. It displays each annotation as a row in a table, with columns corresponding to the qualifiers for the annotations. Selection of annotations is synchronised with other viewers, such as the sequence viewer and dotplot.
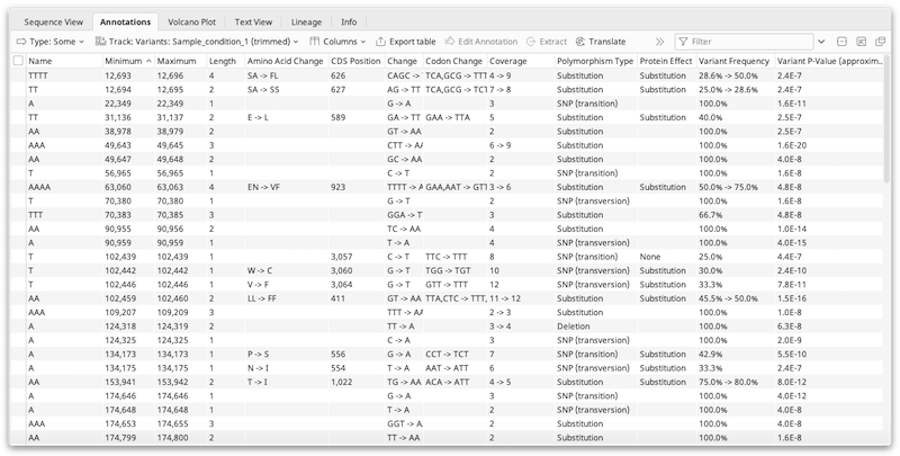
To change what is displayed in the annotations table, use the buttons above the table:
-
Types allows you to specify what annotation types are displayed in the table.
The Select One button in the menu is a quick way to view just one type while also selecting the relevant columns for that type. Relevant columns are deemed to be ones where at least one annotation of that type has a value for the column.
-
Tracks allows you to specify what tracks are displayed in the table.
-
Columns allows control over which columns are visible in the table.
To further filter what is visible in the table, use the filter box at the top right of the table. Filtering is only done against the currently visible columns for each annotation.
To export the visible rows and columns of your annotations table, click Export table. This exports the table to a CSV (comma-separated values) file.
The Extract and Translate buttons will create a new document from the selected annotation(s). Extract extracts the region of the selected annotation to a new document. Translate translates the nucleotides in the region of the selected annotation into amino acids, using your choice of reading frame and genetic code, and saves it to a new protein document.
Annotations table functions can also be accessed via a popup menu when right-clicking on one or more selected annotations in the table. This menu contains options for copying the selected value, extracting, translating, showing on sequence, editing and deleting the selected annotations. The show on sequence function in this list will show the selected annotations in the sequence viewer.
Editing annotations
Annotations can be edited by selecting them either on the sequence or from the annotations table, and clicking Edit Annotations. This brings up a window where the annotation name, type, location, properties and intervals can be edited.
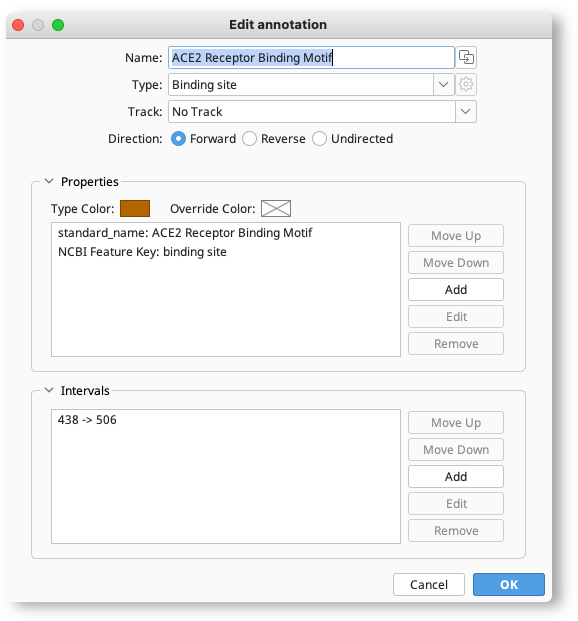
To move the annotation onto a track, click the Track option and either choose an existing track, or type in the name of a new track you want to create. To move the annotation from a track to the sequence itself, choose No track in this setting.
In the Properties section, properties can be added, edited, removed or moved up and down in the list by clicking the buttons to the right. The annotation color can also be set in this section by clicking the color boxes. The Override color sets the color for that particular annotation only but does not change the color of other annotations of that type. To change the color of all annotations of that type, click the Color box.
The Intervals section shows where the annotation is located on the sequence. To change the location, the direction, or mark an annotation as partial, select the interval and click Edit. The direction of the annotation can be changed by clicking the colored arrow. Check truncated left end to mark an annotation as partial at the left end (e.g. if a gene is incomplete at the left end when viewed on the sequence), or truncated right end to denote that the feature is incomplete at the right end.
Batch editing annotations
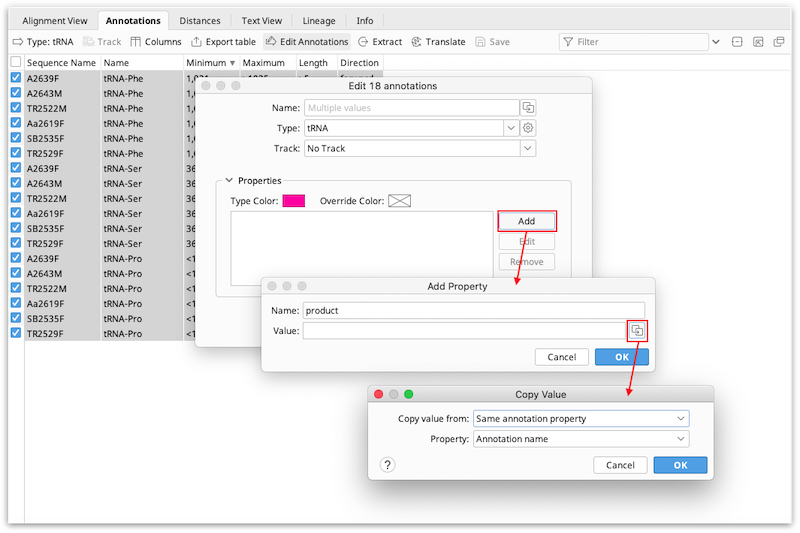
Multiple annotations can be edited at once by selecting the annotations while holding down the cntrl/command key, and clicking Edit Annotations. Only properties of the annotations can be edited in batch mode, not intervals.
Where properties contain different values in different annotations, Multiple values will be shown next to that property. To edit the property so that it is the same for all annotations, just type in the new value that you want to apply to all the annotations. To apply different values for different annotations you can use the copy icon to the right of the annotation name or qualifier. This allows you to copy values from another annotation or annotation property according to the options below:
-
Sequence property allows you to copy a property from the sequence containing the annotation.
-
Same annotation property allows you to copy another property from the same annotation.
-
Another annotation (in intersecting location) allows you to copy the annotation property from another annotation on the same sequence with intersecting intervals (for example copying a property from a CDS annotation to the Gene annotation for that gene on the same sequence).
-
Another annotation (in the same location) allows you to copy the annotation property from another annotation on the same sequence with the same intervals and direction.
The figure below shows an example where a new "product" property is added to all selected annotations, and the value is taken from the annotation name.
Extracting Annotations
To extract an annotation to a separate document, select it either on the sequence or in the annotations table and click  Extract.
If you want to actively link the extracted annotation to the source document (so that changes on the source document are propagated to the extracted document), check Actively link source and extracted documents.
If the annotation you are extracting contains multiple intervals, the intervals can be concatenated into a single sequence. If this option is not selected, then each interval in the annotation will be extracted to a separate sequence and grouped into a list.
Bulk extraction
Bulk extraction of annotations can be done in two ways:
-
Select all the annotations you want to extract, either on the sequence or in the Annotations table and click Extract. As with multi-interval annotations, you are given the option to concatenate all the annotations into a single sequence.
-
Go to Extract Annotations under the Tools menu. Using this interface, all annotations on the selected sequences which match certain criteria (e.g. a particular annotation type or gene name) can be extracted in bulk, without needing to select the annotations on the sequence first.
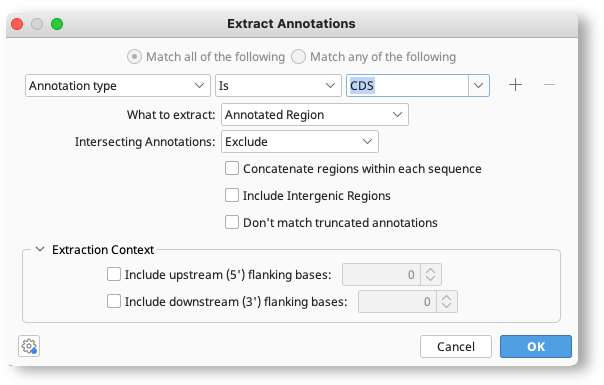
To define what annotations to extract, select the value of the annotation type or property (qualifier) that you want to extract by in the chooser. To set more than one criteria, click the + button to add an additional row of options, and choose to either Match all... or Match any... of the criteria.
What to Extract allows you to set which part of the sequence to extract (e.g. just the annotated region, or the entire sequence) based on the criteria you have set. To extract regions of sequence upstream or downstream of the annotated sequence, enter the length of the additional sequence you want to extract under Extraction Context. Intersecting Annotations allows you to set what to do with other annotations that don't match the criteria, but which overlap with the matched region.
If there are multiple annotations on one sequence which match the criteria, these can be concatenated into one sequence by checking Concatenate regions within each sequence.
Adding annotations
Geneious Prime has many functions for adding annotations to sequences. They can be added manually, imported from external sources, transferred from other sequences, or added as part of structure or gene prediction steps. Each of these options is described in the sections below. For more information on viewing and editing annotations, see Viewing, editing and extracting annotations.
Manual creation of annotations
To create an annotation on your sequence or alignment, select the region of the sequence where you wish to place the annotation and click the  Add Annotation button.
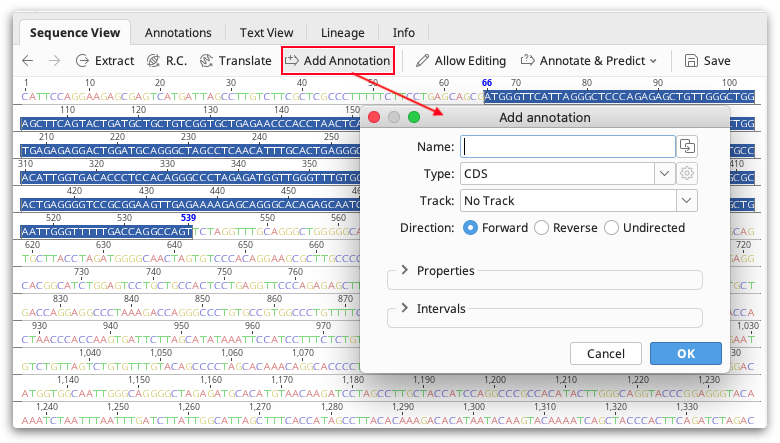
In the Add Annotation dialog enter an annotation name and select a existing type or type a new one. If you wish to put the annotation on a track rather than directly on the sequence, either choose an existing track from the drop-down menu, or type in a new track. Expand the Properties section to enter additional properties for that annotation. In the Interval section you can adjust the position of the annotation, add an additional interval, or mark the annotation as truncated at the 5' or 3' end.
Importing annotations from external sources
BED files, GFF files and VCF files contain annotation information which can be imported into Geneious Prime. These files often do not contain the sequence itself, so when you import the file you will be prompted for the reference sequence.
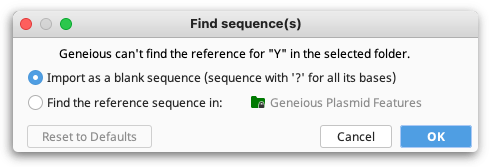
Note that if you choose "use a sequence in the selected folder", or you have a sequence list or more than one sequence selected and choose "use a sequence in the selected documents", then your sequence's name in Geneious must match the sequence name in the first column of the BED, GFF or VCF file. If you select a single sequence and choose "use a sequence in the selected documents" then your annotations will be imported onto that sequence regardless of whether it matches the sequence name in the file.
For more information on these file formats, see:
-
BED format: http://genome.ucsc.edu/FAQ/FAQformat.html#format1
-
GFF format: http://www.sanger.ac.uk/resources/software/gff/spec.html
-
VCF format: http://samtools.github.io/hts-specs/VCFv4.2.pdf
Note that in BED format the first base is numbered 0 rather than 1, and Geneious accounts for this when it imports the file so your annotations will be shifted 1 bp to the right compared to their positions listed in the BED file.
Copying or transferring annotations from other sequences
Copy to...
You can copy annotations from one sequence to other sequences in the same alignment or assembly document by right-clicking on the annotation and choosing Annotation → Copy to.
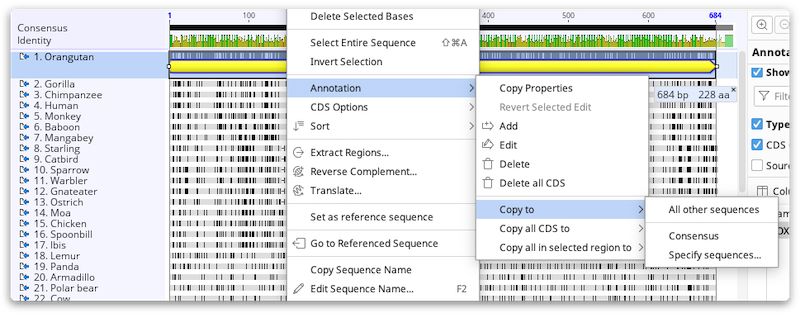
This will give you the option of either transferring the annotation to the consensus sequence, reference sequence (if there is one), or any of the other sequences in the alignment or assembly. You can also use the associated options: Copy all x to... to copy all annotations of the currently selected annotation type on the selected sequence; and Copy all in selected region to... to copy all annotations in the selected sequence. In each case, the annotation(s) will be copied across regardless of the similarity between the sequences.
Transfer Annotations
Using Transfer Annotations, you can copy annotations to the reference and/or consensus sequence of an alignment or assembly. This function can be accessed from the Annotate and Predict menu, or in the  Live Annotate and Predict tab in the sequence viewer. To set a sequence as a reference sequence Ctrl-click on it and choose Set as reference sequence.
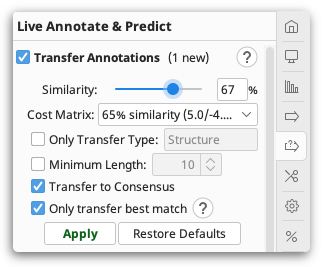
Annotations will only be transferred where the annotated sequence and the reference/consensus sequence have at least the specified minimum similarity. All transferred annotations will be annotated with a Transferred From qualifier indicating the names of the sequences the annotation came from (sorted in order of decreasing similarity), and a Transferred Similarity qualifier which indicates the percentage similarity of the most similar sequence the annotation was transferred from.
Annotations of the same type and covering the same interval that would be transferred from multiple sequences are merged together such that the name of the transferred annotation will consist of the names of all contributing annotations sorted in order of decreasing similarity. Similarly, if contributing annotations have different qualifier values, the resulting qualifier value will consist of all contributing qualifier values sorted in order of decreasing similarity.
The percentage similarity is the sum of the similarity values for each position as a fraction of the sum of the maximum similarity values of the bases/residues in each position. For example if one sequence is LLK and the other is LIK using the Blosum62 matrix, L/L scores 4, I/I scores 4, L/I scores 2, K/K scores 5. Therefore the total score is 4+2+5=11 out of a maximum of 4+maximum(4,4)+5=13 for a percentage similarity of 85%. Gaps (if allowed) are scored as the lowest value from the score matrix (e.g. -4 for Blosum62).
Translation properties on CDS annotations are not transferred to the destination sequence. Instead these are renamed to Transferred Translation. The Sequence View calculates and displays an Automatic Translation property on any CDS annotation without a translation. However, this is not a real annotation property that is visible when exported. To add a real Translation property to annotations, use Tools → Workflows → Set CDS Translation Property.
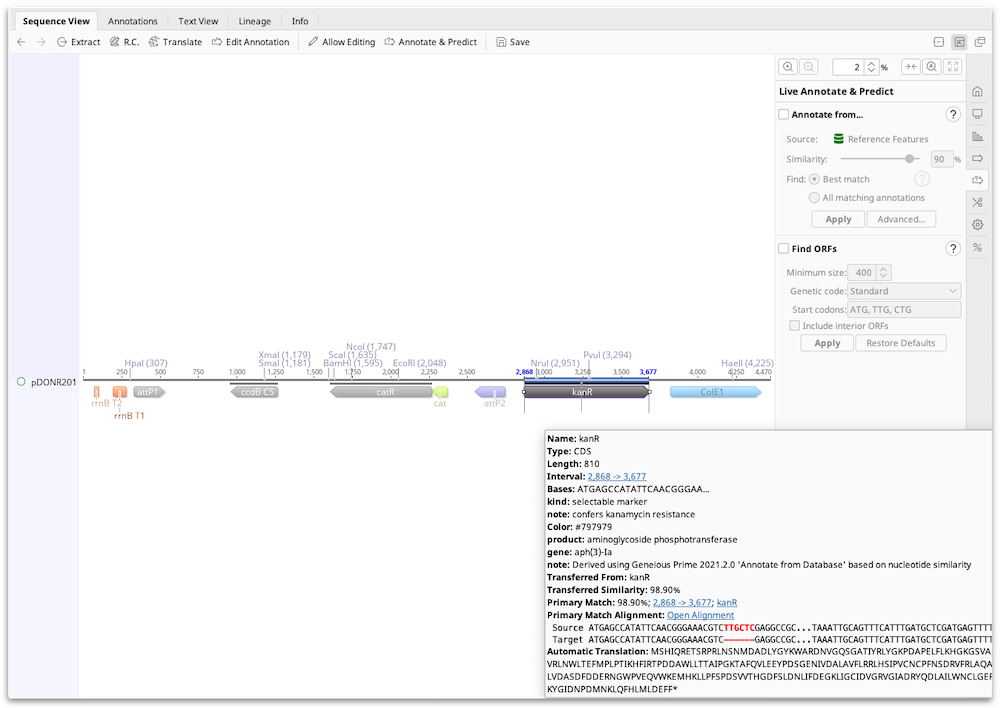
Annotate from Database
Annotate from Database allows you to annotate your sequence with particular genes or motifs from a custom annotation database. This function uses a BLAST-like algorithm to search for annotations in the Source folder that match your sequence, by aligning it against the full length of each annotation. Annotations which match with the given similarity are copied to your sequence.
To use Annotate from Database, click the Live Annotate and Predict tab to the right of the viewer, and check the Annotate From... box, or go to Annotate and Predict → Annotate from Database. Then set the Source folder you wish to use to annotate your sequences.
The Source folder
The default Source annotation folder is the Reference Features folder which can be found at the bottom of your Local folder. Within this is a locked Geneious Plasmid Features folder which contains a curated list of common plasmid features including promoters, terminators, tags, rep origins and marker genes.
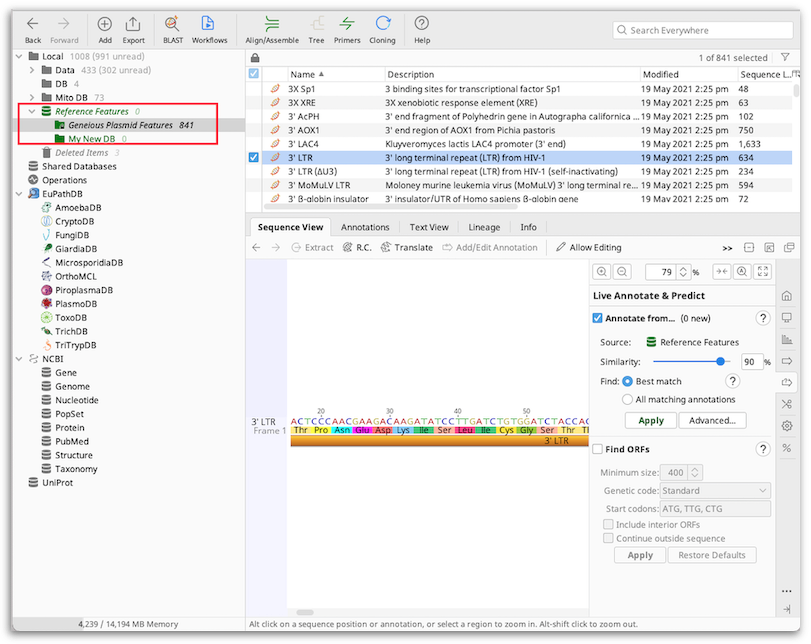
You can also create a customized annotation database from other sequences in your database. These sequences can be annotated or unannotated nucleotide or protein sequences, such as reference genomes downloaded from Genbank, lists of peptides, BLAST hits, or your own previously annotated sequences. These sequences should be placed in their own folder, which can then be selected as the Source to annotate from. You can set any folder within your database as the Source folder, but we recommend you place your personal annotation databases in the Reference Features folder so they are easy to find and access.
Finding and applying matches
You may need to adjust the Similarity slider in order to find matches between your sequence and the source annotations. This sets the minimum percentage of sites covered by an annotation that must be identical in order to transfer the annotation. Insertions and deletions count as mismatched sites. Ambiguous matches are counted as partial mismatches. For example, for nucleotides, N versus A is 0.75 of a mismatch. Similarity is calculated along the full length of the annotation. For example, if your sequence is only half the length of the annotation, it can have a maximum similarity of 50%.
By default, only the Best match annotation will be shown in cases where multiple annotations of the same type overlap with each other in the same region on the target sequence. The best match is considered as the annotation with the highest similarity at a position, when comparing annotations of the same type that overlap in length by the % threshold set in the Advanced options under Best Match Criteria (default is 75% length overlap). The exception to this is primer annotations, where all annotations are always annotated.
To turn off this behaviour and annotate all annotations, choose All matching annotations.
Once you are happy with how your annotations look, click Apply to add them to the sequence. If you only want to add a selected few of the annotations that are previewed on the sequence, select those annotations you want to add before clicking Apply.
The transferred annotations contain the annotation qualifiers from the original sequence (note that some of these, such as database references and transferred translation may not be correct for the target sequence), plus qualifiers detailing the source of the transferred annotation and the match percentage. The Open Alignment hyperlink allows you to view an alignment of the target region and matching annotation.
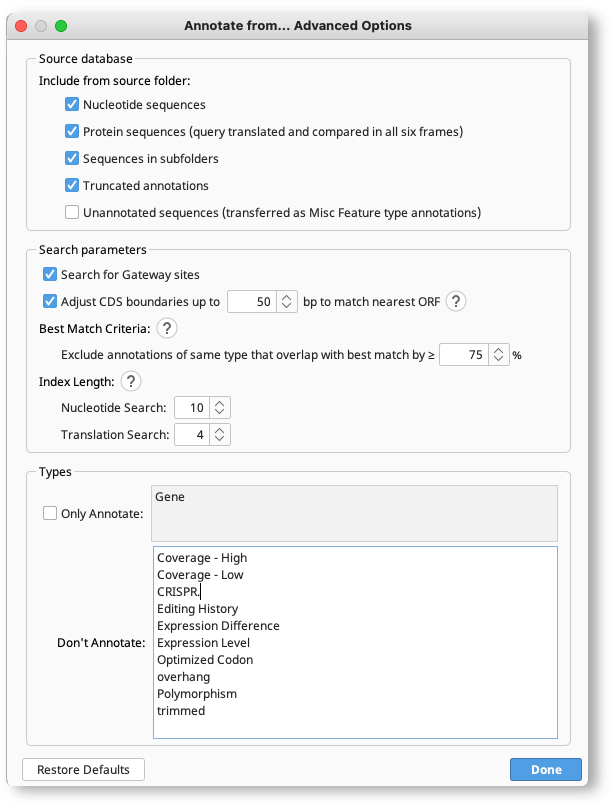
Advanced options
Advanced options can be configured by clicking the Advanced button under Annotate from Database.
Annotating nucleotide from protein sequences.
Nucleotide query sequences can be annotated from protein or nucleotide source sequences. If annotating from protein, the nucleotide query will be translated in all 6 frames for comparison to the protein sequences. You can disable this option by unchecking Protein sequences under the Source database advanced options.
Using unannotated sequences in the Source folder
You can optionally annotate from unannotated sequences in your Source folder. Geneious will treat sequences without any annotations as though they have an annotation of type "misc feature" which covers the full length of the sequence and is named the same as the sequence name. If a match is found, this "misc feature" annotation will be transferred to the query sequence. To turn on this option, check Unannotated sequences (transferred as Misc Feature type annotations) under the Source database advanced options. When this option is off, unannotated sequences will be ignored.
Adjusting the search parameters
-
Adjust CDS boundaries up to [x] bp to match nearest ORF. Single interval CDS annotations will be adjusted to match open reading frames (ORFs) on the query sequence, if one is available within the specified distance. A valid ORF begins with a start and ends with a stop codon, using the start and stop codons defined in the genetic code for the specified destination sequence (or if none is selected, using the genetic code specified on the annotation, or the source sequence). Gene annotations will also be adjusted when they exactly match an adjusted CDS annotation. If adjusting a CDS annotation causes its similarity to drop below the transfer threshold, the unadjusted annotation will be transferred instead. This option is on by default. Uncheck this option to transfer CDS annotations exactly as they match, regardless of whether they span a complete ORF.
-
Best match criteria. This option sets the percent length overlap threshold for applying best match annotations.
-
Index length. Specifies the size of words (number of consecutive nucleotides or amino acids) in each sequence to put into an index for quickly finding all other sequences containing the same word. A higher index sequence length is faster but uses more memory and is less sensitive. An annotation must have a sub-sequence of at least the index sequence length which matches perfectly with the target sequence in order to produce a result. For annotating longer (i.e. gene length) annotations onto a genome we recommend increasing the nucleotide Index Length to the maximum value of 15.
Annotate by BLAST
Annotate by BLAST allows you to annotate your nucleotide sequences by running a BLAST search on ORF, CDS or mRNA annotations on your sequence. This function will find and extract all the annotations of the type selected, translate them and run blastp against a BLAST database of your choice. Annotations from BLAST hits which match with the selected similarity are back translated and transferred onto your sequence.
To use Annotate by BLAST, you must firstly annotate your sequences with ORF, CDS or mRNA annotations. ORF annotations can be added using Find ORFs under the Annotate and Predict menu, or by using the Glimmer plugin for predicting bacterial genes. CDS and/or mRNA annotations can be added with a gene prediction tool, such as Augustus (available as a plugin).
Then select your sequence and go to Annotate and Predict → Annotate by BLAST.
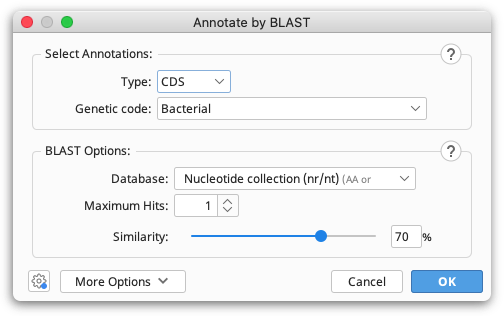
In the top panel of the Annotate by BLAST options, select the genetic code for your sequence, and the type of annotations on your sequence (ORF, CDS or mRNA).
In the BLAST Options panel, select the database you wish to BLAST against. Note that as blastp is used, only amino acid databases can be selected.
If you have a large number of annotations we suggest using a custom BLAST database rather than blasting to NCBI, as large searches to NCBI can be extremely slow. See Custom BLAST for instructions on setting up and using custom BLAST. Be aware that the larger the BLAST database, the slower the search will be.
You may need to adjust the Similarity slider in order to find matches between your translated annotations and the BLAST hits. This sets the minimum percentage of sites covered by an annotation that must be identical in order to transfer the annotation. Insertions and deletions count as mismatched sites. Ambiguous matches are counted as partial mismatches. For example, for nucleotides, N versus A is 0.75 of a mismatch. Similarity is calculated along the full length of the annotation. For example, if your sequence is only half the length of the annotation, it can have a maximum similarity of 50.
Under More Options you can set other BLAST parameters, such as E-value thresholds, or the number of CPUs for custom BLAST.
Once the BLAST searches have finished, annotations from the BLAST hits will be back-translated and transferred to your original sequence. Note that if you have chosen to return multiple hits, and the hits cover the same region of sequence, only the closest match is annotated. The transferred annotations will contain the annotation qualifiers from the original nucleotide sequence plus qualifiers detailing the source of the transferred annotation and the match percentage.

Annotation of sequence features using EMBOSS tools
The EMBOSS tools which were available under the Annotate and Predict menu in previous Geneious versions are now available as separate plugins. EMBOSS protein analysis includes antigenic to predict antigenic regions, sigcleave to predict signal cleavage sites, and garnier to predict secondary structures. The EMBOSS Nucleotide Analysis plugin includes tfscan to search for transcription factors, and tcode which provides a protein coding prediction graph.
When these plugins are installed, the protein coding prediction graph will be available under the Graphs tab, and the other options will show up under the Annotate and Predict menu. Further information on these applications is available at http://emboss.open-bio.org/
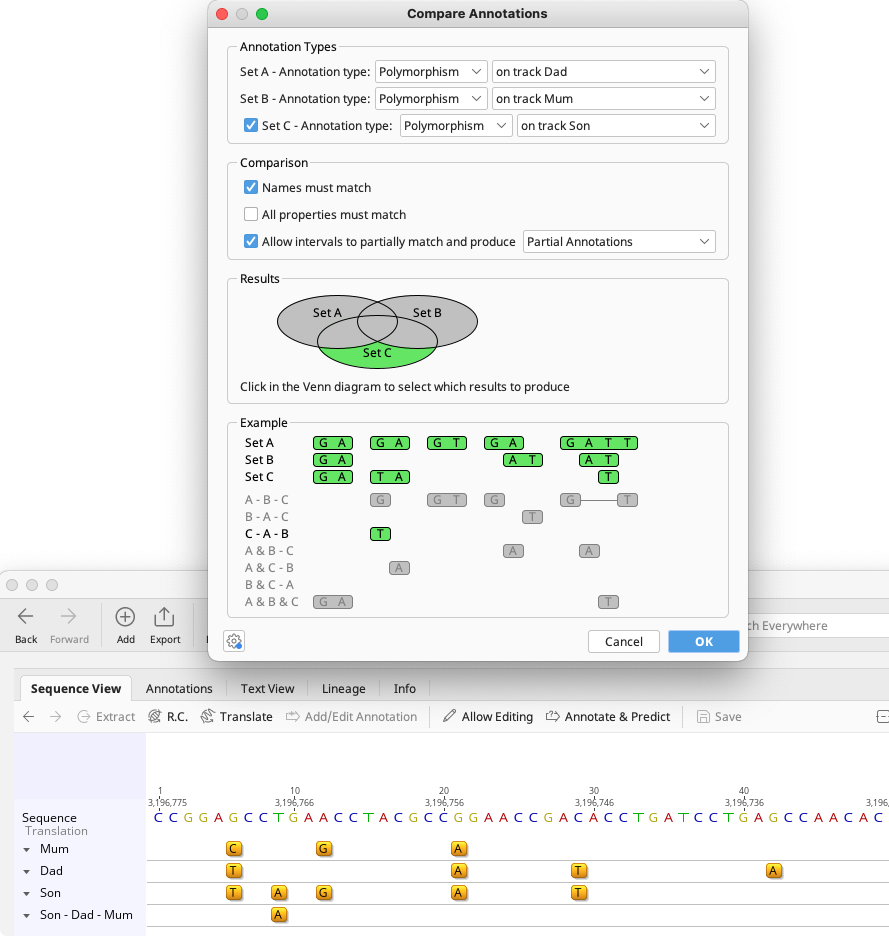
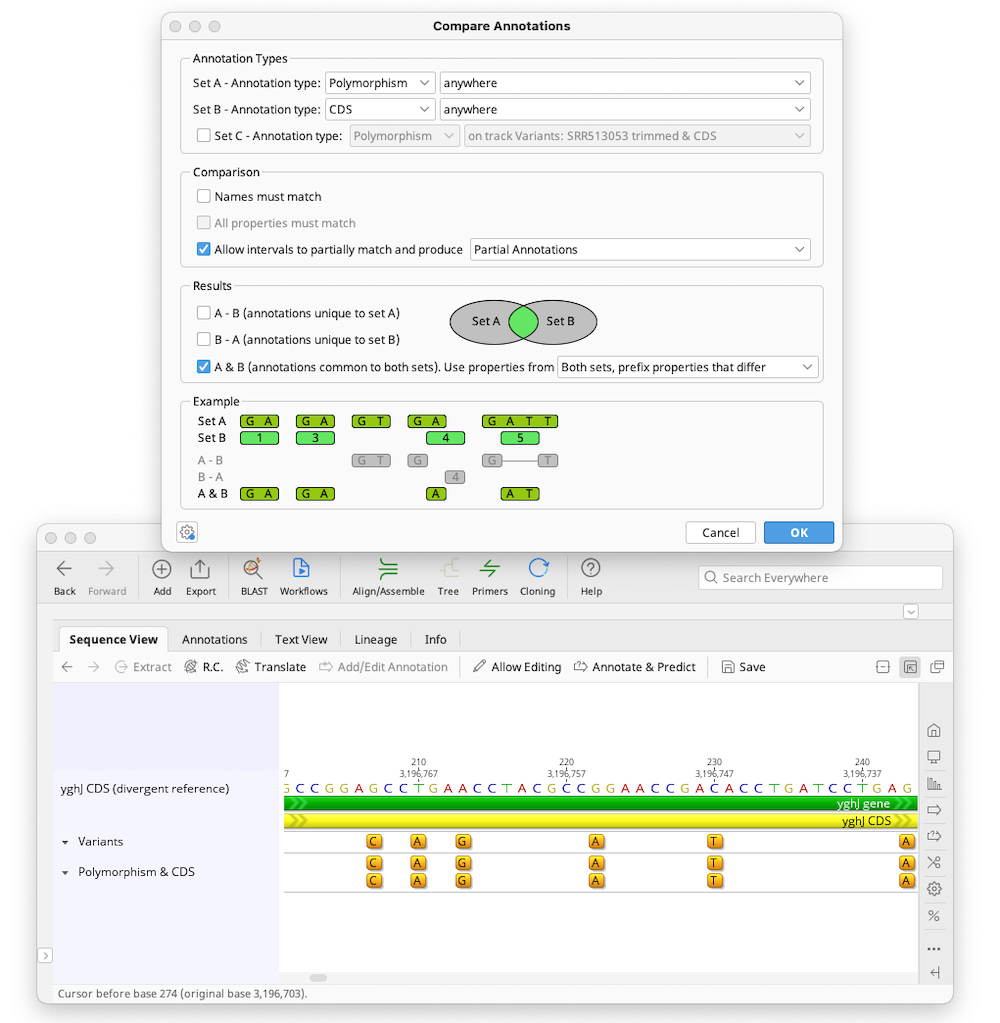
Compare Annotations
Geneious Prime can compare annotations across up to 3 annotation tracks or documents, highlighting annotations which are common or unique depending on which criteria you choose.
To use this function, select the sequence or sequences containing annotations you wish to compare, and go to Annotate and Predict → Compare Annotations. In the Annotation Types panel, select the annotations you wish to compare. The default setting is for pairwise comparison; if you wish to do three-way comparison select Set C. Choose the annotation type and location for each set, and the type of comparison.
Comparison options are:
-
Names must match: The names of the annotations must be the same. When allowing partial matches for polymorphism annotations, just the name of the matching region of the annotation must match.
-
All properties must match: All properties in addition to the name must be the same to be considered a match
-
Allow intervals to partially match: When one annotation partially overlaps another, you can choose to return either Partial Annotations or Full Annotations. Partial Annotations will return annotations spanning or excluding only the matching region. Full Annotations will return annotations spanning the entire length of the applicable source annotation. Uncheck this option if you only want to return annotations which match across the full length of both sets.
Results
A new annotation track will be created showing the results of the comparison. The results panel in the compare annotations set up allows you to choose which comparison to return:
-
A-B-C returns annotations found only in set A
-
B-A-C returns annotations found only in set B
-
C-A-B returns annotations found only in set C
-
A&B&C returns annotations common to all sets. For a pairwise comparison, when the annotation is common to both sets the result will have the name and type of annotation from set A but share properties from both sets if selected. For a three-way comparison properties from set A will be used.
More than one of these options can be selected at once, either by checking the box next to the option, or clicking the appropriate section of the venn diagram to the right. Each result comparison is displayed on a separate track on the original sequence, and a preview of these tracks is given in the Example panel.
Example 1 - finding polymorphisms within a gene or feature (e.g. CDS, restriction site)
To return a track containing polymorphism annotations that are within another gene or feature, such as a coding sequence, select the Polymorphism annotation type for Set A, and choose which track it is on (or select anywhere if there are no tracks, or you want to include polymorphisms on any track). Then choose the other annotation type (e.g. CDS) for Set B. Uncheck Names must match as in general polymorphism annotation names do not match those of other annotation types, and check Allow intervals to partially match and produce partial annotations. Under Results, choose to return A & B (annotations common to both sets). This will return a new track containing annotations of the type in Set A (polymorphisms) that are contained within Set B (CDS) annotations.
Example 2 - finding polymorphisms in a child which are not present in either parent
To return polymorphisms which are unique to the offspring, set Annotation Type as Polymorphism for Sets A, B and C, and set A and B as the parent tracks, and C as the child track, as in the figure below. Check Names must match and Allow intervals to partially match and produce partial annotations. Choose C-A-B in the results display. This will return a new track containing annotations found in Set C (child), but not in Sets A and B (parents).