Importing and Exporting Data
Geneious Prime is able to import raw data from different applications and export the results in a range of formats. All import and export options can be accessed via the Add and Export buttons in the Toolbar, or via the File menu.
Importing data from the hard drive to your Local folders
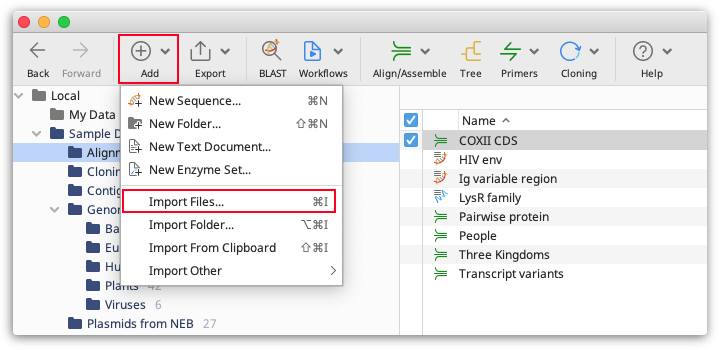
To import files from local disks or network drives, click the Add button in the Toolbar and select Import Files, or go to File → Import → Files.... This will open up a window where you can either select the file format or let Geneious autodetect the format. The different file formats that Geneious can import are described in detail in the next section.
Files can also be dragged and dropped from your hard drive directly into Geneious and the file type will automatically be determined.
Files imported from disk are imported directly into the currently selected local folder within Geneious. If no folder is selected, you will be prompted to choose a folder during the import.
Bulk import of multiple files
To import an entire folder and all its subfolders and files into Geneious Prime in one step, click the Add button and choose Import Folder, or go to File → Import → Folder.... If the folder has subfolders, the folder structure will be retained when it is imported into Geneious. In version 10.1 and above zip files containing multiple files and subfolders can also be imported.
In version 11.1 onwards, Geneious supports bulk import of a mixture of SAM, BAM, GFF, BED, VCF and Fasta formatted files, allowing sequence, annotation and assembly information to be imported in a single step. Any combination of these files can be selected and then dragged and dropped into Geneious. The reference sequence will be loaded first, followed by the annotation and assembly files. Sequence IDs in the files must match for the import to proceed correctly. If no reference sequence is present in the imported documents, you will be prompted to select a reference from existing documents in your database, or load onto a blank sequence.
Data input formats
Geneious Prime version can import the following file formats:
| Format | Extensions | Common Sources |
|---|---|---|
| BED | *.bed | UCSC |
| Common Assembly Format | *.caf | Sequencher |
| Clone Manager molecule | *.cm5 | Clone Manager |
| Clustal | *.aln | ClustalX |
| CSFASTA | *.csfasta | ABI SOLiD |
| Comma/Tab Separated Values | *.csv, *.tsv | Microsoft Excel |
| DNAStar | *.seq, *.pro | DNAStar |
| DNAStar SeqBuilder Doc | *.sbd | DNAStar |
| DNA Strider | *.str | DNA Strider (Mac program), ApE |
| Embl/UniProt | *.embl, *.swp | Embl, UniProt |
| EMBOSS codon usage table | *.cusp, *.cut | EMBOSS cusp tool |
| Endnote (8.0 or 9.0) XML | *.xml | Endnote, Journal article websites |
| Excel spreadsheet | *.xlsx, *.xls | Microsoft Excel |
| FASTA | *.fasta, *.fas, *fasta.gz etc. | ClustalX, BLAST, FASTA |
| FASTQ | *.fastq, *.fq, *fastq.gz etc. | Illumina and other NGS sequencers |
| GCG | *.seq | GCG |
| GCG codon usage table | *.cod | GCG CodonFrequency tool, https://www.kazusa.or.jp/codon/ |
| GenBank | *.gb, *.xml | GenBank |
| Geneious | *.xml, *.geneious | Geneious |
| Geneious Education | *.tutorial.zip, *.geneiousTutorial | Geneious |
| GFF, GFF3, GTF | *.gff, *.gff3, *.gtf | NCBI, Ensembl and other genome browsers |
| MEGA | *.meg | MEGA |
| Molecular structure | *.pdb, *.mol, *.xyz, *.cml, *.gpr, *.hin, *.nwo | 3D structure databases and programs |
| Newick | *.tre, *.tree, etc. | PHYLIP, PAUP*, Figtree, other tree building programs |
| Nexus | *.nxs, *.nex | PAUP*, Mesquite, MrBayes & MacClade |
| PDB | *.pdb | SP3, SP2, SPARKS, Protein Data Bank |
| Adobe Writer, LaTeX, Office | ||
| Phrap ACE | *.ace | Phrap/Consed |
| PileUp | *.msf | pileup (gcg) |
| PIR/NBRF | *.pir | NBRF PIR |
| Qual | *.qual | Associated with a FASTA file |
| Raw sequence text | *.seq | Any file that contains only a sequence |
| Rich Sequence Format | *.rsf | GCGs NetFetch |
| SAM/BAM | *.sam, *.bam | SAMtools |
| Sequence Chromatograms | *.ab1, *.scf | ABI Sanger sequencing machines |
| SnapGene sequence | *.dna, *prot | SnapGene |
| Text/html | .txt, .rtf, .html | Simple text editors |
| VCF | *.VCF | 1000 Genomes Project, SNP callers |
| Vector NTI sequence | *.gb, *.gp | Vector NTI |
| Vector NTI/AlignX alignment | *.apr | Vector NTI, AlignX |
| Vector NTI Archive | *.ma4, *.pa4, *.oa4, *.ea4, *.ca6 | Vector NTI |
| Vector NTI/ContigExpress | *.cep | Vector NTI |
| Vector NTI database | VNTI Database | Vector NTI |
BED annotations
The BED format contains sequence annotation information. You can use a BED file to annotate existing sequences in your local database, import entirely new sequences, or import the annotations onto blank sequences.
Clone Manager
Geneious can import annotated sequences files in the standard Clone Manager molecule format .cm5. This will import name, description, topology, sequence and annotations. Currently it does not import other fields, restriction cut sites or primer binding sites.
Other Clone Manager formats such as .cx5 and .pd4 are not currently supported for import.
CLUSTAL alignment
The Clustal format is used by the well known multiple sequence alignment programs ClustalW, ClustalX and Clustal Omega .
Clustal format files are used to store multiple sequence alignments and contain the word clustal at the beginning. An example Clustal file:
CLUSTAL W (1.74) multiple sequence alignment

HQ625570 MRVMGMWRNYPQWWIWGILGLWM--ICSVVGKLWVTVYYGVPVWTDAKATLFCASDAKAY
HQ625589 MRVKGRSRNYPQWWVWGILGFWMFMICNGVGNRWVTVYYGVPVWKEAKATLFCASDAKAY
HQ625572 MRVKGILKNYQQWWIWVILGFWMLMICNVVGNQWVTVYYGVPVWREAKATLFCASDAKAY
HQ625588 MRVMGKWRNCQQWWIWGILGFWIILICN-AEQLWVTVYYGVPVWKEAKTTLFCASDAKAY
HQ625568 MRVRGTQRNWPQWWIWTSLGFWIILMCR--GNLWVTVYYGVPVWTDAKTTLFCASDAKAY
HQ625581 MRVMGIPRNWPQWWIWGILGFWIMLMCRVEENSWVTVYYGVPVWKEATTTLFCASDAKAY
CSFASTA format
ABI .csfasta files represent the color calls generated by the SOLiD sequencing system.
CSV/TSV (Comma/Tab Separated Values) and Excel spreadsheet files
Sequences, primers and metadata information stored in spreadsheets can be uploaded to Geneious from either .csv, .tsv, .xlsx or .xls files. For files containing sequences, including nucleotides, proteins, primers or probes, Geneious will create a new document containing the sequence and any additional fields chosen for import. For more information on importing primers from a spreadsheet, see the PCR Primers section. Files containing only metadata can be imported onto existing sequences in Geneious, see Importing Metadata.
DNAStar sequences
DNAStar .seq, .pro and .sbd files are used in Lasergene, a sequence analysis tool produced by DNAStar.
DNA Strider sequences
Sequence files generated by the Mac program DNA Strider, containing one Nucleotide or Protein sequence.
EMBL/Swiss-Prot sequences
Nucleotide sequences from the EMBL Nucleotide Sequence Database, and protein sequences from UniProt (the Universal Protein Resource)
EndNote 8.0/9.0 XML
EndNote is a popular reference and bibliography manager. EndNote lets you search for journal articles online, import citations, perform searches on your own notes, and insert references into documents. It also generates a bibliography in different styles. Geneious can interoperate with EndNote using Endnote's XML (Extensible Markup Language) file format to export and import its files.
FASTA sequences
The FASTA file format is commonly used by many programs and tools, including BLAST, T-Coffee and ClustalX. Each sequence in a FASTA file has a header line beginning with a "$>$" followed by a number of lines containing the raw protein or DNA sequence data. The sequence data may span multiple lines and these sequence may contain gap characters. An empty line may or may not separate consecutive sequences. Here is an example of three sequences in FASTA format (DNA, Protein, Aligned DNA):
>Orangutan
ATGGCTTGTGGTCTGGTCGCCAGCAACCTGAATCTCAAACCTGGAGAGTGCCTTCGAGTG

>gi|532319|pir|TVFV2E|TVFV2E envelope protein
ELRLRYCAPAGFALLKCNDADYDGFKTNCSNVSVVHCTNLMNTTVTTGLLLNGSYSENRT
QIWQK

>Chicken
CTACCCCCCTAAAACACTTTGAAGCCTGATCCTCACTA------------------CTGT
CATCTTAA
FASTQ sequences
FASTQ format stores sequences and Phred qualities in a single file. These should typically be used to import NGS sequence data e.g from Illumina, Ion Torrent, and PacBio sequencers. From R11 onwards, you can set read technology and pair reads as part of the Fastq import process. Note that the native HDF5 file format from PacBio and Oxford Nanopore is not supported and must be converted to fastq for import into Geneious.
GenBank sequences
Records retrieved from the NCBI website (http://www.ncbi.nlm.nih.gov) can be saved in a number of formats. Records saved in GenBank or INSDSeq XML formats can be imported into Geneious.
Geneious format
The Geneious format can be used to store all your local documents, meta-data types and program preferences. A file in Geneious format will usually have a .geneious extension or a .xml extension. This format is useful for sharing documents with other Geneious users and backing up your Geneious data.
Geneious tutorial
This is an archive containing a whole bundle of files which together comprise a Geneious education document. This format can be used to create assignments for your students, bioinformatics tutorials, and much more. See Geneious Education for information on how to create such files.
GFF annotations
The GFF format contains sequence annotation information (and optional sequences). You can use a GFF file to annotate existing sequences in your local database, import entirely new sequences, or import the annotations onto blank sequences. Geneious also supports GFF3 and GTF formats.
MEGA alignment
The MEGA format is used by the MEGA (Molecular Evolutionary Genetics Analysis) software program.
Molecular structure
Geneious imports a range of molecular structure formats. These formats support showing the locations of the atoms in a molecule in 3D:
-
PDB format files from the Research Collaboratory for Structural Bioinformatics (RCSB) Protein Database
-
.mol format files produced by MDL Information Systems Inc
-
.xyz format files produced by XMol
-
.cml format files in Chemical Markup Language
-
.gpr format ghemical files
-
.hin format files produced by HyperChem
-
.nwo format files produced by NWChem
Newick tree
The Newick format is commonly used to represent phylogenetic trees (such as those inferred from multiple sequence alignments). Newick trees use pairs of parentheses to group related taxa, separated by a comma (,). Some trees include numbers (branch lengths) that indicate the distance on the evolutionary tree from that taxa to its most recent ancestor. If these branch lengths are present they are prefixed with a colon (:). The Newick format is produced by phylogeny programs such as PHYLIP, PAUP*, Tree-Puzzle and PHYML. Geneious can import and export trees (including bootstrap values and branch lengths) in Newick format.
Nexus tree
The Nexus format was designed to standardize the exchange of phylogenetic data, including sequences, trees, distance matrices and so on. The format is composed of a number of blocks such as TAXA, TREES and CHARACTERS. Each block contains pre-defined fields. Geneious imports and exports files in Nexus format, and can process the information stored in them for analysis.
If you want to export a tree in a format that preserves bootstrap values make sure you export with metacomments enabled, otherwise the bootstraps will be lost.
PDB structure
Protein Databank files contain a list of XYZ co-ordinates that describe the position of atoms in a protein. These are then used to generate a 3D model which is usually viewed with Rasmol or SPDB viewer. Geneious can read PDB format files and display an interactive 3D view of the protein structure, including support for displaying the protein's secondary structure when the appropriate information is available.
PDF stands for Portable Document Format and is developed and distributed by Adobe Systems, commonly used for journal articles and reports. The advantage of PDF files is that they look the same regardless of the software used to create them. Most word processors are able to export a document into PDF format. Alternatively, Adobe Writer can be used. You can use Geneious to read, store and open PDF files.
ACE/PHRAP assembly
Ace is the format used by the Phrap/Consed package, created by the University of Washington Genome Center. This package is used mainly to assemble sequences.
GCG PileUp alignment
The PileUp format is used by the pileup program, a part of the Genetics Computer Group (GCG) Wisconsin Package.
PIR/NBRF sequences
Format used by the Protein Information Resource, a database established by the National Biomedical Research Foundation
Qual quality/Phred scores
Quality file which must be in the same folder as the sequence file (FASTA format) for the quality scores to be used.
RSF rich sequences
RSF (Rich Sequence Format) files contain one or more sequences that may or may not be related. In addition to the sequence data, each sequence can be annotated with descriptive sequence information.
SAM/BAM alignment
SAM and BAM format are produced and used by SAMtools. SAM/BAM files contain the results of an assembly in the form of reads and their mappings to reference sequences.
Sequence Chromatograms
Sequence chromatogram documents contain the results of a sequencing run (the trace) and a guess at the sequence data (base calling).
Informally, the trace is a graph showing the concentration of each nucleotide against sequence positions. Base calling software detects peaks in the four traces and assigns the most probable base at more or less even intervals.
SnapGene
Geneious can import annotated DNA sequence files in .dna format and protein sequences in .prot format from SnapGene. Note that for nucleotide sequences longer than 65,536 bases, restriction sites are not imported automatically, but you will be asked if you wish to import them as an enzyme set. You can then re-annotate the sites onto the sequence using "Find restriction sites".
Text/HTML
Plain text files and simple HTML can be imported and displayed. HTML is a widely used markup language that can apply format and structure to text, and will be interpreted by the sequence viewer. In Geneious R10 and above, text files can also be created and edited in Geneious, see Adding note documents to folders.
Unformatted sequence
A file containing only a sequence.
VCF variant calls
The VCF format contains sequence annotation information. You can use a VCF file to annotate existing sequences in your local database, import entirely new sequences, or import the annotations onto blank sequences.
Vector NTI
In addition to the import of whole VNTI databases (see below), Geneious supports the import of several Vector NTI file formats:
-
.gb and *.gp formats These formats are used in Vector NTI for saving single nucleotide and protein sequence documents. They are very similar to the GenBank formats with the same extensions, although they contain some extra information.
-
.apr format This format is used for storing alignments and trees made with AlignX, Vector NTI's alignment module.
-
.ma4, *.pa4, *.oa4, *.ea4 and *.ca6 formats These are the archive formats which Vector NTI uses to export whole databases.
-
.cep format This format is produced by the ContigExpress module and Geneious will import sequences (including the positions of the base calls), traces, qualities, trimmed regions, annotations and editing history for individual reads and contigs.
Importing Vector NTI Databases
Geneious can import whole databases from Vector NTI Advance or Express. Metadata, structure and lineage information from Vector NTI will be preserved so your files will be organized in Geneious the same way as they were in Vector NTI.
To import your VNTI database, go to File → Import → Vector NTI Database. Browse to the location of your VNTI Database folder and click OK to load it into Geneious. For more information on VNTI database import, please see this post on our Knowledge Base.
Importing metadata from a spreadsheet onto existing documents
In Geneious Prime 2020.1 onwards you can add metadata to your Geneious documents by importing it from a .csv or .tsv file. Importing metadata from an Excel spreadsheet file in .xlsx format is supported in Geneious Prime 2022.1 onwards. Your file of metadata needs to have one field in common with the documents you want to import the data onto, such as the name or sequence ID field, so that Geneious can match the data to the correct document.
Prior to importing the file, the metadata fields you plan to add from your spreadsheet need to be set up in Geneious. To check which fields are present and to add new fields, select any document and go to the Info tab. Click Edit Metadata types to see the list of fields currently available in Geneious. For a step by step guide to adding new metadata fields, see How do I add custom metadata fields to my sequence?
Once the appropriate metadata fields are set up, you can proceed with importing your data.
To do this, first select the folder containing the documents you want to add the metadata to. Then go to File → Import → Files..., select CSV/TSV or as the format, and select your file of metadata. Or alternatively, drag and drop the file of metadata directly into Geneious.
In the Import Documents window, click on Metadata as the type of document to import.
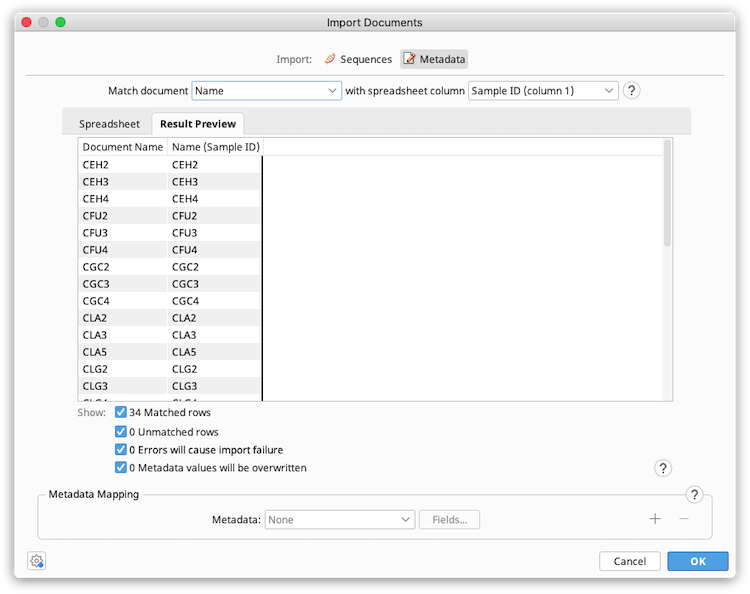
Matching Geneious document fields to your spreadsheet
Under Match document, select the Geneious document field that should be used to match the spreadsheet data in the first dropdown menu. In the second dropdown menu, select the spreadsheet column that contains the matching data.
For example, if you have a "Sample ID" column in your spreadsheet that corresponds to the appropriate document names in Geneious, you should select to Match document [Name] with spreadsheet column [Sample ID]
Notes:
-
To match successfully, values must (a) be identical in the document and spreadsheet, including matched case (leading and trailing white space on spreadsheet data is trimmed) and (b) have a single match between the document and spreadsheet.
-
Some Geneious document fields cannot be used for matching, such as dates, percentages and true-or-false values. These will be excluded from the dropdown menu. Additionally, only those fields present on documents in the current folder will be available to select here.
-
The spreadsheet column used for matching can be selected based on column number (counting left to right) or by an optional column header row.
Preview window
The Spreadsheet tab in the preview window shows the data in the spreadsheet file. The Result Preview tab shows the matching fields in the Geneious document and spreadsheet, and shows the metadata that will be added (Metadata mapping needs to be set up before this is populated).
Colors are used to highlight information about the import. Hover your mouse over a coloured value for more information about the notification or error.
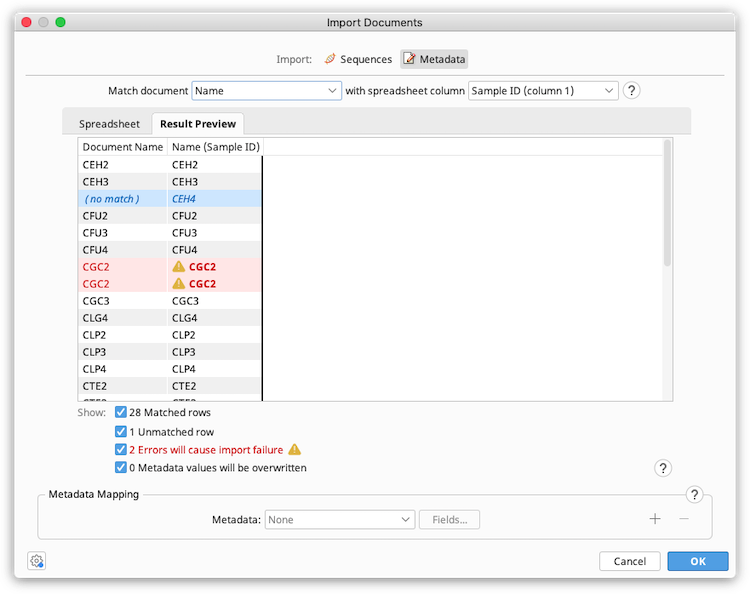
Blue: The spreadsheet row does not match any documents in the selected folder. Check that the correct Geneious field and spreadsheet column has been selected for matching, and ensure that corresponding match values are identical in the Geneious field and spreadsheet cell. Note that match values are case sensitive.
Yellow with Asterisk: The metadata field in Geneious already contains data, which will be overwritten on import. The preview shows the new value that will be imported from the spreadsheet. To see the old value, hover your mouse over the cell. Once metadata has been imported it cannot be undone and any overwritten data will be lost.
Red with Warning Icon: There is an error which will prevent the import from proceeding. Errors will occur when:
-
Multiple Geneious documents in the selected folder match one row in the spreadsheet based on the columns selected for matching. Each row in the spreadsheet should match one and only one document in Geneious.
-
Multiple spreadsheet rows contain an identical value in the column being used to match by.
-
Some fields in Geneious may have value constraints, such as requiring a number between 1 and 10, a true or false value, or a date to name a few. If the spreadsheet data does not adhere to these constraints an error will occur. Metadata constraints can be viewed or edited via Edit Metadata Types in the Info tab of any document.
All errors must be resolved before commencing the import operation.
The checkboxes below the preview table allow you to filter which rows are displayed. These filters do not affect the import operation. Geneious will apply metadata changes on all matched rows once there are no errors.
Metadata mapping
In this section, specify which columns from the spreadsheet should be imported, by assigning spreadsheet columns to metadata fields on the Geneious document.
In the Metadata dropdown menu, choose the Geneious metadata field you want to add spreadsheet data to. All metadata types currently available in your database should show up here, including those you added yourself. If you wish to add a new type, you can do this on any document under Info → Edit Metadata types. The Standard fields type includes generic fields such as Name, Description, Accession, Organism, Taxonomy and Notes. Click the + button to add fields from more than one metadata type. Then click the Fields button to specify which columns in the spreadsheet should be mapped to which field in Geneious.
For example, in the screenshot below the spreadsheet columns for Sampling Location, Sampling date, and Freezer location have been added under the Sampling Information metadata type, and the Organism column has been added under the Standard Fields type.
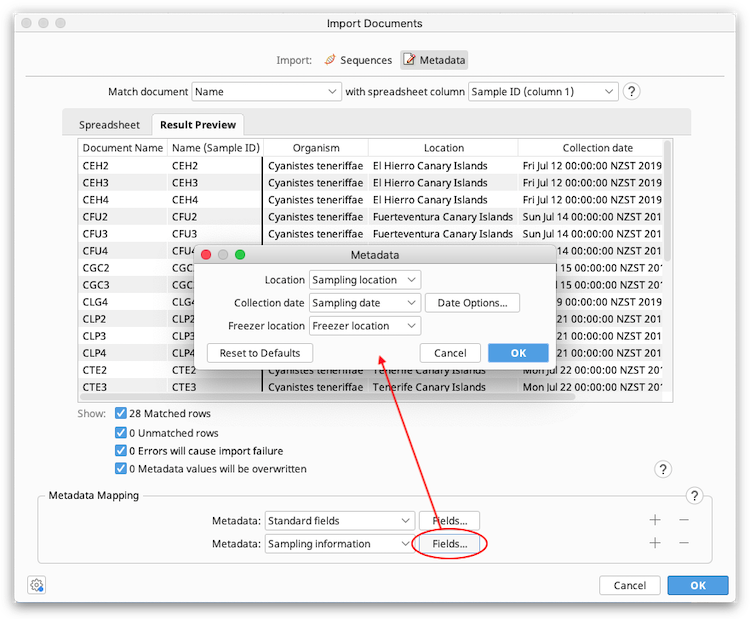
The Result Preview table will be updated automatically when spreadsheet columns are mapped to metadata fields.
Once you are happy with how the import looks, click OK to load the metadata. You should now see the metadata in the document table (you may need to scroll to the right hand side of the table to see the new columns).
Importing files from public databases
Geneious Prime is able to communicate with a number of public databases hosted by the National Centre for Biotechnology Information (NCBI), as well as the UniProt database. You can access these databases through the web at http://www.ncbi.nlm.nih.gov and http://www.uniprot.org/ respectively. These are all well known and widely used storehouses of molecular biology data - more information on each is given in the sections below.
You can search these databases through Geneious Prime by selecting the NCBI or Uniprot database folders at the bottom of the Sources tree, and entering your search term. Press Enter or the Search button to initiate the search. If you get a connection error, you may need to configure your network connections manually (see Connecting to the internet from Geneious Prime).
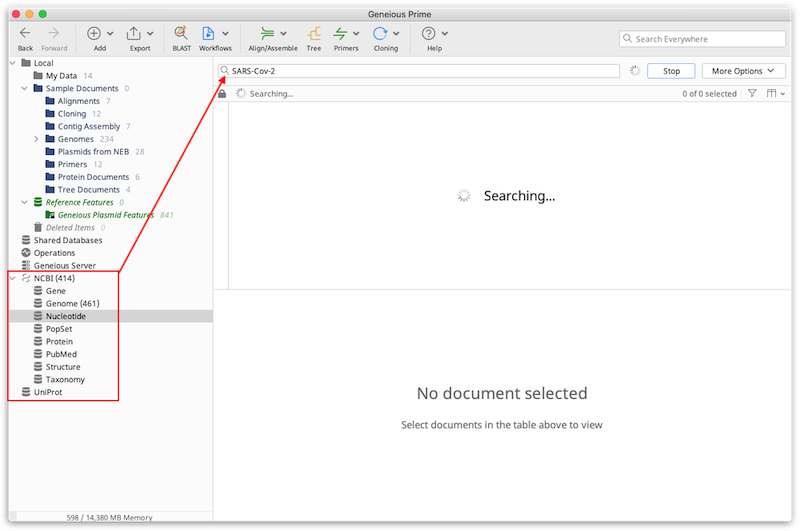
For advanced search options, click the More Options button. This allows you to search for specific terms in specific fields of the Genbank or Uniprot documents, such as specific organisms or author names. By clicking the '+' icon you can search in multiple fields at once, and choose to match either "Any" of the fields (if only one of the fields needs to match), or "All" of the fields (if all of the fields must match).
If you have a list of known accession numbers that you wish to download, you can enter these in the Search box separated by a comma. For consecutive accessions, enter the first and last numbers separated by a colon, and append [accn] to this. E.g. Entering "AB000001:AB000009[accn]" will download all accessions between AB000001 and AB000009.
The results will appear in the Document table as they are found. The Search button changes to a Stop button while the search is running, and this can be clicked at any time to terminate the search. As the results are downloaded, you will see a small padlock icon in the status bar above the Document Table, which indicates that these items cannot be modified in any way. You must drag the file into a folder in your local database if you wish to retain the file and/or modify it. If you don't drag the documents from a database search into your local folders the results will be lost when Geneious is closed. For more information on how to move files between folders in your database, see Moving files around.
Note: When searching the Genome, Gene or PopSet databases, the documents returned are only summaries. To download the whole genome, select the summary(s) of the genome(s) you would like to download and the click the Download button inside the document view or just above it. Alternatively you can choose Download Documents in the File menu and in the popup menu when document summary is right-clicked (Ctrl+click on Mac OS X). The size of these files is not displayed in the Documents Table. Be aware that whole genomes can be very large and can take a long time to download. You can cancel the download of document summaries by selecting Cancel Downloads from any of the locations mentioned above.
UniProt
This database is a comprehensive catalogue of protein data. It includes protein sequences and functions from Swiss-Prot, TrEMBL, and PIR.
NCBI (Entrez) databases
NCBI was established in 1988 as a public resource for information on molecular biology. Geneious allows you to directly download information from eight important NCBI databases and perform NCBI BLAST searches.
| Database | Coverage |
|---|---|
| Gene | Genes |
| Genome | Whole genome sequences |
| Nucleotide | DNA sequences |
| Popset | sets of DNA sequences from population studies |
| Pubmed | Biomedical literature citations and abstracts |
| Structure | 3D structural data |
| Taxonomy | Names and taxonomy of organisms |
Entrez Gene. Entrez Gene is NCBI's database for gene-specific information. It does not include all known or predicted genes; instead Entrez Gene focuses on the genomes that have been completely sequenced, that have an active research community to contribute gene-specific information, or that are scheduled for intense sequence analysis.
The Entrez Genome database. The Entrez genome database has been retired. For backwards compatibility Geneious simulates searching of the old genome database by searching the Entrez Nucleotide database and filtering the results to include only genome results.
The Entrez Nucleotide database. This database in GenBank contains 3 separate components that are also searchable databases: "EST", "GSS" and "CoreNucleotide". The core nucleotide database brings together information from three other databases: GenBank, EMBI, and DDBJ. These are part of the International collaboration of Sequence Databases. This database also contains RefSeq records, which are NCBI-curated, non-redundant sets of sequences.
The Entrez Popset database. This database contains sets of aligned sequences that are the result of population, phylogenetic, or mutation studies. These alignments usually describe evolution and population variation. The PopSet database contains both nucleotide and protein sequence data, and can be used to analyze the evolutionary relatedness of a population.
The Entrez Protein database. This database contains sequence data from the translated coding regions from DNA sequences in GenBank, EMBL, and DDBJ as well as protein sequences submitted to the Protein Information Resource (PIR), SWISS-PROT, Protein Research Foundation (PRF), and Protein Data Bank (PDB) (sequences from solved structures).
The PubMed database. This is a service of the U.S. National Library of Medicine that includes over 16 million citations from MEDLINE and other life science journals. This archive of biomedical articles dates back to the 1950s. PubMed includes links to full text articles and other related resources, with the exception of those journals that need licenses to access their most recent issues.
The Entrez Structure database. This is NCBI's structure database and is also called MMDB (Molecular Modeling Database). It contains three-dimensional, biomolecular, experimentally or programmatically determined structures obtained from the Protein Data Bank.
Entrez Taxonomy. This database contains the names of all organisms that are represented in the NCBI genetic database. Each organism must be represented by at least one nucleotide or protein sequence.
Literature searching
Geneious Prime allows you to search for relevant literature in NCBI's PubMed database. The results of this search are summarized in columns in the Document Table and include the PubMed ID (PMID), first and last authors, URL (if available) and the name of the Journal.
When a document is selected, the abstract of the article is displayed in the Document Viewer (Text View tab) along with a link to the full text of the document if available, and a link to Google Scholar, both below the author(s) name(s).

As well as the abstract and links, Geneious also shows the summary of the journal article in BibTex format in a separate tab of the Document Viewer (BibTex tab). BibTex is the standard LaTeX bibliography reference and publication management data format and the information in the BibTex screen can be imported directly into a LaTeX document when creating a bibliography. Alternatively, a set of articles in Geneious can be directly exported to an EndNote compatible format. This is usually done when creating a bibliography for Microsoft Word documents.
Note: If the full text of the article is available for download in PDF format, it can also be stored in Geneious by saving it to your hard drive and then importing it. This will allow full-text searches to be performed on the article. To view a .pdf document either double click on the document in the Documents Table or click on the View Document button. This opens the document in an external PDF viewer such as Adobe Acrobat Reader or Preview (Mac OS X). On Linux, you can set an environmental variable named "PDFViewer" to the name of your external PDF viewer. The default viewers on Linux are kpdf and evince.
Agents
Databases searches can be automated using an Agent, allowing you to continuously receive the latest information on genomes, sequences, and protein structures. Each agent is a user-defined, automated search. You can instruct an agent to search any Geneious accessible database at regular intervals (e.g. weekly). This simple but powerful feature ensures that you never miss that critical article or DNA sequence. To manage agents go to View → Agents. An agent has to be set up before it can be used.
Creating agents
To set up an Agent go to View → Agents and click the Create button. You now need to specify a set of search criteria including the database to search, key words to search on, search frequency and the folder you wish the agent to deliver its results to.
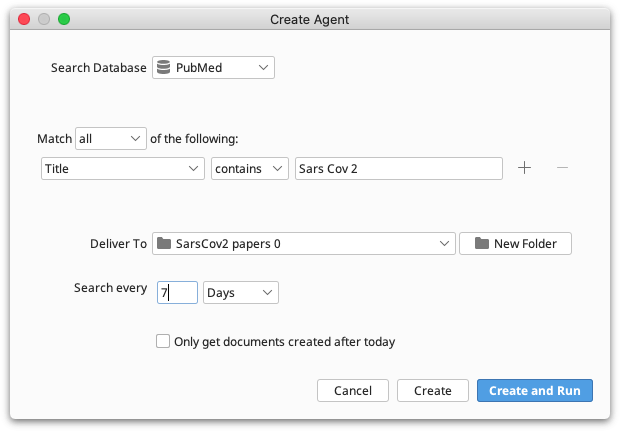
The search frequency may be specified in minutes, hours, days or weeks. You can only use whole numbers.
Selecting Only get documents created after today will cause the agent to check what documents are currently available when the agent is created. Then when the agent searches it will only get documents that are new since it was created. This is useful if, for example, you have already read all publications by a particular author and you want the agent to only get new publications.
The easiest way to organize your search results is to create a new folder and name it appropriately. You can do that by navigating to the parent folder in the Deliver to box and clicking New Folder, or by creating a new folder beforehand as follows:
-
Right-click (Ctrl+click on Mac OS X) on the Sample Documents or Local folders. This brings up a popup menu with a New Folder... option.
-
Create a new folder and name it according to the contents of the search. (For example, type "CytB" if searching for cytochrome b complex.)
-
Once created, select the new folder. You can now select the Create or Create and Run. The agent will then be added to the list in the agent dialog and it will perform its first search if you clicked Create and Run. Otherwise it will wait until its next scheduled search.
All downloaded files are stored in the destination folder and are marked "unread" until viewed for the first time.
Checking agents
Once you have created one or more agents, Geneious allows you to quickly view their status in the agents window. Your agents' details are presented in several columns: Enable, Action, Status and Deliver To.
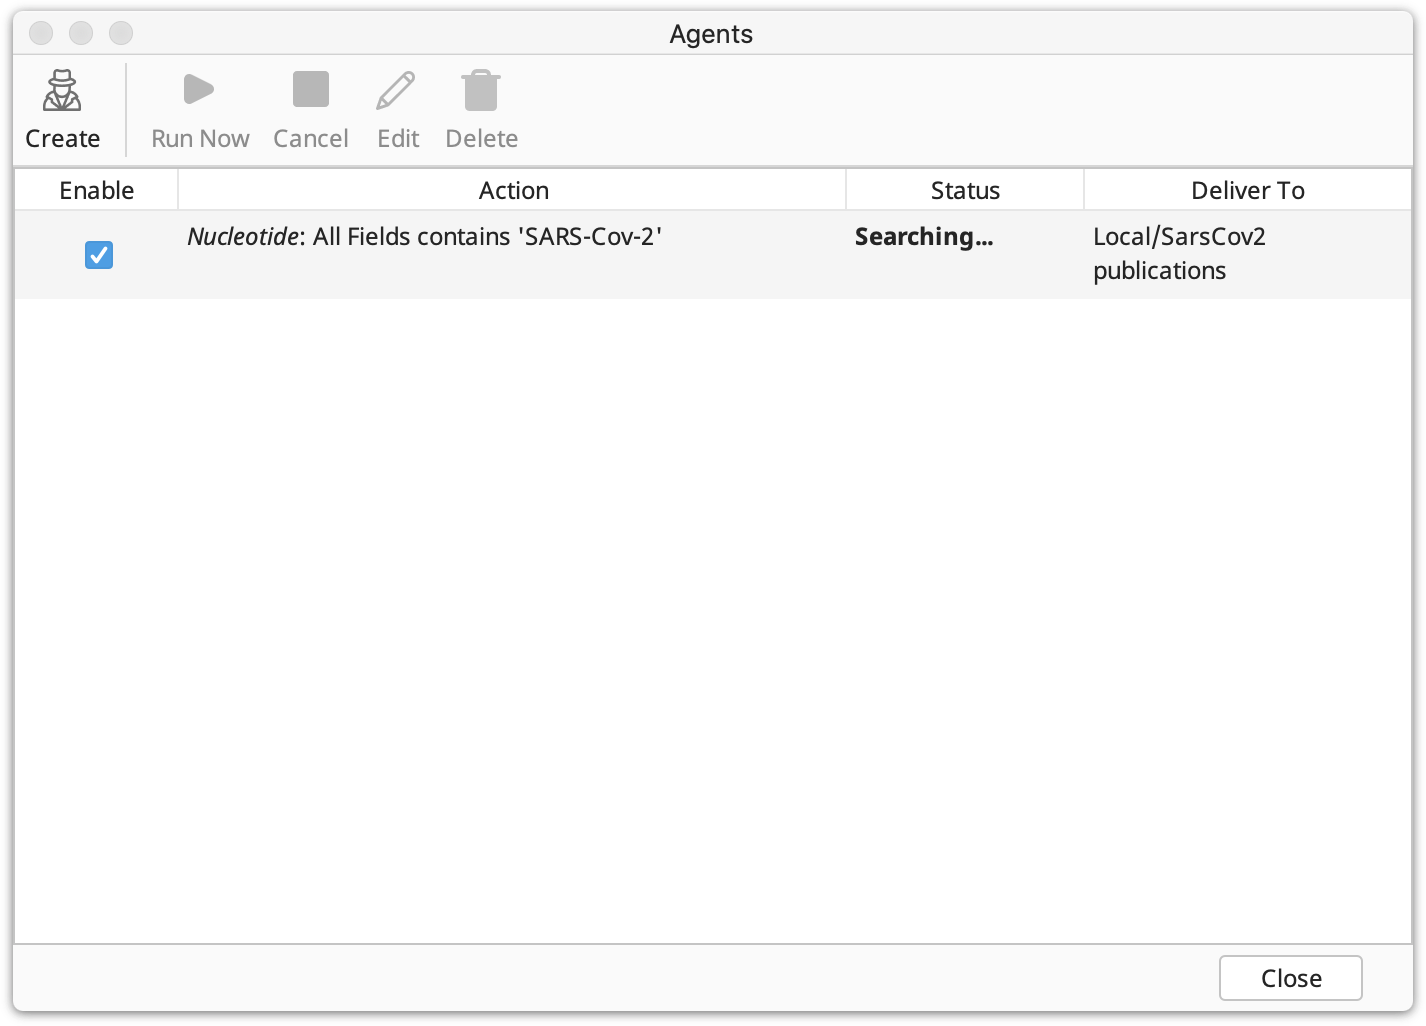
Enable: This column contains a check box showing whether the agent is enabled.
Action: This summarizes the user-defined search criteria. It contains:
-
Details of the database accessed. For example, Nucleotide and Genome under NCBI.
-
The search type the Agent performed, e.g. "keyword".
-
The words the user entered in the search field for the Agent to match against.
Status: This indicates what the Agent is currently doing. The status will be one of the following:
-
"Next search in x time" e.g. 18 hours. The agent is waiting until its next scheduled search and it will search when this time is reached.
-
"Searching." These are shown in bold. The agent is currently searching.
-
"Disabled." The agent will not perform any searches.
-
"Service unavailable." The agent cannot find the database it is scheduled to search. This will happen if the database plugin has been uninstalled.
-
"No search scheduled" The agent is enabled but doesn't have a search scheduled. To correct this click the "Run now" button in the agent dialog to have it search immediately and schedule a new search.
Deliver To: This names the destination folder for the downloaded documents. This is usually your Local Documents or one of your local folders.
Note. If you close Geneious while an agent is running, it will stop in mid-search. It will resume searching when Geneious is restarted.
Manipulating an agent
Once an agent has been set up, it can be disabled, enabled, edited, deleted and run. All these options are available from within the Agents dialog.
-
Enable or disable an agent by clicking the check box in the Enable column.
-
Run Now Cause the agent to search immediately
-
Cancel If the agent is currently searching, click this to stop the search.
-
Edit Click this to change an agent's database, search criteria, destination or search interval.
-
Delete Delete the agent permanently. Any documents retrieved by the agent will remain in your local documents.
Exporting files
To export files from Geneious Prime, select the file or files you want to export and click the Export button in the Toolbar and choose Export Documents, or go to File → Export → Documents.... Each data type has several export options, as detailed in the table below. Any set of documents may be exported in Geneious native format, and these files are back-compatible to Geneious version 6.0 (e.g. Files exported in .geneious format from Geneious R7 and above can be imported to Geneious R6 or later).
If you wish to export the parents and/or descendants of a particular file at the same time, choose File → Export → with Parents/Descendants.
| Data type | Export format options |
|---|---|
| DNA sequence | FASTA, Genbank (XML or flat), CSV/TSV, Geneious |
| Amino acid sequence | FASTA, Genbank (XML or flat), CSV/TSV, Geneious |
| Chromatogram sequence | ABI, Geneious |
| Sequence with quality | As above, also FastQ, Qual |
| Annotation | GFF, BED, Genbank, Geneious |
| Alignment or Assembly | Phylip, FASTA, NEXUS, MEGA, Phrap ACE, SAM/BAM, Geneious |
| Variant calls | VCF (single sample only) |
| Phylogenetic tree | Phylip, FASTA, NEXUS, Newick, MEGA, Geneious |
| PDF document | PDF, Geneious |
| Publication | EndNote, Geneious |
| Graphs | CSV, WIG |
| Document Properties | CSV, TSV, Geneious |
| Text files | .txt, CSV, TSV, Geneious |
| Assembly report | .html |
Documents imported in any chromatogram or molecular structure format can be re-exported in that format as long as no changes have been made to the document.
Both fasta and fastq files can be exported in compressed (fasta.gz and fastq.gz) format for smaller file size. If exporting paired reads in fasta format, an option to export the forward and reverse reads to separate files is available by choosing 'Fasta Paired Files' as the file type option.
Export to comma-separated (CSV) or tab-separated (TSV) files
The values displayed in the document table can be exported to a csv file which can be loaded by most spread sheet programs. When choosing to export in csv format Geneious will also present a list of the available columns in the table (including hidden ones) so you can choose which to export.
Sequences can also be exported in .csv files either from individual sequence documents, or sequence lists and alignments. If a sequence list or alignment is chosen for export, you will have the choice of exporting fields from each sequence in the file as a separate row in the output file, or exporting fields from the whole document (one row per document in output file).
Exporting multiple files
There are several options for export of multiple files from Geneious Prime:
-
Export to a single file: Multiple files can be exported to a single file by selecting all the files you wish to export and going to File → Export → Documents. This will combine all the files you selected into a single file for export.
-
Batch Export: The option File → Export → To Multiple Files exports each selected file as a different document. E.g. you can select several sequence documents and use this option to export each sequence as an individual fasta file. The options for batch export let you specify the format and folder to export to as well as the extension to use. Each file will be named according to the Name column in Geneious.
-
Export Folder: To export an entire folder to a single file, click on the folder in the Sources panel and go to File → Export → Folder. Note that folders can only be exported in .geneious format.
Drag to desktop Genbank export
Sequence files smaller than 1 MB can be exported in Genbank format simply by dragging them out of the Geneious window to the desktop or to your operation system's file manager. The default options for Genbank export are used, except that annotations on the document are exported as written, and not converted to strict Genbank format. If multiple documents are dragged out at once, each is exported to a separate file. If multiple sequences are combined into a list prior to export, they will be exported to a single Genbank document. This option is not available for alignment documents.
Printing and Saving Images
Geneious Prime allows you to print (or save as an image) the current display for any document viewer. This includes the sequence viewer, tree view, dotplot, and text view.
Printing
Choose Print from the file menu. The view is printed without the options panel. It is recommended to turn on Wrap sequence before printing. Wrapping prints the sequence as seen in the sequence viewer and the font size is chosen to fill the horizontal width of the page. The following options are available:
Portrait or landscape. Controls the orientation of the page.
Zoom. Can be used to decrease or increase the size of everything in the view, while still printing within the same region of the page. For many types of document views, decreasing the zoom will decrease the number of pages required to print the image.
Size. Controls the size the printed region on the paper. Effectively, increasing the size reduces the margins on the page.
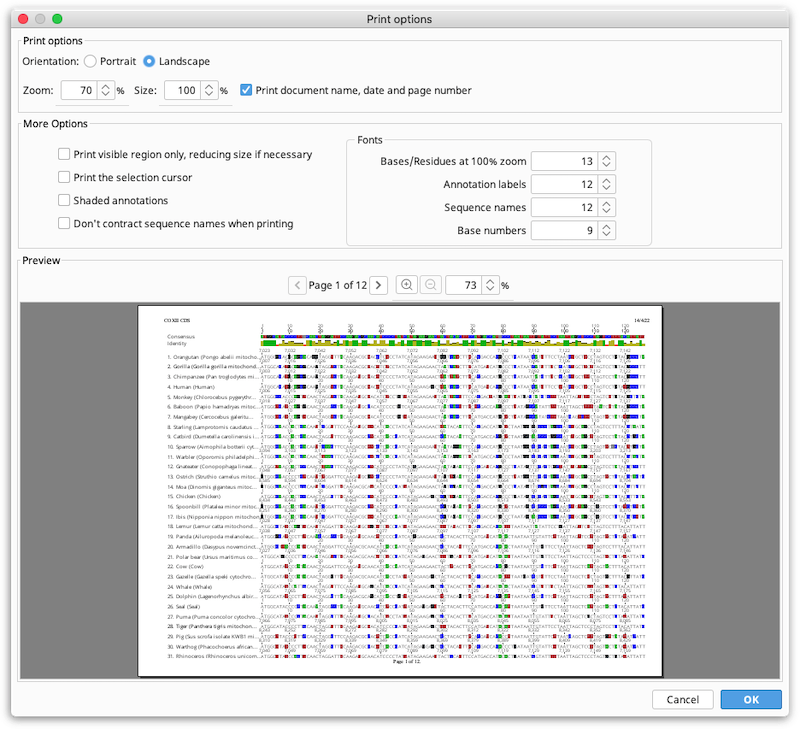
Note that the Print option can also be used to print to pdf, using your system print to pdf tools. This is the best way to create multi-page PDF documents of large alignments or sequences.
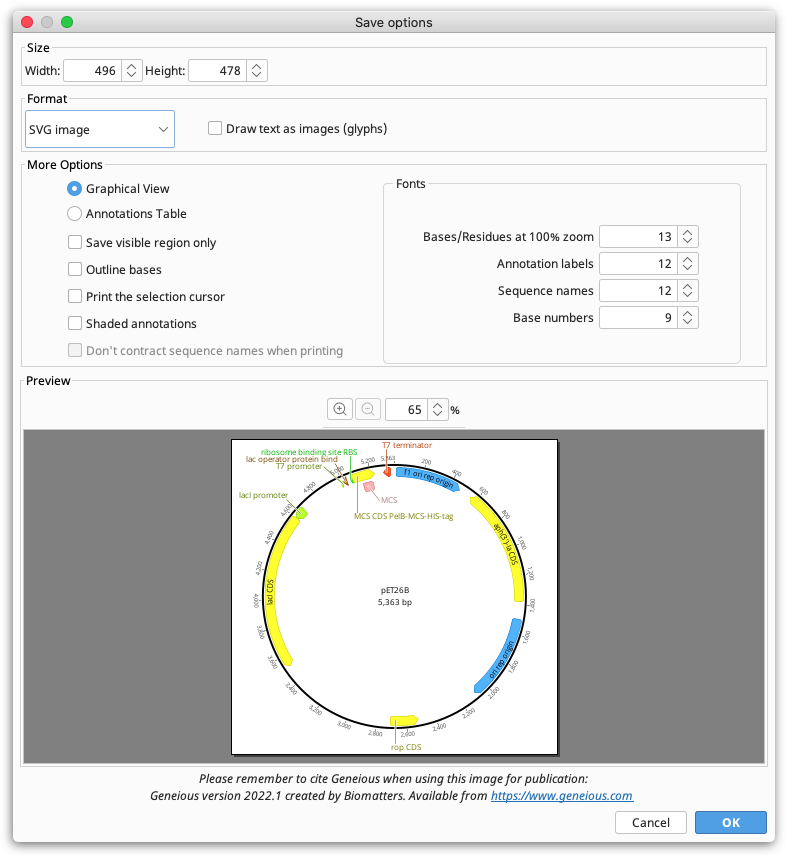
Saving Images
Choose Save as image file from the File menu, or click the Export button in the toolbar and choose Export to Image. The following options are available:
Size. Controls the size of the image to be saved. Depending on the document view being saved, these may be fixed or configurable. For example, with the sequence viewer, if wrapping is on, you are able to choose the width at which the sequence is wrapped, but if wrapping is off, both the width and height will be fixed.
Format. Controls image format. Vector formats (PDF, SVG and EMF) are ideal for publication because they won't become pixelated. Raster formats (PNG and JPG) are easier to share, great for emailing and posting on the web. If you wish to edit the file outside of Geneious, SVG or EMF format should be used. SVG files can be edited in tools such as Adobe Illustrator or Inkscape, and EMF files can be edited on Windows using PowerPoint, or LibreOffice Draw on Mac or Linux (the Mac version of PowerPoint can't modify EMF files). With SVG or EMF it is possible to ungroup components of the graphic for editing, and because they are vector graphics they will scale without becoming pixelated.
Resolution. Only applies to raster formats (PNG and JPG) and is used to increase the number of pixels in the saved image. We recommend increasing the resolution to at least 300% for printing PNG or JPG files.
Exporting sequences and alignments as rich text
If you wish to export your sequence or alignment as a rich text file rather than an image, click the Text view tab and format your sequence the way you wish. For further details on the options available, see this post on our knowledge base. To export your formatted text, use the Copy full sequence button to copy the displayed text to the clipboard, or use the Save as *.txt button to export the displayed text as a text file.