Getting Started
The best way to get started with Geneious Prime is to visit Geneious Academy where you can view quick start videos or try out some of our tutorials. Within Geneoius you can also find an inbuilt tutorial with a basic introduction to the major features of Geneious Prime (Help > Tutorial). Additional tutorials on specialized functions can be downloaded from Geneious Academy: https://www.geneious.com/geneious-academy/
Downloading & Installing Geneious Prime
Geneious Prime is free to download from https://www.geneious.com/download. If you are a first-time user you will be offered a free trial. If you have already purchased a license you can enter it when Geneious Prime starts up.
Geneious Prime can be run on Windows, Mac, or Linux. The following OS versions are supported for the latest release:
| Operating System | Version |
|---|---|
| Windows | 7/8/10/11 |
| Mac OS | 10.11 - current |
| Linux | Ubuntu Desktop LTS, last 2 supported versions |
Note: From Geneious Prime 2020 onwards, only 64-bit Windows and Linux operating systems are supported.
Supported Apple operating systems vary depending on the version of Geneious you are running, for further information on supported operating systems and information for previous versions of Geneious, please see our Knowledge Base.
We recommend at least the following specifications for running Geneious Prime (note that these are minimum requirements - for working with large datasets such as NGS sequences you will need a higher-spec machine):
-
Processor: Intel x86/x86_64
-
Memory: 2048MB or more
-
Hard-disk: 2GB or more free space
-
Video: 1024x768 resolution or higher
Installing on Windows
Download the installer for Windows, then double-click on it to run it and follow the prompts. The default installation location is in Program Files.
Installing on macOS
Download the installer for macOS. If the disk image does not automatically open, double-click on it to open it. Drag the Geneious icon to Applications to complete the installation.
Installing on Linux
The installer for linux is an executable script. To install Geneious Prime, open the Terminal and use the "cd" command to navigate to the location where you downloaded the installer. Then to run the installer, type sudo sh ./installer_name.sh
e.g. sudo sh ./Geneious_Prime_linux64_2022_1_1_with_jre.sh
Note that Geneious can be installed without sudo privileges, and it will then be installed into the user's home directory.
If you are installing for a user on an older "Flexnet" license: in order to activate FLEXnet will need to be installed with sudo, using the following command (all on one line):
sudo /home/<username>/Geneious_Prime/licensing_service/install_fnp.sh "/home/<username>/Geneious_Prime/licensing_service/linux64/FNPLicensingService"
Geneious Prime setup
User preferences
User preferences can be changed by going to Tools → Preferences. This window can also be opened using the shortcut keys Ctrl+Shift+P (Windows/Linux) or command+Shift+P (Mac OS X). In the user preferences you can change data storage, memory and connection settings, install plugins, customize the appearance and behaviour, define shortcut keys, and set up sequencing profiles. Many of these options are explained in more detail in the next sections.
To reset all of your preferences back to the default, click the Reset All Preferences button at the bottom left of the Preferences window.
To export all of your user preferences in xml format (i.e if you wish to transfer the same preferences to another database), go to File → Export → Geneious Preferences or click the Export button in the toolbar and choose Export Other → Geneious Preferences.
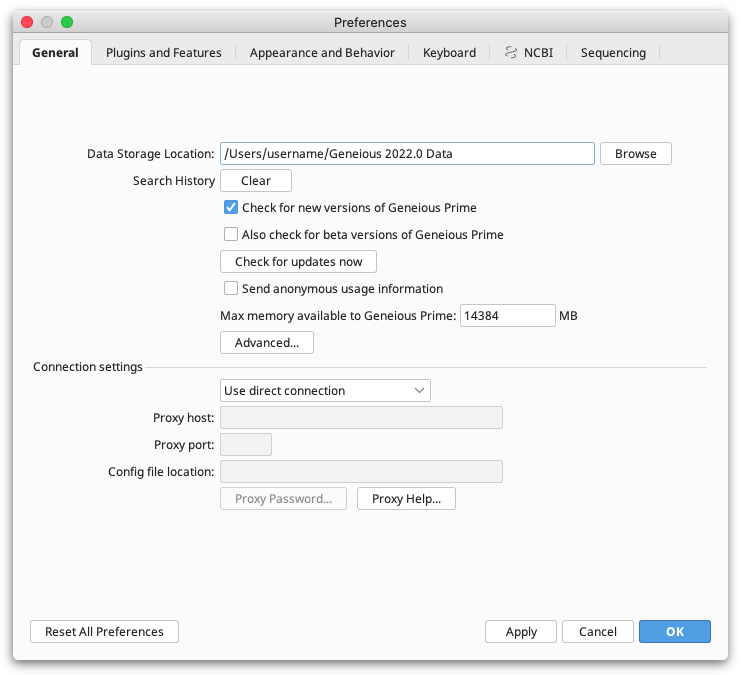
Choosing where to store your data
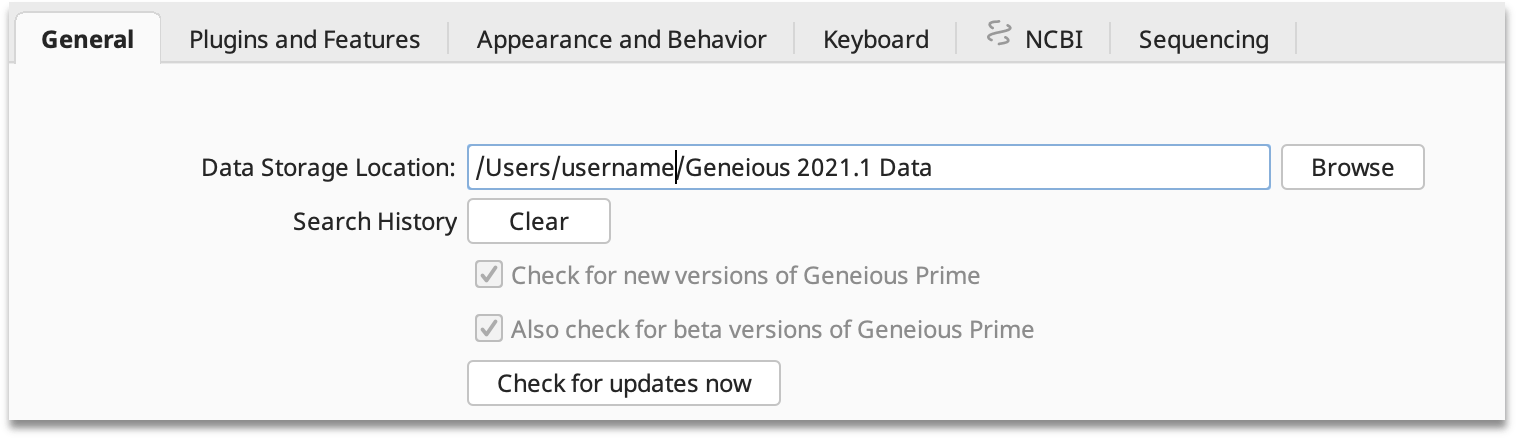
Geneious Prime stores your local data in a folder called Geneious X.Y Data (where X and Y are the version of Geneious you are using), which is stored separately from the application itself. When Geneious Prime first starts up you will be asked to choose a location for this folder. The default location in the user's home directory is normally the best option. To store your data somewhere different to the default, simply click the 'Select' button in the welcome window and choose an empty folder on your drive where you would like to store your data.
Alternative Storage of your Local Data: Storing your data on a USB drive may decrease performance, but is generally safe as long as you shutdown Geneious and safely eject the drive before disconnecting the drive. Be aware that disconnects are still common with external devices and these can lead to corrupt data. Therefore, it's critically important to keep frequent backups of your database if using this method of storage. To use an external drive for your data, open Tools → Preferences in Geneious and change the Data Storage Location to a new folder on your drive.
For reasons described in "Can I store my database on an external drive or a network drive?", storing your database on network drives or cloud syncing services is not recommended as a way to access it from multiple machines. However, you can export documents in .geneious format to these locations, which can then be dragged into another local database on another machine.
Changing the location of your database: To change the location of your Geneious Prime database at a later date, go to Tools → Preferences → General. The Data Storage Location shows the current location of your database. Click the Browse button to select a new location. Geneious will offer to either copy your existing data across to a new location, or open an empty database at that location. The new location will be remembered when you exit.
Note that if you uninstall Geneious Prime your data will not be wiped as the application itself is stored in a different location from the data folder.
Sharing files or the local database
Shared Database (This option requires knowledge of SQL database setup and maintenance. We suggest you consult with your IT team about requirements prior to considering this option): if all of the computers are on the same local network and you can set up a central server for holding the data then this is a suitable option. Geneious integrates with your SQL server to store your data centrally, giving you access from within the network and allowing you to share data with colleagues. See the Geneious User Manual for instructions on how to do this. The manual for your copy of Geneious can be found by going to Help→Online Resources→Download Manual.
You can also export documents in .geneious format and transfer these files via a USB or network drive for others to use. Storing your database on network drives or cloud syncing services is not recommended as a way to access it from multiple machines.
Changing the memory available to Geneious Prime
Geneious Prime runs in a Java Virtual Machine (JVM). When this JVM starts, it will be allocated a certain amount of RAM and the program can use less than that but never more. An appropriate amount of RAM based on your total RAM will automatically be allocated initially. To change the amount of memory allocated, go to Tools→Preferences, and in the General tab change the Max memory available to Geneious Prime setting. On Windows you need to run Geneious Prime as an administrator to change this setting (to do this, right-click on the Geneious icon and choose "Run as administrator").
You should never allocate the total memory of your computer to Geneious, as you need to leave some RAM available for your operating system. As a general rule of thumb, on a 64-bit machine you should leave around 2GB of RAM for your operating system, for example if your machine has 16GB of RAM do not allocate more than 14GB to Geneious.
To see how much memory Geneious Prime is using, check the Memory Usage Bar under the Sources panel. You may need to turn this on under Tools → Preferences → Appearance and Behavior. Clicking this bar will force a garbage collection and free up memory within the JVM.
Connecting to the internet from within Geneious Prime
In order to activate a license, download plugins and search external databases like NCBI, Geneious Prime needs to be able to connect to the internet. If you have a firewall preventing direct access, or are behind a proxy server you may need to manually configure your connection settings.
To find your system proxy settings, open your default internet browser and go to the connection settings:
- In Google Chrome: Settings → Advanced → System → Open Proxy Settings
- In Safari: Preferences → Advanced → Proxies (Change Settings...)
- In Firefox: Preferences → Network Settings
- In Edge: Settings → System → Open computer proxy settings
To enter your proxy settings into Geneious go to Tools → Preferences, click on General tab and go to Connection settings.
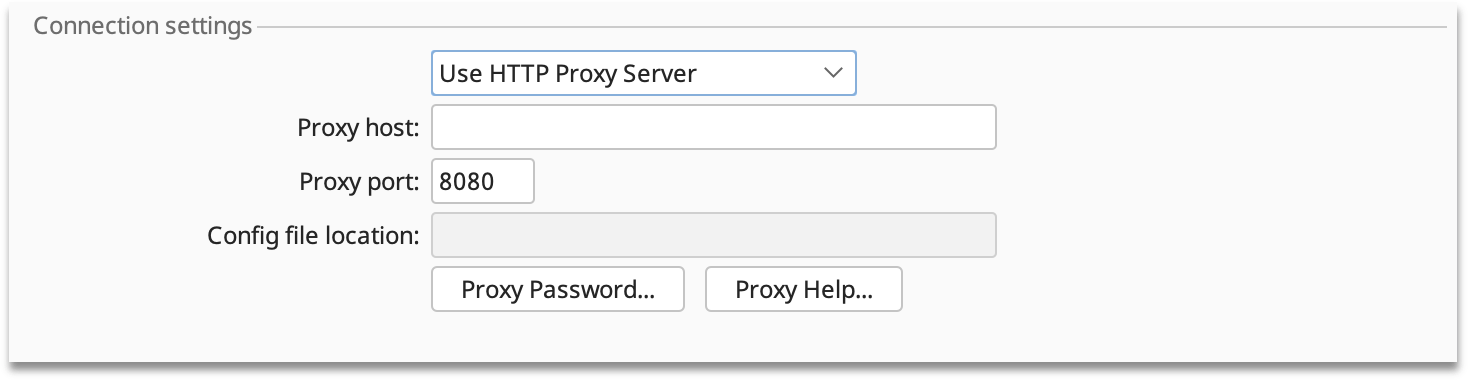
The options are as follows:
-
Use direct connection. Use this setting when no proxy settings are required.
-
Use browser connection settings. This will automatically import the proxy settings. This may not work with all web browsers.
-
Use HTTP proxy server. Enter the proxy host and port as specified in your system proxy settings. Use this if your proxy server is an HTTP proxy server.
-
Use SOCKS proxy server. Enter the proxy host and port as specified in your system proxy settings. Use this if your proxy server is a SOCKS proxy server.
-
Use auto config file. If your proxy settings are specified in an automatic proxy configuration (.pac) file, enter the location of the file here.
Note that if your proxy server requires a username and password you can specify these by clicking the Proxy Password... button.
If there are no proxy settings specified in your browser and you are having trouble connecting, we suggest you consult with your IT people regarding the appropriate settings.
Configuring NCBI options
Under Tools → Preferences → NCBI you can set the URL for the NCBI BLAST database, enter your NCBI API key if you have one, and specify which field of the Genbank document should be copied to the "Name" field in the Geneious document.
Installing plugins and customizing features
You can extend the functionality of Geneious Prime with a variety of plugins. These can be downloaded from our website, or managed via the plugins and features preferences in Geneious Prime. To access the plugins preferences, go to Tools → Plugins.
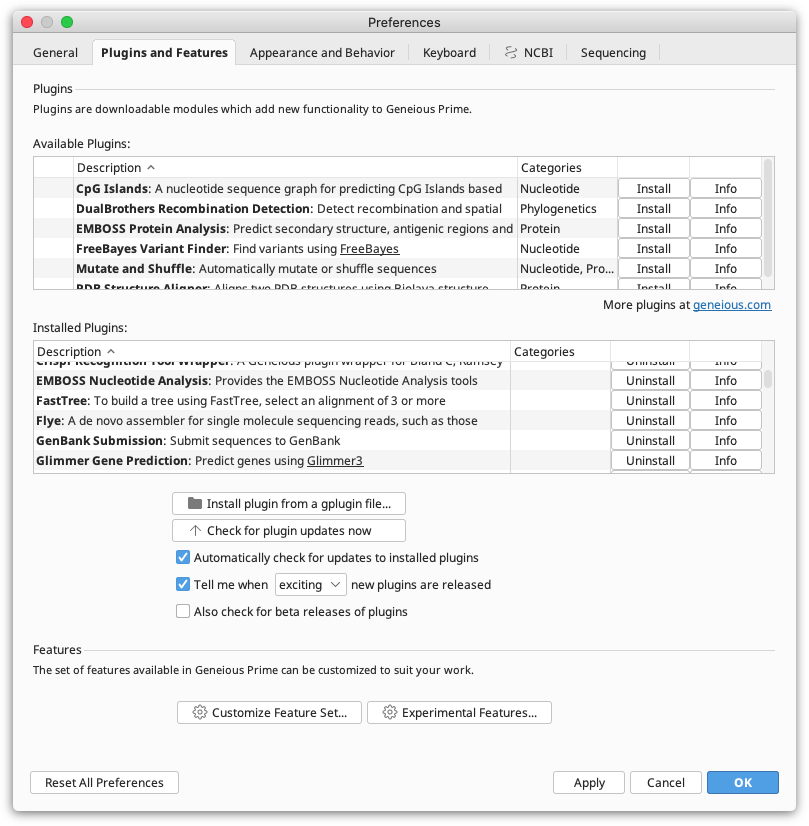
This window contains a list of available plugins in the top window, which lists plugins available for download which aren't already installed. To install a plugin, click the Install button, and for more information about the plugin, click Info.
If you have downloaded a plugin file from our website (or obtained one from another source in .gplugin format) you can install it by clicking Install plugin from a gplugin file and browsing to the location of the file. You can also install plugins by dragging the gplugin file into Geneious.
If you are running Geneious as an administrator then any plugin you install will be installed for all users on the same computer. If you are not running as an administrator then plugins will only be installed for the current user account. When upgrading plugins, Geneious may display a message indicating that it needs to be restarted in order to complete the plugin upgrade. If Geneious was being run as an administrator, it needs to be restarted as an administrator to complete the plugin upgrade.
Note that on Windows you cannot drag and drop plugins in to Geneious while running as an administrator.
Installed Plugins lists all the plugins you current have installed. Click the uninstall button next to a plugin to remove it.
Other options for managing plugins are:
-
Check for plugin updates now: Checks if there are any new versions available for the plugins you have installed.
-
Automatically check for updates to installed plugins: If checked, Geneious will check for new versions of your installed plugins each time the program is started.
-
Tell me when new plugins are released: Changes the way the program notifies you about new plugin releases.
-
Also check for beta releases of plugins: Plugins are sometimes initially released as a beta for the purposes of testing before the officially release. Check this to be notified about the release of beta plugins.
Customizing features
To see a list of all the features in Geneious Prime, click Customize feature set. Features can be turned on or off by checking or un-checking the Enabled box next to each feature. You might like to turn off the Tree Builder and Tree Viewer plugins if you don't do phylogenetics for example.
Configuring Appearance and Behavior
To configure the appearance and behavior of Geneious Prime, go to **Tools → Preferences → Appearance and Behavior. **

In the Appearance panel you can change the way the main toolbar and the document table look, show or hide the memory usage bar and folder path (navigation) bar, and turn dark mode on or off.
In the Behavior panel you can change the way newly created documents are handled, such as where they should be saved to and whether they are selected straight away. You can choose whether to store document history, and create active parent/descendant links (see Parent-Descendant Tracking).
Reset questions allows you to reset the questions where you have previously told Geneious to remember your preference. If you have checked "remember my preference" in a dialog window, that window will no longer appear. You can click the Reset questions button to get these windows to appear again.
The Statistics panel (Prime 2021.0 onwards) allows you to set the sequence length threshold for calculating document table statistics (see Statistics). The Recalculate statistics now button allows you to add statistics on documents created in earlier versions of Geneious, in the currently selected folder.
In the Viewer panel you can set whether the same view settings are saved across documents of the same type, and configure when to show the Dotplot and DNA/RNA fold tabs in the sequence viewer.
Keyboard shortcuts
To define key shortcuts for operations in Geneious Prime, go to Tools → Preferences → Keyboard. Shortcuts that are already defined are highlighted in blue. Setting shortcuts can help you quickly navigate without using the mouse and also allows you to redefine shortcuts to ones you may be familiar with from other programs.
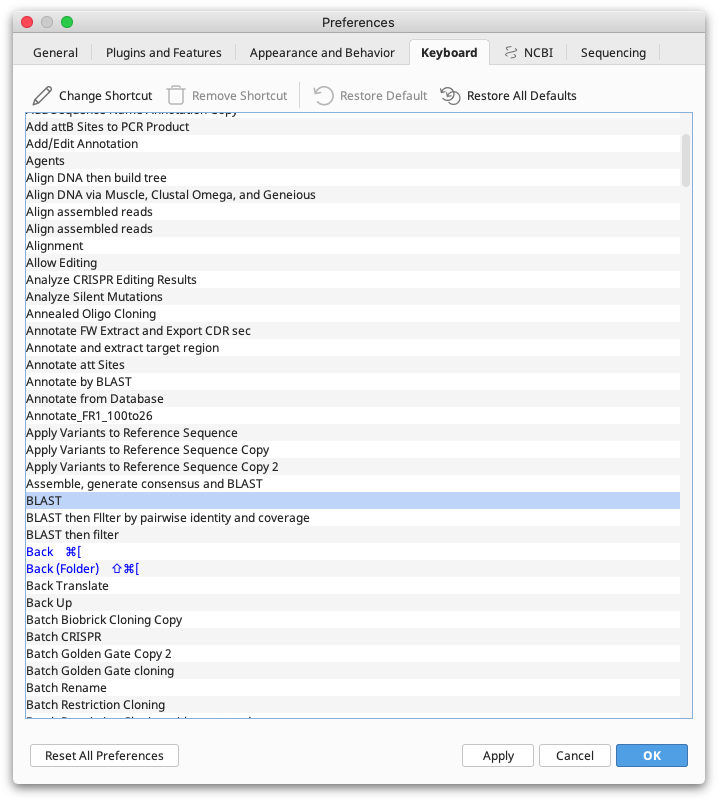
Double click on a function to bring up a window to enter your new keyboard shortcut. If you use one that is already assigned, Geneious will tell you what function currently has that shortcut.
Keyboard shortcuts can also be added from individual operation dialogs. When the setup options for a particular operation are opened, click the settings cog in the bottom left of the window and choose Edit keyboard shortcut to assign or edit a shortcut key for that function.
Configuring sequence binning options
To set quality thresholds for trace files and assemblies, go to **Tools → Preferences → Sequencing. **
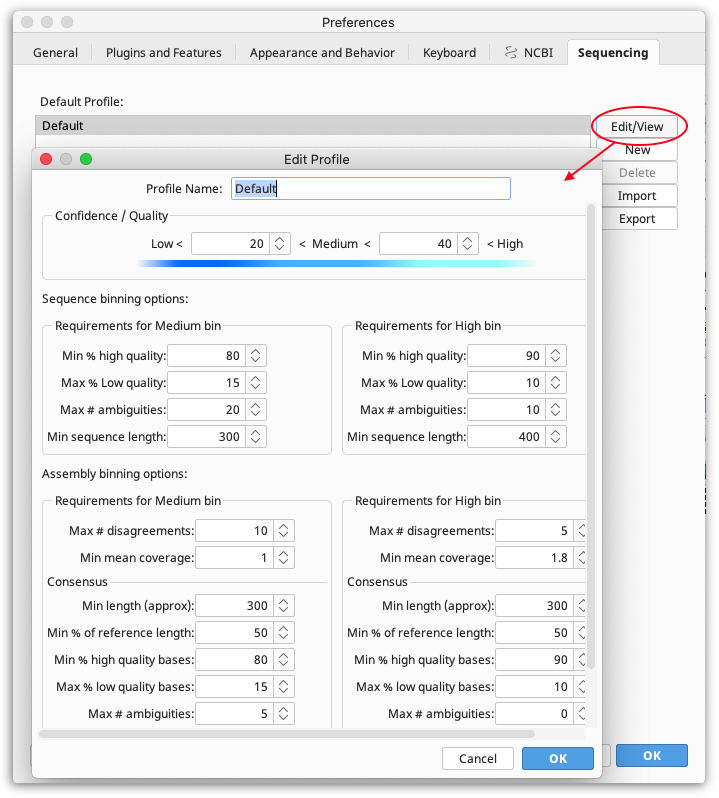
To change the default parameters or set up a new binning profile, click the Default profile then click Edit/View. The following options are available:
-
Confidence: Set the threshold values of base call confidence used to determine if a base call is low, medium or high quality. This affects the binning parameters described below as well as the Base Call Quality color scheme in the Sequence View.
-
Sequence binning options: Specifies the requirements for individual traces to be binned as medium or high quality overall. To see the Bin for a trace, turn on the Bin column under Table Columns in the View menu.
-
Assembly binning options: Specifies the requirements for assembly documents to be binned as medium or high quality overall. To see the Bin for an assembly, turn on the Bin column under Table Columns in the View menu.
To create a new profile, change the parameters how you wish then enter a new Profile name and click OK.
Other options for managing quality bins are:
-
Track binning history in meta-data: When turned on, meta-data will be added to traces when they are trimmed (see the Properties view tab). This meta-data will then be updated every time the trace is re-trimmed, maintaining a history of the trimming.
-
Enable per folder/document binning: When turned on, the Set Binning Parameters option is added to the Sequence menu. This allows you to select an individual folder or set of documents and set the binning parameters to use on those documents instead of the global ones set in the Preferences.
Upgrading to new versions
Geneious Prime will automatically check for new versions of the software if the option "Check for new versions of Geneious Prime" is enabled in the User Preferences (Tools → Preferences → General).
In Geneious Prime 2021 onwards, updates will automatically download and you will be prompted to install the newest version of Geneious Prime when it is available.
If you wish to manually install an update, simply download an installer from our website and install the new version to the same location.
When updating your existing data and license will be automatically loaded in the new version. If you are upgrading to a new major version (e.g. 11.1 to Prime 2019.0, or Prime 2019.0 to 2019.1). Geneious will update your data folder to the new format (creating a new folder with the upgrade's version number in the name), and will offer to keep a copy of your old data folder in case you wish to downgrade.
Downgrading to an earlier version
If you chose to keep a copy of your old data folder when you upgraded, you can easily downgrade if you prefer to use the earlier version, or if your license isn't valid for the latest version. Downgrading requires that the new version of Geneious is uninstalled first to avoid there being vestiges of the old copy in place. Once this is done, the old version can be reinstalled and Geneious will start up and see the old data folder. For instructions on how to import data from a newer version into an old version see the section below on File compatibility.
File compatibility
Geneious data files are backwards compatible to version 6.0. Thus, files that were created in version 6.1 or higher can be exported in .geneious format and opened in any version back to 6.0. If you are using an earlier version than version 6.0 you won't be able to open files in .geneious format that were created in a newer version. Entire Geneious databases are not backwards compatible, so when you upgrade you should accept the offer to keep a backup of your existing database. If you then need to downgrade to an earlier version you can swap back to your old database, and if you are on Geneious 6.0 or above, export any files you changed in the new version in .geneious format and import them into your old database. If you wish to export data back into a version earlier than 6.0, you will need to export the files in a common format such as fasta or genbank.
Licensing
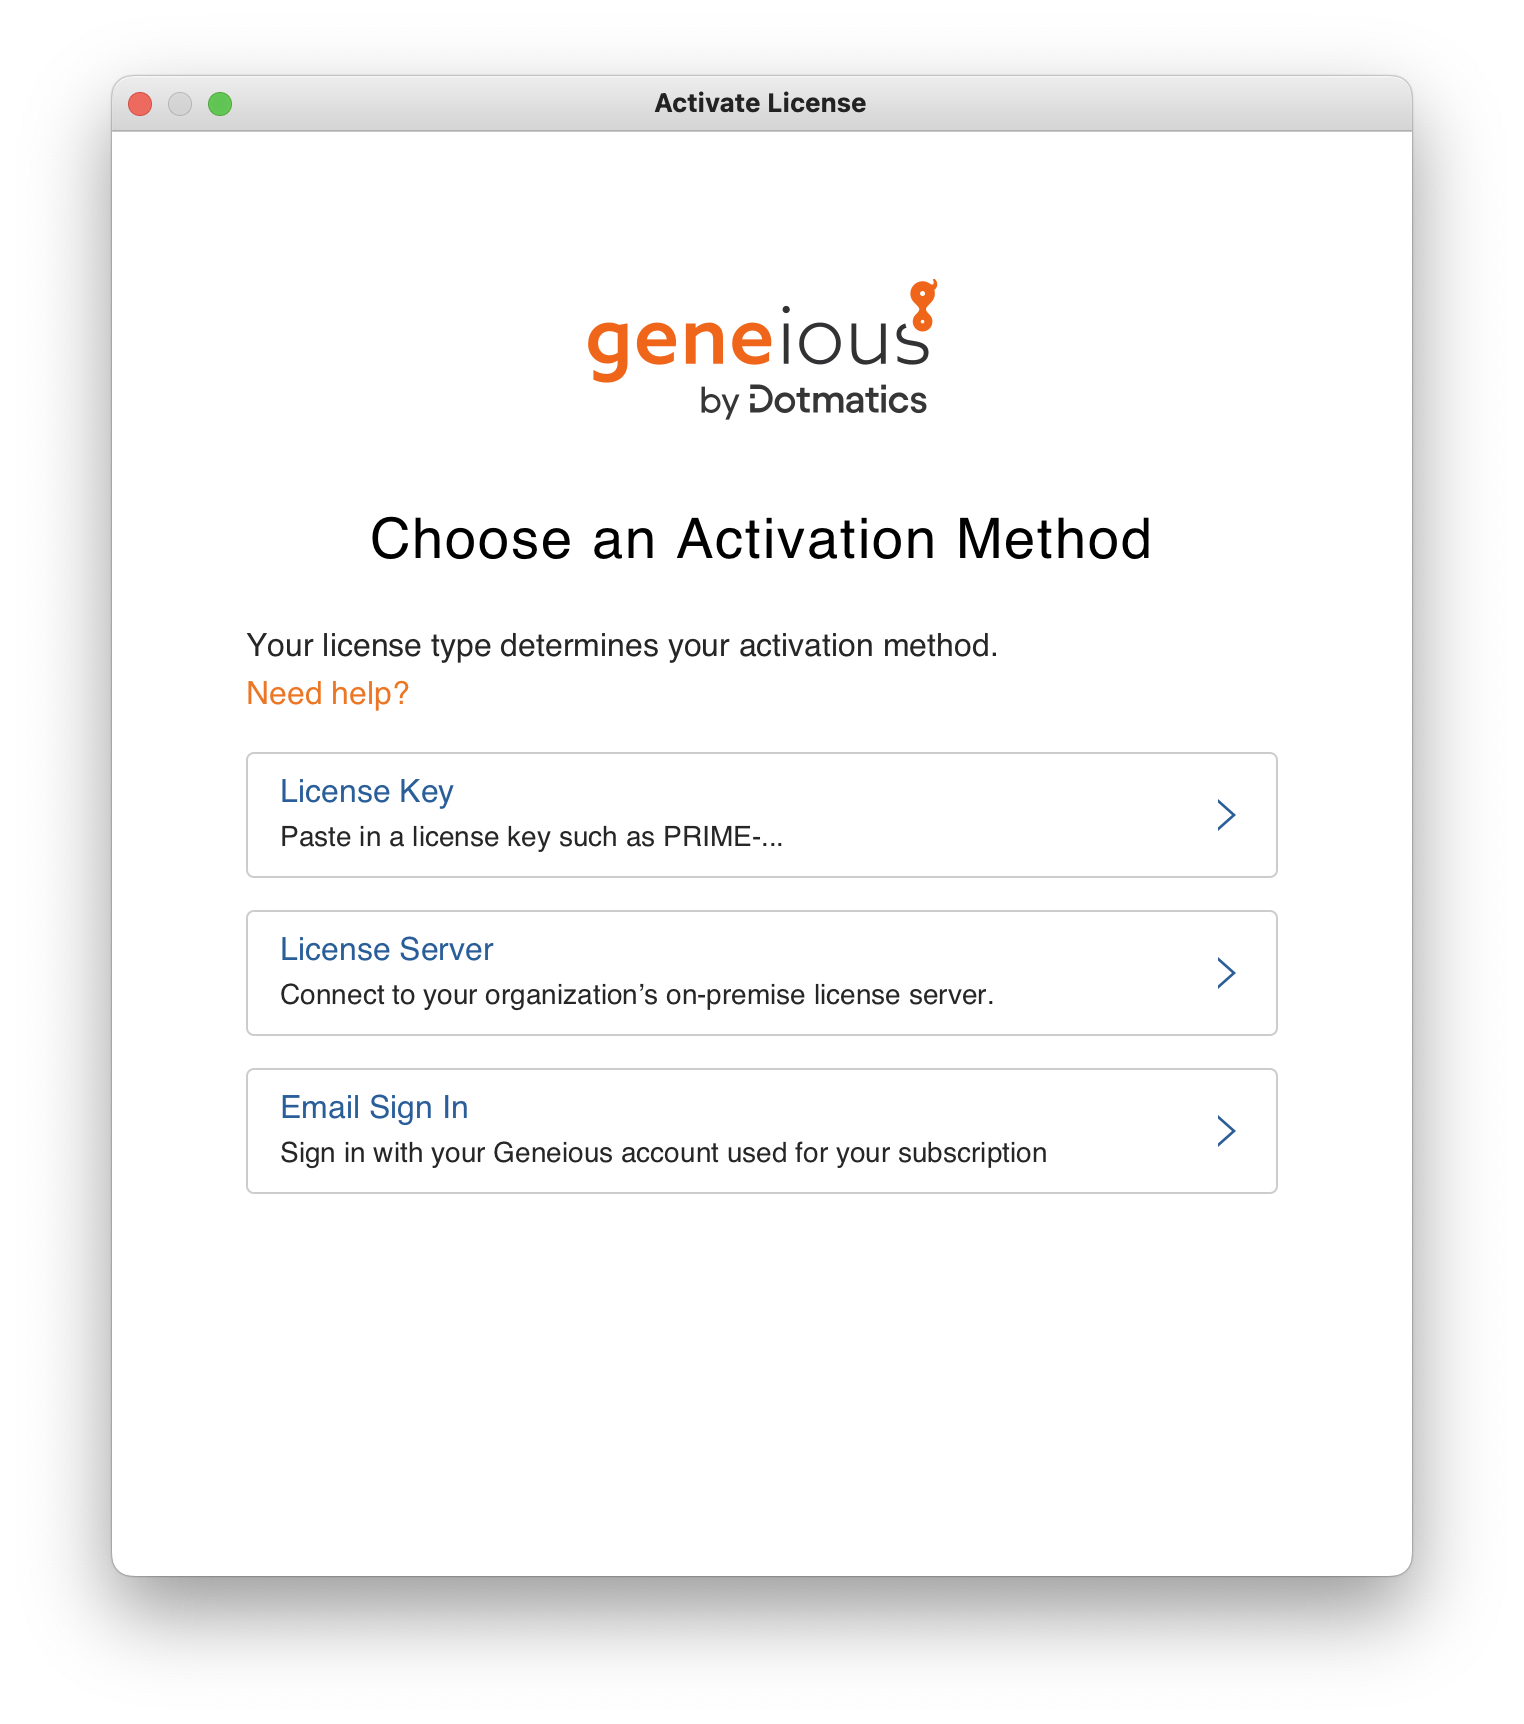
Licenses can be managed under the Help menu in Geneious Prime, using the following options:
Activate License
-
In this window you can activate using a license key or with a license server. Licensing options are as follows:
- License Key. If you have received a license key (such as PRIME-...) choose this option to enter the details and activate it. Make sure you enter the license key exactly as it appears in the email you received when you purchased the license. An internet connection is required to activate, and you may need to configure your firewall/proxy settings to enable access to https://licensing.biomatters.com on port 443.
-
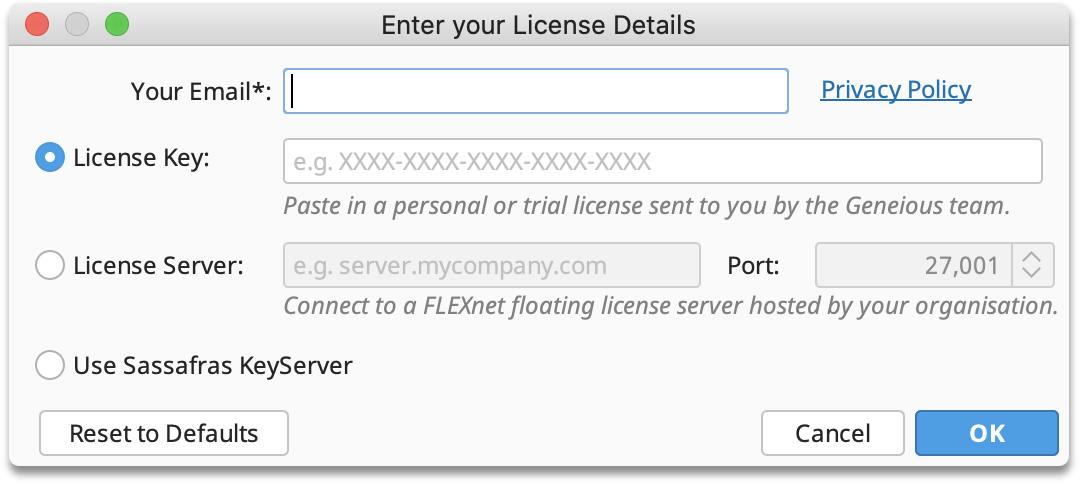
- License Server. If your organization has purchased a floating license administered through the Geneious Floating License Manager or your organization's FLEXnet license server, this is where you enter the details required to connect to the license server. Ask your system administrator for the host name and port of the license server.
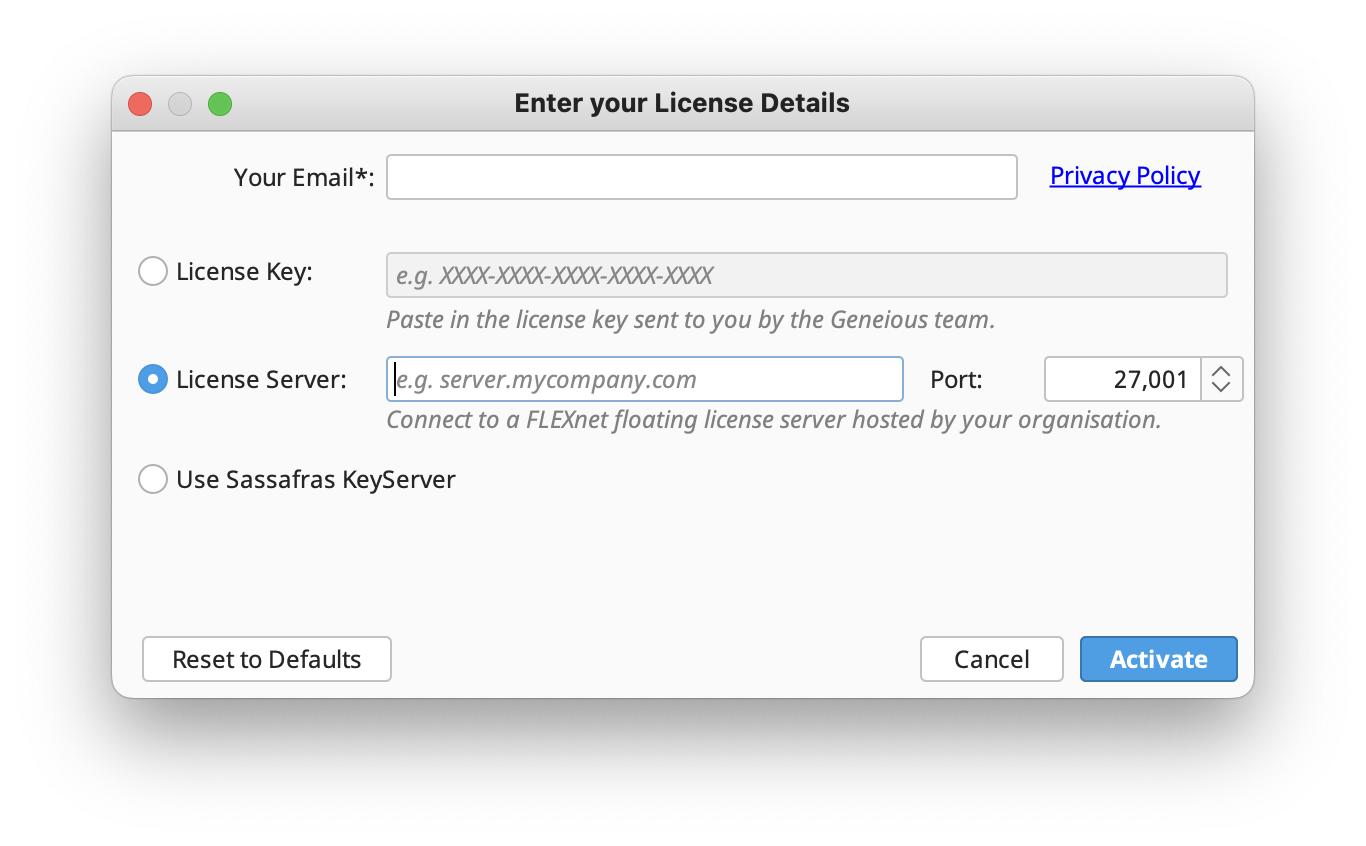
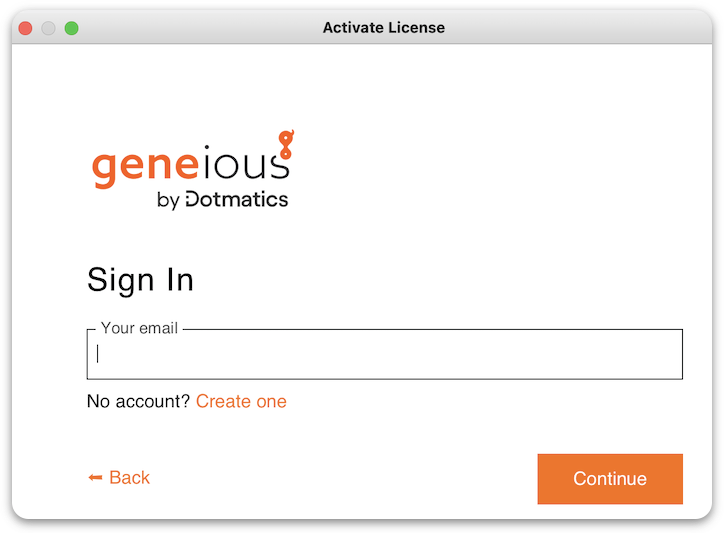
- Email Sign In. If you are using Geneious Prime 2024 or later, and have received an invitation email from your Geneious License administrator with no license key, choose the Email Sign In option. Make sure you enter the email that you have received the invite on, from your administrator. If you do not have MyAccount for this email you have to create one, if you have an existing account then enter the email and password to login and activate Geneious Prime.
Borrow Floating License
This item is only available to users for a floating license administered through a FLEXnet license server. Borrowing a license allows you to borrow one of the seats of a floating license so you can use it even when disconnected from the network. Since this decreases the number of seats available for other users, borrowing can only occur with the authorization of the system administrator. If your borrowing is approved, the system administrator will provide you with a "borrow file" authorizing the borrow. To borrow a license, check "Borrow" in the menu, and navigate to this file when prompted by Geneious. Borrowed licenses have an expiry date, when they will automatically be returned to the server, but if you are finished with the license before the expiry date, please uncheck "Borrow" in the menu while connected to the network in which the license server resides, so that the license is returned to the server and is available to other users again.
Release License
If you no longer need to have Geneious available on a computer where you have activated it, use this option to release the license so it is available for use on another computer.
If you're using a floating license, you can release it allowing another user to access it without you having to shut Geneious down. Once you've released the license, Geneious will enter restricted use mode.
Buy Online
This item will open the Geneious store in your browser, where you can upgrade licenses, purchase new licenses or contact our sales team.