Workflows
Workflows allow you to group Operations together to reduce the number of steps required to perform an often-used combination of Operations. Options for each Operation may be preconfigured, or some or all options 'exposed' for configuration when the Workflow is run. Geneious Prime provides a number of example Workflows for a variety of tasks that you can try. Workflows can be run or managed via the Tools menu or the Geneious Toolbar. Workflows can be shared with other people either by exporting and importing them, or if you are connected to a shared database, by ticking the option to share them (see below). If you have any programming knowledge you can even add customised code in Java (see Custom code in workflows)
Managing Workflows
Workflows can be accessed from the Workflows menu under Tools, or from the Workflows icon in the Geneious Toolbar. If the Workflows icon does not appear in your toolbar, you can add it by right clicking on the main Geneious Toolbar, choosing Customize... and checking Workflows. The Workflows menu allows you to select and run saved Workflows, manage your Workflows and create new ones.
The Manage Workflows... window lists all available workflows and contains options for viewing, editing, copying, deleting, exporting and importing workflows. Each workflow listed in the Manage Workflows window with an  icon next to it will be shown in the drop down under the main Workflows menu. The order in which workflows appear in the drop down menu can be altered either by dragging and dropping workflows in the list to their desired position, or by using the Move Up and Move Down buttons. Multiple workflows can be selected using Shift- or CNTRL-click, and they can then be exported or added/removed from the drop-down list in one go.
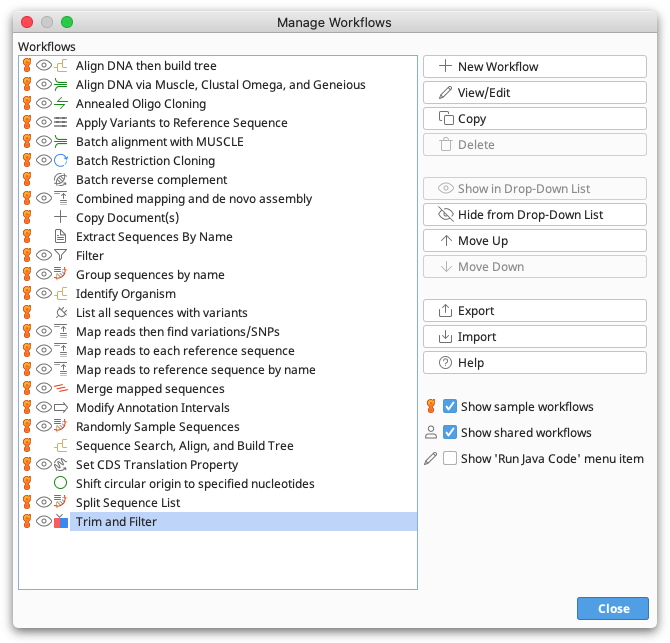
Workflows shared by other users in a server database are indicated by an  icon. These Workflows will not appear in the drop down menu unless you choose to show them. Workflows shared by other users in a shared database are only editable by the creator. However, you can use the Copy button to create your own personal editable copy of any Workflow.
Creating and editing Workflows
To create or edit a workflow, go to Manage Workflows... under the Workflows menu. Here you have the option to create a New Workflow, View/Edit an existing Workflow, or Copy and edit an existing Workflow. Each of these options opens an Edit Workflow window where you can name your Workflow, describe its function, specify an icon for display in the Workflows menu, share via a Shared database, and build/edit your Workflow using the Add Step/Delete Step buttons.
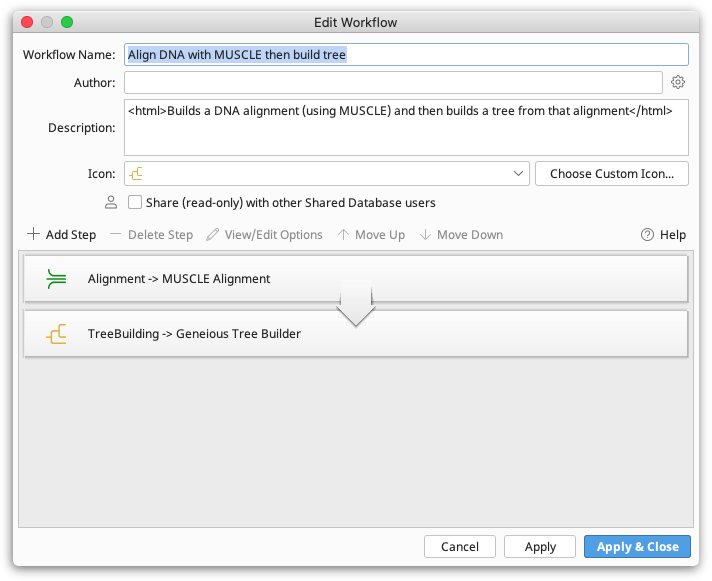
Each Workflow is made up of one or more Steps. A Step may be an Operation (for example, perform Muscle alignment), or a special Step (for example, Group Documents). Each Step accepts one or more documents as input and produces one or more documents as output which are then used as input to the next step in the Workflow. All documents selected when the Workflow is run are provided as input to the first Step (unless specified otherwise, see Advanced Document Management for further information). The output from the final Step of a Workflow is saved in your Geneious database. Outputs from intermediate steps are not saved, unless you include the Save Documents / Branch option after the Step. A document is a single entry that can be selected from your Geneious database. For example a single document can be an alignment, a sequence list, a tree, or a stand-alone sequence.
The Add Step button provides a dropdown menu with a range of Steps that can be added to your WorkFlow.
The purpose/function of each type of Step is summarised in below:
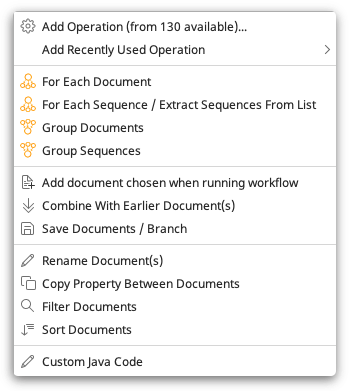
 Add Operation: Runs one of the standard Operations available in Geneious. This can include other Workflows.
 For Each Document: Runs the next Step in the Workflow independently on each document.
For Each Sequence/Extract Sequences From List: Runs the next Step in the Workflow independently on each sequence, extracting sequences from a list if necessary.
 Group Documents: Groups results from multiple operations together so that they are all used in a single invocation of the next operation.
Group Sequences: Groups sequences into a sequence list document.
 Add document chosen when running workflow: Prompts the user to choose a document when they first start the Workflow. This document may either be chosen from anywhere in their database, or from one of the documents selected when the workflow is run. In the latter case, the selected document will be excluded from the list of documents provided to the first Step of the Workflow. If only a single document from the selected documents matches the specified document type, then it will be automatically selected instead of asking the user. In both cases, the selected document is combined with each of the results from the previous Step in the Workflow. See Inputting documents into later stages of a Workflow for more details.
 Combine with Earlier Document(s): For each result from the previous Operation, combines with the corresponding input document(s) of an earlier operation in the Workflow. The documents from the earlier Operation are added to the end of the list of documents from the previous operation.
 Save Documents / Branch: Optionally saves the current results. Also, optionally starts a branch beginning from an earlier Step in the Workflow.
 Rename Documents: Renames the document(s).
 Copy Property Between Documents: Works on a pair of documents. Copies a property from one document to another document and outputs just the destination document. If only a single document is provided, outputs that document unmodified.
 Filter Documents: Filters some documents based on the content of their fields.
 Sort Documents: Sorts some documents based on the contents of their fields.
Custom Java Code: Write some custom Java code to do whatever you want. See Custom Code in Workflows for more details.
Configuring options for Operation and Steps
For each Operation added to your Workflow, you can edit and specify values for the configurable options available for each operation. To do this, select the Step you wish to configure, and click View/Edit Options. To set the Workflow up so that the options are preconfigured and cannot be changed when the workflow is run, select Expose no options, then select the Operation options you want the workflow to use. To allow some or all or the options to be configured each time the workflow is run, select Expose all options or Expose some options. Exposed options can be presented in a number of ways as described below.
-
Optionally label exposed options as: Use this to group and label all the exposed options for this Workflow Step under a labelled section rather than mixing the options for this Step in with options from other Steps in the workflow.
-
Access exposed options via button: Rather than displaying all the options for this workflow Step in the top level options dialog, instead provide a button for the user to click on before showing the options for this Workflow Step.
-
Exposing options with dependencies: Some options have dependencies on other options. For example when a checkbox is off, another option may become disabled. If you choose to expose a subset of the options rather than all options, the dependencies between options will be discarded. For checkbox options that have an associated value, you will probably want to expose the associated value too. Often this associated value doesn't have a label in the user interface so it will appear with its programmatic name immediately following the checkbox option in the drop down list of available options.
Note that for some Operations, not all options may be available when run in a Workflow. Some special Steps also have configurable options, which in some cases can also be exposed when the Workflow is running. For example, the Filter Documents Step can be exposed so that the user can set the Filter criteria when the Workflow is running.
Advanced document management
Grouping and separating documents
In simple Workflows all documents provided to the Workflow are grouped as a single set of documents which are used as input to a single invocation of the first Step in the Workflow. Each Workflow Step will produce one or more output documents, all of which are grouped together and used as input into the next Step in the Workflow.
However, it is possible to create Workflows where each Step in the Workflow may be invoked in parallel on different sets of documents. For example, if the first Step in the Workflow uses the For Each Sequence / Extract Sequences From List Step, then each input sequence is placed into a separate document and the following Step will be invoked independently on each sequence. Each call to the following Step may produce one or more documents. Each of these sets of output documents are used independently as inputs to multiple invocations of the next Workflow Step. Alternatively you could group these results together again, using Group sequences or Group Documents to use as input to a single call to the next Workflow Step. No matter what document grouping or separation (For Each...) Operations are used, each Step in the Workflow is always run to completion on all datasets before starting on the next Step in the Workflow.
Inputting documents into later stages of a Workflow
It is also possible to insert documents into later stages of the workflow, either from additional documents the user selects in the options when they first start the workflow (using the Add document chosen when running workflow Step) or to use documents generated from earlier stages in the workflow (using the Combine With Earlier Document(s) Step). You can create branches in your workflows by using the Save Documents / Branch Step often in conjunction with a Filter Documents Step as the first Step in each branch. For an example on branching and filtering, see the sample 'Identify Organism' Workflow.
Custom code in Workflows
Custom code allows you to create Geneious operations that do almost anything. The Workflow custom code automatically inserts the surrounding import statements for the complete Geneious API and a class framework around the methods you implement here. Additional import statements can be provided prior to the first method. Documentation for the API is available at Geneious API. For more advanced programmatic access to Geneious (for example creating importers, exporters or viewers), please download and refer to the Geneious Plugin Development Kit.