Shared Databases
This option requires knowledge of SQL database setup and maintenance. We suggest you consult with your IT team about requirements prior to considering this option. For the recommended method of sharing files, we offer Geneious Cloud (included with your eligible Geneious Prime subscription) as a pre-established cloud-based file server incorporated into Geneious Prime.
A Shared Database provides a synchronized storage location accessible by multiple concurrent users, which behaves like the local folders with additional Group based access controls on folders. Once logged in, folders in the shared database are available under the Shared Databases icon in the Sources panel.
Your Geneious license will provide access to set up a basic Shared Database using Direct SQL Connection.
Using a Shared Database
A Shared Database can be used in the same way as your local database, but also allows multiple users to access the same database at the same time. The folders in your Shared Database can be private to an individual, shared with a subset of users, or shared with all database users, and users can be given read or write access to documents as required.
This section provides an overview of what you need to know to connect to and use an existing Shared Database.
Overview of Direct SQL Connection
This section provides an overview of key points for using a Shared Database with Direct SQL Connection. For more information on setting up and administration of a direct SQL connection database see Direct SQL Connection.
Connecting to your database:
-
Before you can use a Shared Database with Geneious Prime, an SQL database needs to be created and set up on your server. This requires knowledge of creating and administering SQL databases.
-
You can connect to your Shared Database from different computers or Geneious Prime installations.
Sharing documents:
-
Access to documents is controlled by creating Groups and Roles which specify the permission level for members of the group.
-
When new folders are added on the root folder, by default everybody has access to them. This can be changed by a Database Admin.
-
Subfolders will be added to the same group as their parent folder.
-
Only Database Admins can create and remove groups and add users to new groups.
-
If you want to change the group of a folder, you need to be a Group Admin.
Read only folders:
-
If you have VIEW access to a folder, the documents will be read only.
-
Read only folders are indicated by a grey padlock on the folder icon.
-
If you try to edit a document in a read only folder, you will be asked to select a different location to save a copy of the document with your changes.
Overview of Geneious Server Database
This section provides an overview of key points for using a Geneious Server Database. For more details, refer to the section Geneious Server Database.
Connecting to your database:
-
Geneious Server Database is available to customers who have purchased a license for Geneious Server Database in addition to their Geneious Prime license.
-
Once the database has been set up, you can connect to your shared database from different computers or Geneious Prime installations.
Sharing documents:
-
Access to documents is controlled by creating Groups and Roles which specify the permission level for members of the group.
-
When new folders are added on the root folder, by default they are private to the user who created them. This can be changed by a Database Admin.
-
Subfolders will be added to the same group as their parent folder.
-
All users can create and remove groups and add users to new groups by default. This can be changed by a Database Admin.
-
By default, you can change the group of a folder if you have EDIT access. This can be restricted to Admins by a Database Admin.
Read only folders:
-
If you have VIEW access to a folder, the documents will be read only.
-
Read only folders are indicated by a grey padlock on the folder icon.
-
If you try to edit a document in a read only folder, you will be asked to select a different location to save a copy of the document with your changes.
Connecting to a Shared Database
This section explains how to connect to an existing Shared Database in Geneious. You may need to speak to your system administrator for connection details, including the database type and your user account details. System administrators can also preconfigure the connection settings for users via the geneious.properties file.
To connect to a Shared Database, select the Shared Database service in the Sources panel and click on New database connection. Select the Connection Method tab that corresponds to your shared database -- either Direct SQL Connection or Geneious Server Database -- and enter the connection details provided by your system administrator. You can optionally choose to Connect account on start up (selected by default) if you would like to automatically log in to your shared database every time you use Geneious.
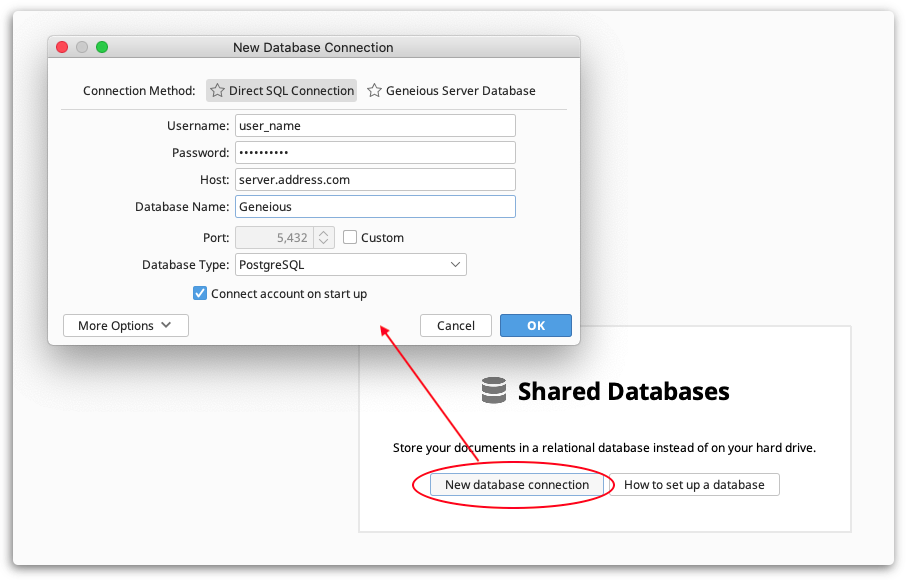
Note that from Geneious Prime 2019.2.1 onwards, the drivers required to use Windows Authentication with Microsoft SQL Server are bundled with Geneious. To use this option, select Microsoft SQL Server as your database type and check Use Windows Authentication. If you are on an older version of Geneious and wish to use Windows authentication, contact support for further instructions.
You can log in manually by right clicking on the root folder for your shared database, and selecting Connect. You can also Edit Account Details via this menu, if required.
Removing a Shared Database
To remove your Shared Database from Geneious Prime, simply right click on its root folder and choose Remove database. This will remove your connection to the Shared Database, but will not delete the database nor any of the data contained within it, nor will it remove your account. You can add the database again following the instructions above on connecting to the shared database.
Storing Documents in a Shared Database
Document Compatibility Between Versions
By default the Shared Database stores documents in the latest document format the same way the Local Database does. This can cause compatibility problems if different sets of users are using different versions of Geneious. For example if a user on Geneious 2022.x saves a new alignment document, users on Geneious 2021.x will be unable to read those documents.
To get around this issue the Shared Database can be configured to save documents in a format specified by an older version of Geneious if that version is still supported. In most cases this will allow for users using Geneious 8.1 or later to seamlessly share documents with users of any version back to Geneious 6.0. However be aware that if the document format has changed since the compatibility version, then users of the newer version may find their documents missing properties or bug fixes that have been added since the format changed.
The Document Compatibility Version setting can only be set by a Database Admin. You will find this setting by choosing Administration in the shared database context menu (visible when you right-click on the database root folder) and then Set Document Compatibility Version.
Document Size Limitations
For Direct SQL Connection Shared Databases, document size is limited by the underlying database system. Talk to your system administrator if you work with very large files such as contig assemblies and complete genomes.
Geneious Server Databases have no limits on document size, and performance with large documents is significantly better than with Direct SQL Connection Shared Databases.
Backing up your shared database
It is important that you back up your shared database on a regular basis following the recommendations for the SQL system you are using. For example, the PostGreSQL manual (see link below) provides instructions on how to create and restore 'dump' backups of a shared database. https://www.postgresql.org/docs/9.1/static/backup-dump.html
Note that for Geneious Server database, data is also stored on the file system in the directory /home/HOSTNAME/.geneiousServerX.Ydata (where x and y are version numbers for Geneious), so this must also be backed up. See this article for further information.
Direct SQL Connection
A basic shared database can be set up using Direct SQL Connection, to provide a synchronized storage location for Geneious data, accessible by multiple concurrent users. To use a Direct SQL Connection Shared Database, an empty SQL database first needs to be set up using a supported database management program. Once the database has been set up, users can connect to the Shared Database from Geneious Prime, add files to it and use it in the same way as the local database.
Folders added to the shared database will be shared with all users by default, but this can be configured by the Database Admin(s). Database Admins can also add Groups and set user Roles for each group, which control access to folders by granting users permission to view, edit or administrate a group.
Setting up a Direct SQL Connection Shared Database
Supported Database Systems
To use a database as a Shared Database, Geneious requires that it support transactions with an isolation level set to READ COMMITTED. Supported database vendors include Microsoft SQL Server, PostgreSQL, Oracle and MySQL. It is possible to use other database vendors if you provide the database driver (see Supplying your own database driver) but we may not be able to provide support if you run into problems.
The following SQL database versions (with the default configurations) are currently tested as Shared Databases:
-
Microsoft SQL Server 2019
-
PostgreSQL 15
-
Oracle Database 19c
-
MySQL 8.0
Document Size Limitations
For Direct SQL Connection Shared Databases, document size is limited by the database's maximum binary large object (BLOB) size. This varies between 1-4 GB. Refer to the documentation of your database system for the maximum BLOB size.
Recommended SQL configurations for the Shared Database
In most cases, the default settings for whatever SQL database system you are using are sufficient. The character set encoding for MS SQL should be set to UCS-2, all others should use UTF-8 to avoid any potential problems indexing documents containing unusual characters.
To avoid connection failures when many users access the Shared Database, the default connection pool should be adjusted to accommodate 6 connections for each user.
There are a few exceptions where we recommend changes to the default configuration, listed below:
MYSQL
Some changes you may need to make to the MySQL configuration file (my.cnf) to improve performance are as follows:
-
innodb_buffer_pool_size=[On a dedicated database server you may set this parameter up to 80% of the machine physical memory size]
-
innodb_flush_log_at_trx_commit=2
-
query_cache_limit=2M
-
query_cache_size=128M
-
max_allowed_packet= 1073741824 (Note this is the maximum size for max_allowed_packet and can prevent errors when handling large files)
Further optional improvements:
-
innodb_log_file_size=256M
-
innodb_log_buffer_size=16M
Note: If you change the innodb_log_file_size then you will need to delete the current log files before the server will start up again.
Microsoft SQL Server
The character encoding for MS SQL should be changed to UCS-2. Other default settings for MS SQL server are generally sufficient. However, we strongly recommend using Snapshot Isolation to avoid deadlocks. These can occur when multiple users use the shared database at once and may lead to failure of some actions. This setting becomes necessary if there will be more than a handful of users using the database concurrently. Read more about Snapshot Isolation here.
Setting up an SQL database to use with Geneious Prime
Follow these steps to set up a Direct SQL Connection shared database to use with Geneious Prime. The instructions in this section require knowledge of how to create and administer an SQL database and are intended for your IT department or system administrator. For instructions on connecting to your shared database once it has been set up, refer to Connecting to a shared database.
(1) Create database
- Install a supported database management system if you do not already have one.
- Create a new database with your desired database name. Make sure that you have a user that has rights to create tables.
- Make sure to create the database with a suitable character set and collation - UTF8 (or UCS-2 for Microsoft SQL Server) is recommended.
- You should consider possible limitations to document size due to the database's maximum BLOB size when selecting a database system.
(2) Add users to your database using the database management system
- Make sure all users of the database have SELECT, INSERT, UPDATE and DELETE rights, otherwise they will not be able to use the Shared Database as intended.
(3) Set up database with Geneious Prime
- Run Geneious Prime and click on the Shared Database icon in the Sources panel, then click the New database connection button to connect to your database. Geneious will automatically set up the database when you connect, if it has not yet been set up.
- This will only succeed if you have permission to create tables on the database.
(4) Set the first Database Admin
- To create your first Database Admin, right click on the root folder of your database and select Make the current user a Database Admin. This option is only available when your shared database does not have any Database Admins.
- Additional Database Admins can be added by setting the user's role in the group Everybody to ADMIN.
(5) Set up sharing permissions for your database
-
By default, all folders in your database will be shared with all users. This will allow you to use your Shared Database like a shared local database. If this is what you want, no further setup is required.
-
If you want to restrict access to particular folders you can do so using Groups and Roles. Groups can only be created by a Database Admin.
Your database should now be ready to use with Geneious Prime. Users can connect to the database by clicking on Shared Databases in the Sources panel and then clicking New database connection. This will bring up a dialog for the user to enter in the database details. If you wish to preconfigure the connection settings for users, you can do so via the geneious.properties file.
Supplying Your Own Database Driver
Shared Databases were designed with the supported databases in mind and packaged with database drivers for them. However, Geneious allows you to supply your own jdbc database driver if you want to, for example if you have an updated driver, or want to use a driver for an unsupported database. It is not guaranteed that Shared Databases will work with an unsupported database system and we cannot provide support if you run into problems.
You can supply your own driver under More Options in the New database connection dialog, or the Edit Account Details dialog (available by right clicking on the root folder of your shared database) for an existing shared database.
Administration of Direct SQL Connection Shared Databases
Administration options are available in the Administration sub-menu (accessed by right-clicking any folder in the shared database), which allows Database Admins to manage database settings, add and remove users and groups, and assign groups and roles. The Administration sub-menu and options are only available to users with admin privileges for the database.
Admin Users
There are two types of Admin users in a shared database: Database Admins and Group Admins.
Database Admins
A Shared Database can have one or more Database Administrators. Database Admins are users who have the ADMIN role in the Everybody group. This role should be assigned with great care, as Database Admins always have access to all folders and documents in the database, irrespective of any group roles that have been set for a particular group.
Database Admins are the only users of the shared database who can add or remove groups or edit all user settings.
If there are no Database Admins in your shared database any user can set him or herself as Database Admin with the option Make the current user a Database Admin. This option is accessed by right clicking on any folder in the Shared Database, and is only available when there are no Database Admins.
Group Admins
Group Admins are users with the ADMIN role for a particular group. The first Group Admin for each group needs to be added by a Database Admin, after which Group Admins may add additional Group Admins to the group if they wish.
The admin permissions of Group Admins are limited to changing the group of folders and editing user roles for the group (or groups) that they administer. Group Admins cannot add or remove groups - a Database Admin is required to do this.
User Administration
User administration can only be performed by Database Admins.
Adding and Editing Users
Users must be added to your database via an appropriate SQL administration tool -- you may need to get your system administrator to do this. Users need to be created in the database and granted SELECT, UPDATE, INSERT and DELETE permissions. For information on how to do this, refer to the relevant database documentation.
Users will not be automatically added to the underlying database if you add them in Geneious via Administration → Add New User. This option is useful if you want to set up Group roles for a user before they have logged in for the first time, or before your system administrator has created the user in the underlying database.
Once a user has logged in for the first time, you can edit their group roles and primary group via Administration → Edit User. See Groups and Roles for more information.
Removing Users
Users can be removed from the Geneious Shared Database by going to Administration → Remove Users. This will delete the user's Geneious Shared Database account, but will not remove the user from the database (the user can log in again after being removed, which will register a new Geneious Shared Database account for them in the Shared Database).
When a user is removed, any folders or data that they have added to the shared database will remain. Any groups that the user is the sole member of will also remain, and will be accessible by Database Admins.
Groups and Roles
Groups and Roles are used to manage the sharing of documents in your Shared Database. Documents can be shared with all database users, private to an individual, or shared with a subset of users, and users can be given read or write access to documents as required. This is achieved by creating a Group in which users have the appropriate Roles, and assigning folders to that group.
By default there is only one group, the Everybody group, and all folders are assigned to this group, for which all users have edit permission. If you want to manage access to documents, then additional groups with specified users can be added by a Database Admin. Once a group is created, Group Admins can be added who can manage the group and edit roles for users already in the group.
Adding and Removing Groups
Groups can be set up in the Geneious Prime interface as follows.
-
Right-click on the Shared Database root folder, go to Administration → Add Group
-
Enter a name for your Group and add the users you want to assign to that group. Group members must be assigned ADMIN, EDIT, or VIEW permissions.
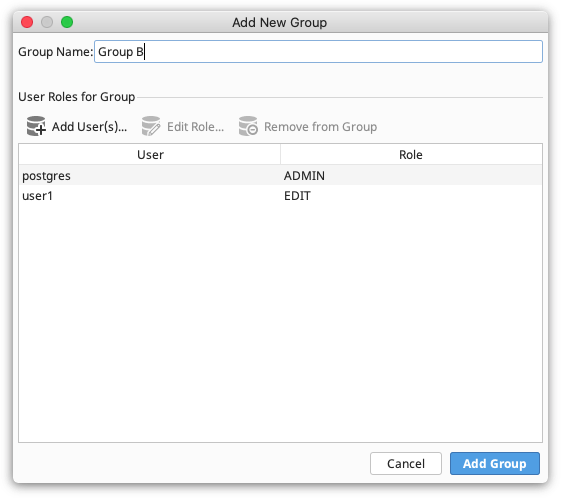
Note that only a Database Admin can create new groups.
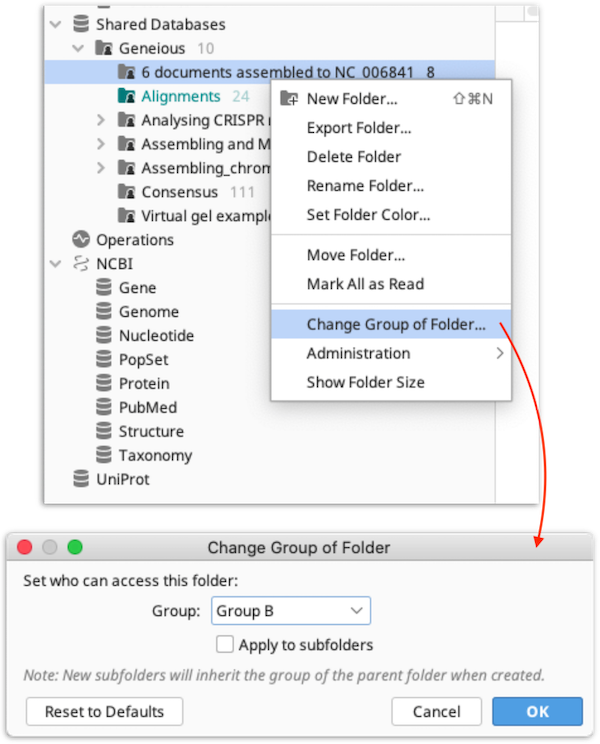
Once a group has been created, folders can be added to that group by right clicking on the folder and selecting Change Group of Folder. To do so, a user must have the ADMIN role for both the current and new group.
To remove a group, you must first ensure the group has no folders associated with it, then right click on any folder in the shared database, click on Administration→ Remove Groups and select the group/s you wish to remove. Groups can only be removed by Database Admins.
User Roles for Groups
User Roles for a group specify the access level that each user has for the folders (and thus documents) in that group. Users can belong to any number of groups and can have a different role within each group.
The three roles are:
VIEW: allows the user to view the contents of folders.
EDIT: allows the user to view and edit the contents of folders.
ADMIN: allows the user to view and edit the contents of folders, and to manage folders and user roles for that group.
If a user is not in the group of a folder, they will not be able to access the documents in that folder. Inaccessible folders will either be hidden or will display a red circle with a white bar on the folder icon, depending on whether the Show Inaccessible Folders option (accessed by right clicking on the root folder) is selected.
Everybody Group
The Everybody Group is a group to which all users have at least EDIT access. This group is automatically created when the Shared Database is initially set up.
The Everybody Group behaves differently from user-created groups in the following ways:
-
Group Admins of the Everybody Group are always Database Admins.
-
The Everybody Group can never be deleted
-
All users must have EDIT access
-
The root folder always belongs to this group and cannot be changed
User's Primary Group
The user's Primary Group specifies the group for new folders that are created on the root folder of the shared database. By default, a user's Primary Group is the Everybody group. A user's Primary Group can be changed by a Database Admin, by right clicking on any folder, clicking on Administration → Edit Users and selecting the user to configure.
To be able to move folders out of their Primary Group, a user must either have ADMIN permission for their Primary Group.
Assigning Folders to Groups
Each folder in a Shared Database belongs to a Group, which defines the users who can access the documents within that folder, and their access permissions. Any number of users can be added to a group.
When a new folder is created in the shared database it will be added to a group as follows:
-
If it is created in the root folder of the Shared Database, the new folder will be added to the current user's Primary Group (by default this is the Everybody group).
-
If it is a subfolder (i.e the new folder's parent is not the root folder of the shared database), the new folder will be added to the same group as the parent folder.
Once a folder has been created, its group can be changed by right clicking on the folder and selecting Change Group of Folder. Only Admins can change the group of a folder.
Geneious Server Database
Geneious Server Database provides a synchronized storage location for Geneious data accessible by multiple concurrent users, with a greater level of control and increased security for data access for your organisation. This feature is available to customers who have purchased a license for Geneious Server Database in addition to Geneious Prime.
Geneious Server Database is installed on a dedicated server and can be configured to utilise existing authentication infrastructure such as LDAP to secure your data and simplify account management. It provides increased security over the regular Shared Database by restricting communication and preventing access to the underlying SQL database.
Once set up, users can connect to Geneious Server Database from Geneious Prime and use it in the same way as the local database. Folders added to Geneious Server Database will be private to the current user by default, but this can be configured by the Database Admin/s. Sharing of folders can be controlled by setting user Roles, which grant users permission to View, Edit or Administer a Group. Database Admins can choose whether Groups may be created by all users, or only Admin users.
Setting up a Geneious Server Database
Instructions for setting up a Geneious Server Database are available in the Geneious Server Database Installation Manual, which is provided with your Server Database license.
Administration of Geneious Server Databases
This section relates to Administration of Geneious Server Database from within Geneious, including managing user access to folders and some database settings. For administration of licensing and user accounts via the Geneious Server Admin interface, refer to the Geneious Server Database Installation Manual.
Administration options within Geneious Prime are available in the Administration sub-menu (accessed by right-clicking any folder in the database), including options for managing database settings, adding and removing users and groups, and assigning groups and roles. The Administration options for Group management are available to all database users by default, but this can be restricted to Admins only via Administration → Set Who Can Manage Folders if preferred.
Admin Users
There are two types of Admin users in a Geneious Server Database: Database Admins and Group Admins.
Database Admins
Geneious Server Database can have one or more Database Admins, who are users with the ADMIN role in the Everybody group. This role should be assigned with great care, as Database Admins always have access to all folders and documents in the database (including documents in folders assigned to a user's Private Group).
A Database Admin can also manage the following database settings available via the Administration sub-menu (accessed by right clicking on the root folder of your Geneious Server Database):
-
Change Group for New Folders: This setting determines whether new folders created in the database root will be added to a user's Private Group (default) or to a user's Primary Group. A user's Primary Group is Everybody by default, which can be changed via Administration → Edit User.
-
Set Who Can Manage Groups: This setting determines whether groups can be created and removed by non-admin users (default), or only by Admins.
-
Root Folder Access: This setting determines whether documents can be saved directly in the root folder of the database, or must be saved in a subfolder (default). Folders can be added to the root folder of the database by all users irrespective of this setting.
-
Database Admins can also create new groups or users, and can modify and delete any existing users or groups. These options are also available to Group Admins, and depending on the database settings may also be available to regular database users.
If there are no Database Admins in your Geneious Server Database any user can set his or her self as Database Admin with the option Make the current user a Database Admin. This option is only available when there are no Database Admins. As Database Admins can access all folders in the database, it is important that the first Database Admin is set to the appropriate person as soon as possible.
Group Admins
Group Admins are users with the ADMIN role for a particular group, who can manage folders and user roles for that group. Group Admins can be added to a group when the Group is created, or later by anyone who is an Admin for that Group.
For a Geneious Server Database which has been set to only allow Groups to be managed by Admins, the first Group Admin for each group needs to be added by a Database Admin. This may be changed via Administration → Set Who Can Manage Groups, which by default allows all users to create groups. Note that irrespective of this setting Database Admins will always be able to access all data and reassign roles for all groups.
User Administration
The Administration sub-menu provides tools for adding, editing, and removing users. However, the Geneious Server system administrator first needs to add or remove users from the underlying database system. For example if LDAP is being used for authentication then the user must be added to or removed from the LDAP directory. Refer to the Geneious Server Database Installation Manual for information about the Geneious Server Admin interface and adding users.
Adding Users
If the server is configured to use database authentication, users can be added to your Geneious Server Database either by going to Administration → Add New User, or via the Geneious Server Database Admin interface.
For all other methods of authentication you must add users in the underlying system. In this case, it is also possible to register a user in Geneious Prime using Add New User before they are added to the underlying database system. This might be useful if you want to set up Group roles for a user before your system administrator has created the user in the underlying database. Note that if you do this, the user will only be able to log in to Geneious once they have been added to the underlying database system.
Editing Users
Database Admins can change the Group roles for a user, or set the user's Primary Groups in Administration → Edit User. Group Admins may access Edit User for users who are members of the Groups that they Administer, and may edit the user's Roles for those groups. See Groups and Roles for further details.
Removing Users
If the server is configured to use database authentication, users can be removed from your Geneious Server Database either by going to Administration → Remove Users, or via the Geneious Server Admin interface. For all other methods of authentication you must remove users in the underlying system first.
To remove a user from a Geneious Server Database, folders associated with their Private Group must first be removed or moved to a different group, as the Private Group will be removed along with the user. Since groups cannot be removed when they have folder's associated with them, attempts to remove the user will fail if any folder's remain in their Private Group.
Any user-created groups that the user is the sole member of will remain in the database and will be accessible by Database Admins. Additionally, any folders or data that a user has added to your Geneious Server Database will remain after the user has been removed.
Groups and Roles
Groups and Roles are used to manage the sharing of documents in your shared database. Documents can be shared with all database users, private to an individual, or shared with a subset of users, and users can be given VIEW or EDIT access to documents as required. This is achieved by creating a Group in which users have the appropriate Roles, and assigning a folder to that Group.
The default groups in Geneious Server Database are the Everybody group, for which all users have EDIT permission, and a Private Group for each user. If you want to manage access to documents, then additional groups with specified users can be added.
Adding and Removing Groups
Groups can be set up in the Geneious Prime interface as follows:
-
Right-click on any Shared Database folder, go to Administration → Add Group
-
Enter a name for the Group and add the users you want to assign to that group. Group members must be assigned ADMIN, EDIT, or VIEW rights.
Who can add new groups to your database depends on the setting of Administration → Set Who Can Manage Folders:
-
If all users may manage groups (default), then any user may create a new group.
-
If managing groups is restricted to Admin users, then only Database Admins may create new groups.
Once a group has been created folders can be added to that group by right clicking on the folder and selecting Change Group of Folder. This option is only available if you have permission to change the group of a particular folder.
To remove a group, you must first ensure the group has no folders associated with it, then right click on any folder in the shared database, click on Administration → Remove Groups and select the group(s) you wish to remove. You must be a Group Admin to remove a group.
User Roles for Groups
User Roles for a group specify the access level that each user has for the folders (and thus documents) in that group. Users can belong to any number of groups and can have different roles in each group.
The three roles are:
VIEW: allows the user to view the contents of folders.
EDIT: allows the user to view and edit the contents of folders.
ADMIN: allows the user to view and edit the contents of folders, and to manage folders and user roles for that group.
If a user is not in the group assigned to a folder, they will not be able to access the documents in that folder and any folders in that group will not be visible for that user.
Everybody Group
The Everybody Group is a group to which all users have at least EDIT access. This group is automatically created when the Shared Database is initially set up.
The Everybody Group behaves differently from user-created groups in the following ways:
-
Group Admins of the Everybody Group are always Database Admins.
-
The Everybody Group can never be deleted
-
All users must have EDIT access
-
The root folder always belongs to this group and cannot be changed
User's Private Group
A Private Group is created automatically for each user when the user is added to the Geneious Server Database. Each user is the sole member of their private group, and Group Admin for it. Note that Database Admins have access to the Private Groups of all users.
Private Groups are distinct from user-created groups in the following ways:
-
No other users can be added to a user's Private Group, such that documents and folders in a user's Private Group are never accessible to other regular users for the purpose of either viewing or editing (a folder in a Private Group can be moved to a different group if you wish to share it).
-
A user's role in their Private Group cannot be edited
-
Private Groups are created and deleted when the user is added or removed, and cannot be created or deleted any other way.
By default, new folders added to the root folder of a Shared Database will be added to the user's Private Group. This can be changed by a Database Admin by right clicking on any folder, clicking on Administration → Change Group for New Folders and selecting the option to use the user's Primary Group.
Note that a Private Group is distinct from a user-created group which contains a single user. Folders added to a user-created group with only one user in it will also be private to that user, until such time as other users are added, but adding additional users is possible and the group will behave like any other user-created group.
User's Primary Group
The user's Primary Group can be used to specify the group for new folders that are created on the root folder of the shared database. The alternative (default) option is to assign these folders to the user's Private Group.
To assign new folders created under the root to the user's Primary Group, go to Administration → Change Group for New folders, and set Assign folders created under the root to "User's primary group".
Each user can be assigned a Primary Group in Administration → Edit User. By default this will be the Everybody group but it can be set to any group, including the user's Private Group, by a Database Admin. To be able to move folders out of their Primary Group:
-
If all users can manage groups, a user must have the EDIT role for their Primary Group.
-
If only Admins can manage groups, a user must have ADMIN permission for their Primary Group.
Assigning Folders to Groups
Each folder in a Geneious Server Database belongs to a group, which defines the users who can access the documents within that folder, and their access permissions. User-created groups can include any number of users. Folders in a group that a user does not have permission to access will not be visible to that user.
When a new folder is created in the shared database it will be added to a group as follows:
-
If it is created in the root folder of the shared database, the new folder will be added to the current user's Private Group (default) or their Primary Group. This is configurable via Administration → Change Group for New folders.
-
If it is a subfolder (i.e. the new folder's parent is not the root folder of the shared database), the new folder will be added to the same group as the parent folder.
Once a folder has been created, its group can be changed by right-clicking on the folder and selecting Change Group of Folder. This option is only available for a folder if you have the correct permissions for the folder's current group, which will depend on the Administration sub-menu option to Set Who Can Manage Groups.
-
If all users may manage groups (default), then any user with EDIT access to the folder's current and new groups may change the group of a folder.
-
If managing groups is restricted to Admin users, then only users with the ADMIN role for the folder's current and new groups may change the group of a folder.
Backing up a Geneious Server Database
There are two parts to backing up a Geneious Server Database:
-
Backup the sql database using the standard backup procedure for your choice of SQL database. The default SQL database name is "geneiousserver" but the actual name used is specified in the database.properties configuration file found in
/home/HOSTNAME/.geneiousServerConfig/. -
Backup the following directory on the Geneious Server:
/home/HOSTNAME/.geneiousServerNN.Ndata, where "HOSTNAME" is the actual host name of the computer, and "NN.N" is the major and minor version number of Geneious Server, for example "2022.1" if running version 2022.1.1. This directory contains the contents of Geneious documents that are too large to store completely in the SQL database.
Audit Logging
Geneious Server Database empowers users to choose the level of access to grant to other members of their organization. In order to enable system administrators to monitor any changes made that can cause users to gain or lose access to data, Geneious Server Database records an audit log of relevant events:
-
Users or groups are added or deleted
-
Users are added to or removed from a group
-
Users' roles within a group change
-
Documents or folders are added, deleted, or moved
-
A folder is assigned to a different group
Audit logs can be found in /var/log/geneiousserver/GeneiousServerAccess.log.