Primers
Geneious Prime provides several operations for designing and working with PCR Primers and DNA or hybridisation probes. PCR Primers and DNA or hybridisation probes can be designed for or tested on existing nucleotide sequences or alignments. A PCR product can be extracted from a sequence that has been annotated with both a forward and a reverse primer. 5′ extensions consisting of restriction enzymes or arbitrary sequence may also be added to primer documents.
In addition, Geneious Prime can determine the primer characteristics for a primer sized sequence and convert it into a primer. Characteristics can also be determined for any number of primer sized selections made in the Sequence View.
To use any one of these primer operations simply select the appropriate nucleotide sequences and either select Primers from the Tools menu or right-click (Ctrl+click on Mac OS X) on the document(s) and select Primers. A popup menu will appear showing the operations valid for your current selection.
Design New Primers
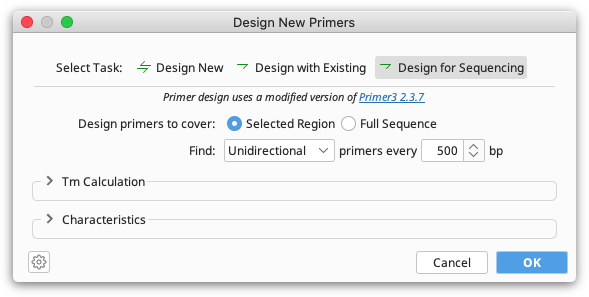
Geneious Prime uses Primer3 to design PCR primers. The Primer Design dialog allows you to set options for where your PCR primers should sit, what size product to return and characteristics such as primer length and melting temperature. In Geneious Prime 2023 onwards, primers can also be tested for specificity against an off-target database during primer design.
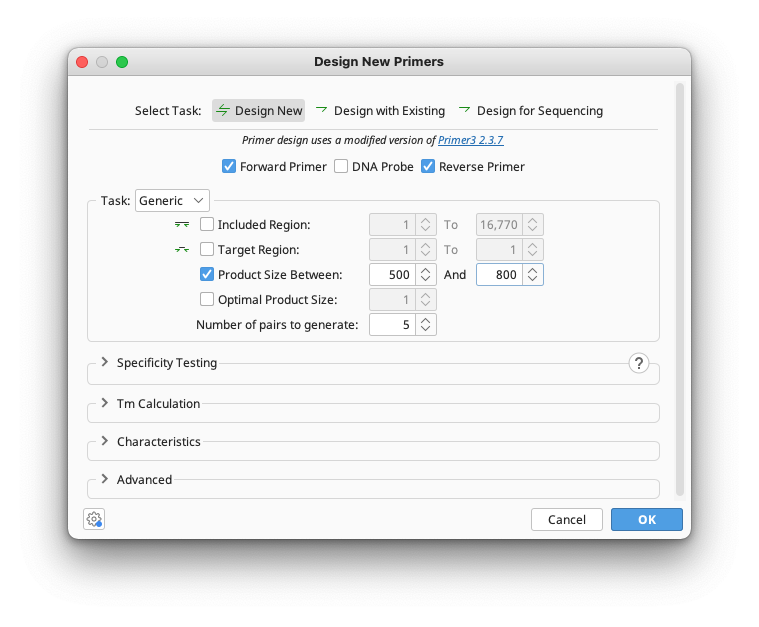
Three options are available for primer design: Design New, Design with Existing, or Design for Sequencing.
Design New designs a pair of forward and reverse primers. You can specify if you wish to design with or without a matching probe. Design with Existing can design a partner primer to match an existing one, for example a reverse primer for a forward or vice versa. It also allows you to design a probe to match a pair of primers. For both of these options, Generic or Cloning primers can be designed. Design for Sequencing allows you to tile primers across a sequence in one or both directions to facilitate Sanger sequencing of the selected molecule or region.
Generic primers
This option will design standard PCR primers according to the region input options you select. These options allow you to specify what part of a sequence you wish to amplify. Most options are optional and can be enabled or disabled with the associated check boxes beside them. If you have selected a region in the sequence before opening the primer dialog then this region will automatically be used for Included Region and Target Region. All of these are expressed in base pairs from the beginning of the sequence and are as follows:
-
Included Region: Specifies the region of the sequence within which primers are allowed to fall. This must surround the target region and allows you to choose a small region on either side of the target in which primers must lie.
-
Target Region: Specifies which region of the sequence you wish to amplify and unless the advanced options allow otherwise, the forward and reverse primers must fall somewhere outside this region.
-
Product Size: Specifies the range of sizes which the product of a primer pair can have. The product size is the distance in bp between the beginning of the forward primer to the end of the reverse primer.
-
Optimal Product Size: Specifies the preferred size of the product. Setting this will mean primer pairs that have a product size close to this will be chosen over those that do not. Warning: Setting these options can cause the primer design process to take considerably longer to complete.
The final option in this section is Number of Pairs to Generate which specifies how many candidate pairs of primers and DNA probes to generate and is compulsory. Setting this to 1 will give you only the primer pair which was considered best by the set parameters.
If you have chosen to return more than one pair of primers and you do not want the same primer used in different pairs, open the Characteristics panel and check Minimum Primer Distance. The number of bases specified here is the minimum distance between the 3′ ends of primers of the same direction in different pairs. If this is on but set to zero, Geneious will not limit primer distances but will try not to reuse the same primer in different pairs.
Cloning primers
To use this option, change the Task to Precise. This option allows you to design primers to amplify a specific region. Only the included region can be set, and the primers will be designed to the very ends of this region so that the entire region is included in the PCR product. This option is useful for amplifying an entire CDS for creating an insert for cloning.
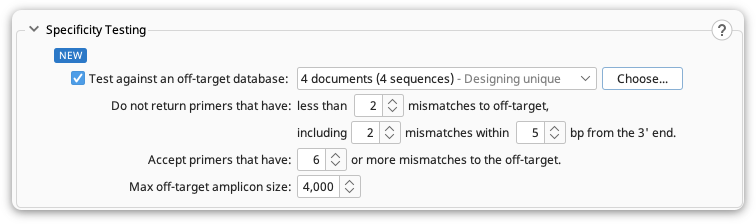
Specificity Testing
This option allows you to test how unique your primers are to your specified target sequence and confirm that they do not bind to specified off-target sequence(s). All generated primers are automatically checked for off-target binding against the input sequence.
This tool uses Geneious BLAST to detect and exclude areas of high similarity between your target and the selected off-target database. Primers are then designed on areas of low similarity according to the specified criteria. Primer Pairs are excluded only if both are able to bind an off-target sequence in the correct orientation.
Primers can be tested against a single sequence (including Alignments), lists of sequences, or a folder containing multiple sequences. Additionally, you can use this option to test against "External sequences".
The following options can be used to specify the criteria for the resulting primers :
Do not return primers that have : this option enables you to ignore primer pairs that have less than the specified number of mismatches between the primers and the off-target sequence(s). More mismatches (especially those towards 3' end, resulting in decreased PCR efficiency) between primers and off-targets, equals greater specificity between the primer pair and your target. You can also limit the proximity of mismatches to the 3’ end of your off-target sequence(s).
Accept primers that have : this options enables you to return primers that have equal or more mismatches (than the specified value) to the off-target sequence(s). More mismatches would result in less annealing of your primers to the off target sites during PCR.
Max off-target amplicon size : This specifies the maximum amplicon size. The Off-target primer pairs that result in amplicon sizes larger than specified value are considered as target primer candidates due to the decreasing efficiency of PCR as the amplicon size increases.
Tm calculation
Tm estimates generated by Primer3
This section provides references for formulas used by Primer3 to calculate melting temperatures for the binding region of a primer. Under Formula you can choose between two different tables of thermodynamic parameters and methods for melting temperature calculation:
-
Breslauer et al. 1986. This is used by old versions of Primer3 (until version 1.0.1), and uses the formula for melting temperature calculation suggested by Rychlik et al. 1990.
-
SantaLucia 1998. This is the recommended value.
Three different Salt Correction Formula options are available:
-
Schildkraut and Lifson 1965 . This is used by old versions of Primer3 (until version 1.0.1)
-
SantaLucia 1998. This is the recommended value.
Rough Tm
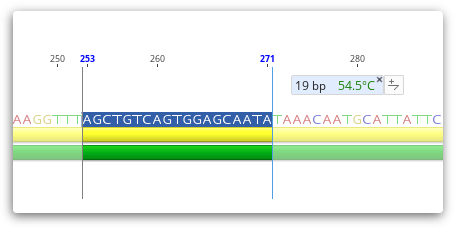
The rough Tm of a selected region of sequence is dynamically calculated and displayed in the Statistics Tab in the Viewer side panel, and is calculated as per the formulas shown for rough Tm in the General Statistics section. The rough Tm is usually within 1-3 of that calculated by Primer3.
If you select a region of sequence less than 100 bp in length, then the Rough Tm will be displayed as a tooltip as shown below.
Characteristics
The Characteristics section allows you to set absolute limits on properties of primers and probes such as melting point and GC content. Optimum values can also be specified. For details on individual options hover your mouse over them and a popup box will describe the function of the option.

Characteristics can be set for either Primers or DNA Probes, depending on the task you have chosen. The Primer section is available if one of Forward Primer or Reverse Primer is being designed or tested and DNA Probe is available if a DNA Probe is being designed or tested. These two sections are quite similar; the DNA probe section has a subset of the options available in the primer section. This is because primers are usually chosen in pairs and so several options can be set for how pairs are chosen.
Primer Picking Weights
At the bottom of the Characteristics panel there is a Primer Picking Weights button. Clicking this brings up a second dialog containing many more options. The purpose of all of these options is to allow you to assign penalty weights to each of the parameters you can set in the options. The weight specified here determines how much of a penalty primers and probes get when they do not match the optimal options. The higher the value the less likely a primer or probe will be chosen if it does not meet the optimal value.
Some of the weights allow you to specify a "Less Than" and "Greater Than". This is for options which allow you to specify an optimum score such as GC content. These weights are used when looking at primers whose value for this option falls below and above the optimum respectively. The other weights are applied no matter in which direction they vary.
For details on individual options in the Primer Picking Weights dialog, again hover your mouse over the option to see a short description.
Degenerate Primer Design
A degenerate primer contains a mix of bases at one or more sites. They are useful when you only have the protein sequence of your gene of interest so want to allow for the degeneracy in the genetic code, or when you want to isolate similar genes from a variety of species where the primer binding sites may not be identical. You can design degenerate primers by using either a sequence containing ambiguous bases or an alignment as the template and checking the Allow degeneracy box. The degeneracy value that you specify is the maximum number of primers that any primer sequence is allowed to represent. For example, a primer which contains the nucleotide character N once (and no other ambiguities) has a degeneracy of 4 because N represents the four bases A,C,G and T. A primer that contains an N and an R has degeneracy of 8 (4 x 2) because R represents the two bases A and G.
Adding Primer Extensions
Primer extensions can be added when the primer is designed under the Advanced options in Design New Primers.

5′ extensions can be arbitrary sequence, a restriction site, and/or Gateway cloning site. Multiple components can be added to an extension, and the preview window in the 5′ extension dialog shows how the extension components will be arranged on the primer. The components can be rearranged by dragging and dropping them in this window.
You can also add a primer extension to an existing oligonucleotide document by selecting Primers → Add 5′ Extension. For a primer annotated on a sequence, you can add an extension by selecting the primer annotation and using the "Edit Annotation" button in the sequence view or by double-clicking the annotation.
The 5′ extension sequence and annotations are visible on primer annotations in the sequence view. The extension sequence is also shown in the list of the annotation's properties in the Annotation Table. Tm, size and GC content values for the primer are shown with and without the extension, and all other values such as hairpin Tm and primer dimer Tm are calculated with the extension included. These values can be viewed by mousing over the primer annotation, or, for primers annotated on a sequence, by clicking Edit Annotation.
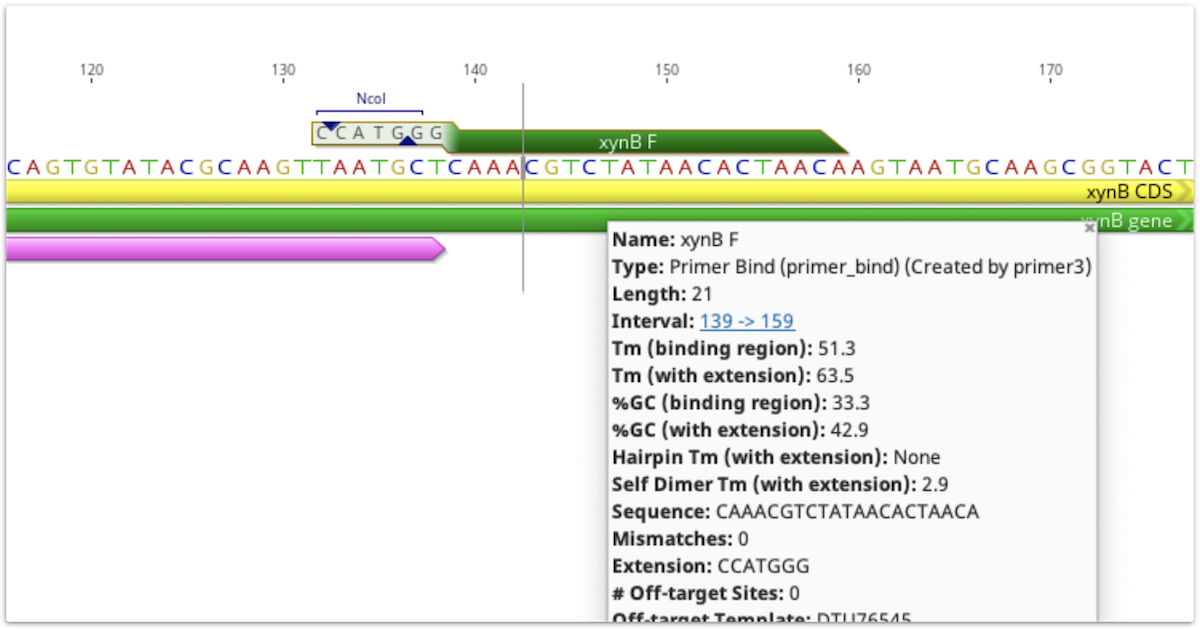
If a primer annotation is extracted to a separate document, the extension will be included. It is not covered by the binding region annotation, but may have its own annotations, as shown below.
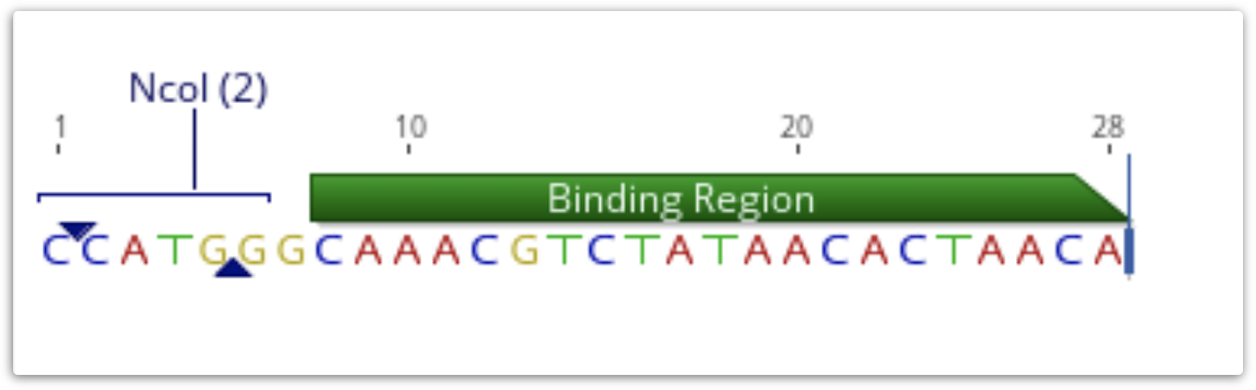
If a PCR product is extracted using this annotation, the result will include the extension. Extensions will be ignored when primer testing is conducted against potential target sequences.
Mispriming libraries
A mispriming library can be set under the Advanced tab in primer design. A mispriming library is a set of sequences (usually repeats) which the primers should not bind to. Four inbuilt libraries are available for selection, or you can upload a custom library of sequences in fasta format. For more information on the inbuilt libraries, see the Primer3 help page.
Alignment primer design
If you are designing primers off an alignment the primer will be designed on the consensus sequence by default. To design primers for every sequence in the alignment and have the primers annotated separately on each sequence or on a few selected sequences, choose Design primers on "Every Sequence", or "Selected Sequences" in the alignment options at the bottom of the Design New Primers window.

Batch Primer Design
Multiple primer pairs can be designed at once by selecting multiple regions within a single sequence and opening Design New Primers, selecting Design New or Design with Existing. When multiple regions are selected, a checkbox Use all selections will appear next to Target and Included regions (for Precise primer design, only Included region can be selected). Check this option for either Target or Included regions to design primers to all selected regions in one step.
Sequencing Primer Design
This option will design primers for Sanger sequencing, placing primers at a specified interval across a whole sequence or selected region. Choose Unidirectional if you wish to sequence with forward primers only. Choose Bidirectional to design forward and reverse primers that will enable recovery of double stranded sequence.
The specified interval is the distance from the 3′ end of one primer to the 3′ end of the next primer on the same strand. Primer3 will attempt to place primers within 20 bp of the specified distance, although this may not always be possible.
If a selected region is chosen for sequencing primer design, the first primer will be placed approximately 50 bp 5′ to the selection if there is enough flanking sequence to do so. If there is no sequence upstream of the selection the first primer is placed as close to the beginning of the selection as possible.
If designing bidirectional primers, the minimum distance from the 3′ end of the fwd primer to the 3′ end of the next primer on the reverse strand is 20 bp.
Output from Primer Design
Once the task and options have been set, click the OK button to design the primers. A progress bar may appear for a short time while the process completes. When complete, primers and probes will be added as annotations on the sequences. The annotations will be labelled with the base number the primer starts at, followed by either F (forward primer), R (reverse primer), or P (probe). Primers will be coloured green and probes red.
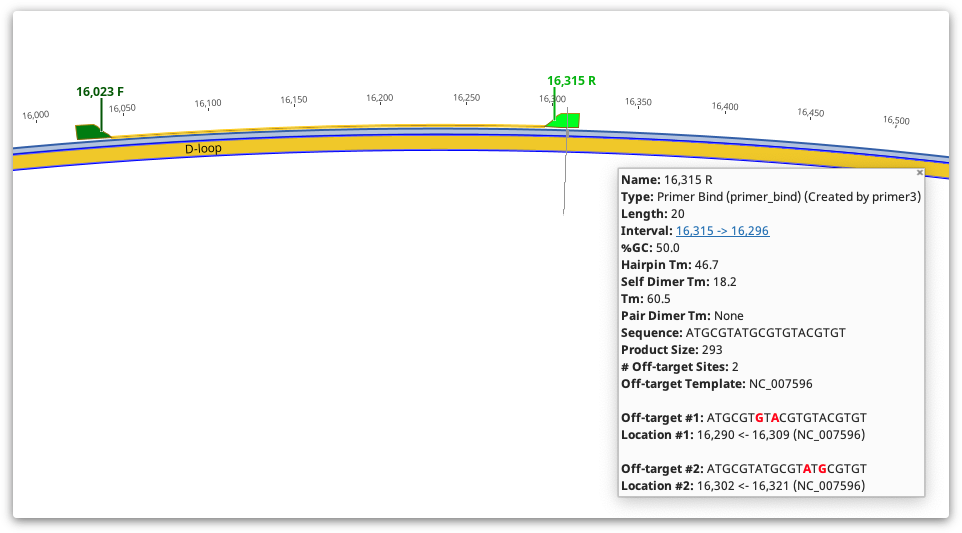
Detailed information such as melting point, tendency to form primer-dimers and GC content can be seen by hovering the mouse over the primer annotation. The information will be presented in a popup box. Alternatively, double clicking on an annotation will display its details in the annotation editing dialog. The table below shows how the values in the Geneious primer annotation map to the original Primer3 values. Note that in Geneious Prime 2020 onwards, for primers with 5′ extensions the primer length, Tm and %GC is calculated both with and without the extension. All other values including hairpin and self dimer Tm are calculated with extension included.
In Geneious Prime 2019.1 onwards, the primer annotation includes a list of Off-target sites for that primer, including their location and sequence. These are putative non-specific primer binding sites identified on the sequence that was used for primer design. The entire sequence will be searched for off-target sites, even if only a selected region is chosen for primer design. An off-target site will be listed if it has no mismatches to the first four 3′ bases of the primer, and less than 10% mismatches with the primer overall. Mismatches between the primer and off-target will be shown in red.
The best way to save a primer or DNA probe for further testing or use is to select the annotation for that primer and click the Extract button in the sequence viewer. This will generate a separate, short sequence document in oligo format which just contains the primer sequence and the annotation (which contains the primer characteristics). In the case of the reverse primer it will automatically be reverse complemented.
To delete primers that you don't want, just select the primer annotation and click the Delete button. You will then be given the option to delete the pair of that primer at the same time.
Geneious primer characteristics and their Primer3 counterparts
| Geneious Primer Characteristics | Primer3 Web Interface | Primer3 Command Line |
|---|---|---|
| %GC | Primer GC% | PRIMER_{LEFT,RIGHT}_GC_PERCENT |
| Tm | Primer Tm | PRIMER_{LEFT,RIGHT}_TM |
| Hairpin | Max Self Complementarity (Any) | PRIMER_{LEFT,RIGHT,INTERNAL_OLIGO}_SELF_ANY |
| Primer-Dimer | Max 3$^\prime$ Self Complementarity | PRIMER_{LEFT,RIGHT,INTERNAL_OLIGO}_SELF_END |
| Monovalent Salt Concentration | Conc. of monovalent cations | PRIMER_SALT_CONC |
| Divalent Salt Concentration | Concentration of divalent cations | PRIMER_DIVALENT_CONC |
| DNTP Concentration | Concentration of dNTPs | PRIMER_DNTP_CONC |
| Sequence | Seq | PRIMER_{LEFT,RIGHT}_SEQUENCE |
| Product Size | Product Size Ranges | PRIMER_PRODUCT_SIZE |
| Pair Hairpin | PAIR ANY COMPL | PRIMER_PAIR_COMPL_ANY |
| Pair Primer-Dimer | PAIR 3$^\prime$ COMPL | PRIMER_PAIR_COMPL_END |
| Pair Tm Diff | Max Tm Difference | PRIMER_PRODUCT_TM_OLIGO_TM_DIFF |
When no primers can be found
If no primers or DNA probes that match the specified criteria can be found in one or more of the sequences then a dialog is shown describing how many had no matches and for what reasons.
To see why no primers or DNA probes were found for particular sequences, click the 'Details' button at the bottom of the dialog. The dialog will then open out to display a list of all the sequences for which no primers or DNA probes were found. For each of the sequences the following information is listed:
-
Which of Forward Primer, Reverse Primer, Primer Pair and/or DNA Probe could not be found in the sequence
-
For each of these, specific reasons for rejection are listed (eg. "Tm too high" or "Unacceptable product size") along with a percentage which expresses how many of the candidate primers or probes were rejected for this reason.
After examining the details you can choose take no action or continue and annotate the primer and/or DNA probes on the sequences which were successfully designed for.
Manual primer design
It is possible to create PCR primers by adding a primer annotation directly onto a sequence. This is especially useful for cloning applications as generally the primers must bind to a specified set of bases at the beginning and end of the gene to be cloned. To manually add a primer, select the region of sequence where you wish the primer to bind. You will see a selection hint with the length and rough Tm of the selection, and an  Add Primer button.
Once satisfied with the position and Tm of the selection then you can click the Add Primer button to open the Add Annotation dialog. The Add Annotation dialog will open with settings appropriate for creation of a new primer.
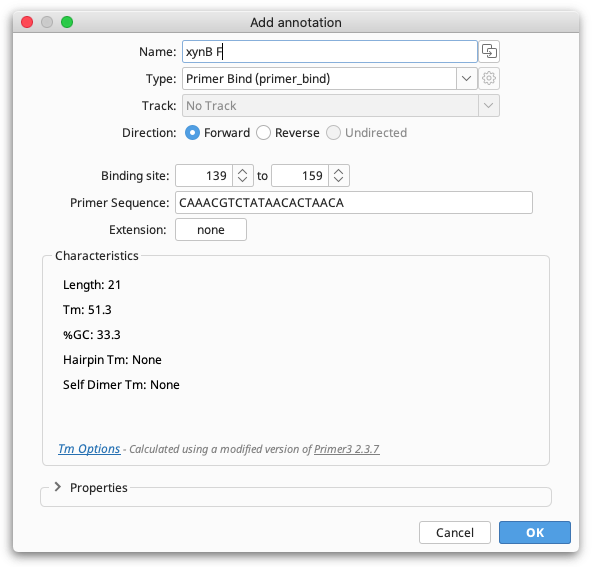
You can then give the primer a name, set the primer direction and, if required, add an extension. Changing the primer binding site position in the Add annotation window will automatically update the primer sequence and characteristics. A 5′ extension can also be added directly onto a primer in this step by clicking the button next to "Extension".
Manually pairing primers
If you have added your primers to a sequence using the manual selection method described above, or you have run Add Primers to Sequence or Test with Saved Primers without checking "pairs only", then your primers will be annotated on the sequence as individual primers, rather than associated with their pair. To pair individual primers after they are annotated, select both primers using cntrl/command-click, then right-click on one of primers and select Manually pair primers.
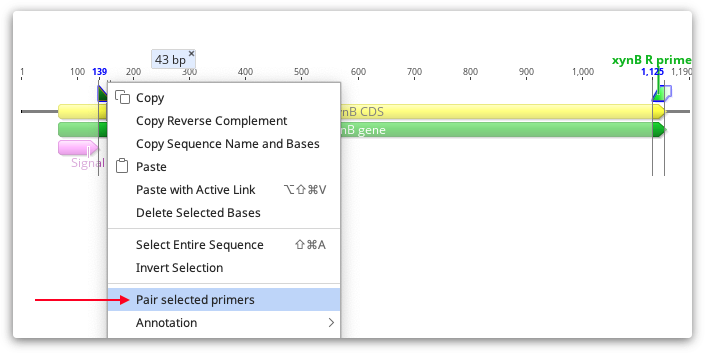
You should then see a line linking the F and R primer, and pair characteristics (Pair dimer Tm and product size) will be added to both primer annotations.
Importing primers from a spreadsheet
You can import primers and probes directly into Geneious Prime from spreadsheet documents in either comma-separated (.csv), tab-separated (.tsv) or native Excel (.xlsx or .xls) format. You can either import them from the Import → From File menu, drag and drop the file in, or simply paste the contents of the document into Geneious Prime.
When Geneious Prime has successfully recognized the file format, you will see the following dialogue:
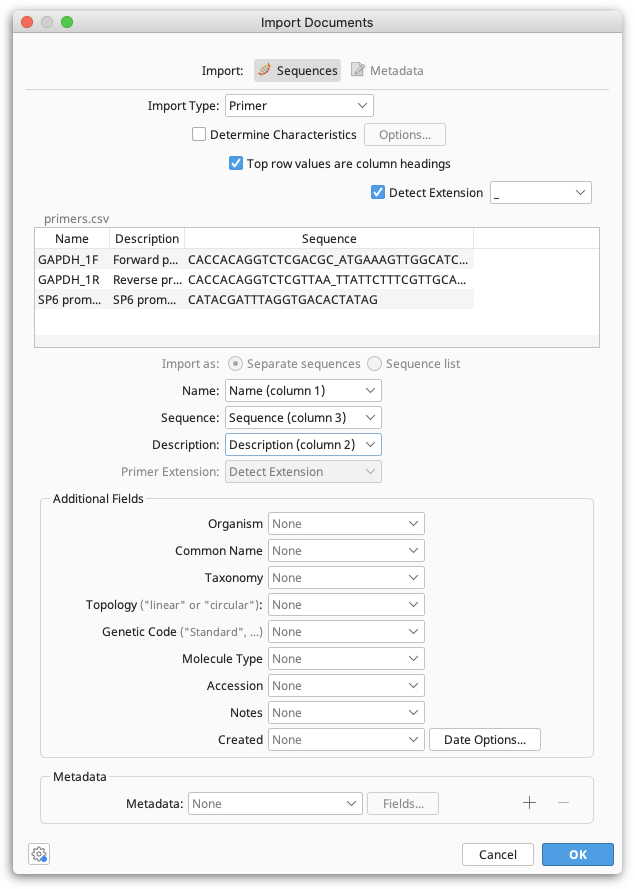
When the import type is set to Primer or Probe you can optionally choose to determine their Characteristics such as Tm on import.
Immediately below this is a preview of the first few rows of data, and a checkbox that allows you to specify that the top row is a heading row and should be ignored.
Below the preview is a list of common and additional fields, along with dropdown boxes. These boxes allow you to specify which column contains which piece of data. Often, one or more of these won't be applicable and can be left as None. Note that at minimum, you must specify a Sequence field.
Primer Extensions can either be specified in a separate column in your file, or can be denoted by a delimiter in the sequence such as an underscore, dash or a change in case. If your extensions are denoted by a delimiter in the sequence, tick "Detect Extension" and specify what delimiter is used. If your extensions are in a separate column, set this column as the Primer Extension field.
Lastly, any add additional data in the form of meta-data. Clicking the dropdown box next to Meta Data at the bottom of the dialog will allow you to import values to meta-data, and clicking the + or — will allow you to insert or remove additional meta-data types. Next, click the Fields... button to bring up a dialog.
An additional set of dropdown boxes will allow you to specify again which columns of data contain the fields which comprise this meta-data type. This includes custom meta-data types that you have created and saved in the past.
When you're ready, hit OK to begin importing. When the import is complete, you may be presented with the option of grouping the sequences you imported into a sequence list. This option is recommended if you're importing very large sets of sequences.
Primer Database
The Primer Database consists of all the oligonucleotide documents that exist in your Local or Shared Databases. The oligonucleotide document type is a short nucleotide sequence representing either a primer or a probe. The text view lists the primer characteristics (Tm, GC etc). These properties can be shown in the document table. Tm is shown by default, but you can turn on others by right clicking on the table header.
Oligo documents are created via one of the following methods:
-
Extract a primer/probe annotation from a sequence
-
Select Sequence → New Sequence from the menu and choose Primer or Probe as the type of the new sequence
-
Select one or more existing primer sequences that are in nucleotide format (maybe ones imported from a file) then click Primers → Convert to Oligo to transform them into oligo type sequences
-
Import primer sequences from a comma separated file (.csv) and choose Primer or Probe as the sequence type.
-
Use Add Primers to Sequence to test primers not currently in your database against a sequence. If a match is found and Extract primers to folder is selected, the oligo document will be added to the database.
If you select a target sequence and go to Test with Saved Primers or Design Primers → Design With Existing, Geneious will find all oligo sequences in your database and offer them as options in the list of oligo sequences. There is no need to select them along with the target sequence before starting the operation.
The meta-data type Primer Info can be used to note the fridge location etc of a particular primer.
Test with Saved Primers
Primers and probes can also be quickly tested against large numbers of sequences to see which ones the primers will bind to. Primers can be tested against a single selection on a sequence, against the whole sequence or against multiple entire sequences at once. To test primers, select one or more target sequences then choose Primers → Test with Saved Primers.
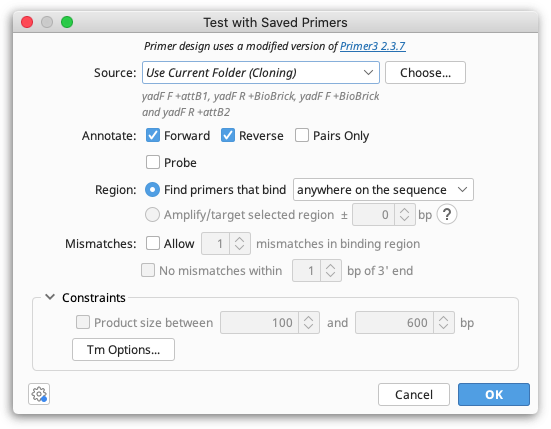
The Source option specifies which primers will be considered for testing on the selected sequence. To test all primers in your local database, choose All Folders. If you select Current Folder, all primers in the same folder(s) as the selected sequence will be tested. Click the Choose button to select any other folder in your local or shared database that contains primers or probes to test.
With Annotate you can limit the primers to a certain direction (relative to the direction of the currently selected sequence). If Pairs Only is selected, inward-directed forward and reverse pairs of primers will be annotated, and the option to limit the Product Size (in the Constraints section) will be enabled. The Pairs Only option normally produces many more annotations, as most primers will be annotated as part of multiple pairs, with all valid partners. If you select the Probe checkbox, oligonucleotide sequences of type "Probe" will be tested (you can create probes when you add a new sequence manually or by running "Convert to Oligo" on a nucleotide document).
The Region allows you to choose whether to find primers that bind either anywhere on the sequence or inside the selected region(s) (only enabled if you have selected one or more regions on the sequence you're testing primers with). Alternatively, if you want to test whether your primers will amplify a selected region by binding within a specified number of bases upstream or downstream of the selection, you can select Amplify/target selected region. This is only available if both Forward and Reverse primers are selected in the Annotate options. Click the "?" button for more explanation on using the Amplify/target selected region option.
By default, only primers that match the target sequence exactly will be found. If you wish to allow a limited number of mismatches between the primer and target sequence you can specify this under Mismatches, where you can also limit the proximity of mismatches to the 3′ end of the binding site.
Expand the Constraints section in order to limit the Product size range (available if both Forward and Reverse are checked in the Annotate options) or to specify the characteristics used for binding site Tm calculation (by clicking the "Tm Options" button).
Click OK to begin testing primers. Once complete, any primers matching your specified criteria will be annotated on the sequence. If you chose to test the primers as pairs, they will be annotated as pairs on the sequence, with a connecting line between the pairs. The number of matching primers found will be displayed briefly in the status bar below the sequence view.
When testing primers Geneious will automatically check the entire template for other binding sites, even if only a selected region of the sequence is chosen for testing primers on. If a non-specific binding site is found, the details will be listed on the primer annotation under Off-target sites. As with Design New Primers, an off-target site will be listed if it has no mismatches to the first four 3' bases of the primer, and less than 10% mismatches with the primer overall. Mismatches between the primer and off-target will be shown in red.
Add Primers to Sequence
If you have primer sequences you'd like to test against a sequence but you don't have the primer documents in your database already, you can use Add Primers to Sequence. This lets you enter a Name and Sequence for one or more primers, and gives you some basic options for testing. You can test multiple primers by adding more rows via the + buttons on the side.
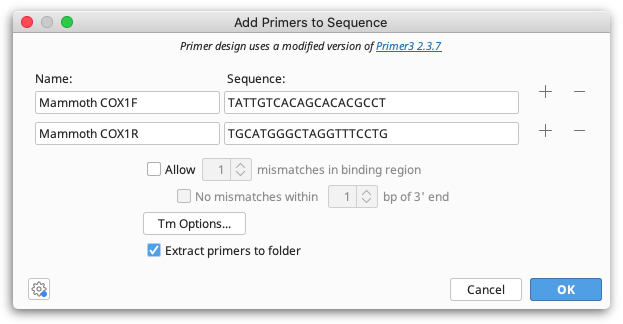
Up to ten previously entered primer names and sequences are remembered in the corresponding fields to make it easier using the same primer again.
All specified primers that bind the selected sequence will be annotated on the sequence, as well as mismatch annotations, as appropriate. Geneious will automatically check the entire template for other binding sites, if any are found they will be annotated on the primer under Off-target sites. If Extract primers to folder is selected, all annotated primers will also be saved as separate primer documents to the folder containing the selected sequence.
Characteristics for Selection
The Characteristics for Selection option will determine the primer characteristics of a selection of sequence within a larger sequence. Select a region of 60bp or less in the Sequence View and choose Primers → Characteristics for Selection. The primer characteristics will then be added as an annotation over the exact region that was selected. This will also work on multiple selected regions in the Sequence View. Hold the Ctrl key while clicking and dragging to select multiple regions simultaneously.
Convert to Oligo
Geneious Prime can convert nucleotide sequences into primers. This is necessary for sequences to show up in the oligo database. To do this, select your sequences and choose Primers → Convert to Oligo from the popup menu that appears. Convert to Oligo can only be performed on sequences less than 400 bp long, and full characteristics (such as primer dimer and hairpin Tms) can only be calculated for primers 60bp or less.
Extract PCR Product
Once primers are annotated on a sequence, the resulting PCR product can be extracted by selecting Primers → Extract PCR Product. If only a single pair of primers are annotated on a sequence then these will automatically be chosen as the Forward and Reverse primer. If multiple primers are annotated on a sequence, then the drop down menus allow you to choose which primers to use for extracting a single PCR product, or alternatively you can choose to Extract PCR products from all primers.
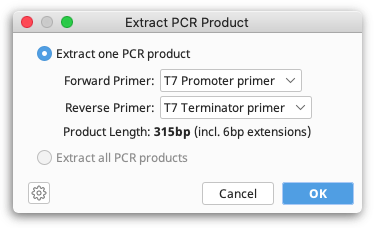
When you click OK a new sequence document is produced containing only the sequence spanning (and including) the PCR primers. Any 5′ extensions on the primers will also be included.
PCR products can also be extracted directly from the annotated sequence by selecting a forward and reverse pair of primers while holding down the shift key to select the sequence bounded by the primers. Then click the Extract button. You will be given the option to either extract the PCR product, or the Selected region. If PCR product is selected, the resulting product will include any 5′ extensions on the primers.
More Information
The Primer features in Geneious Prime are based on a modified version of the program Primer3 (http://bioinfo.ut.ee/primer3/).
Copyright (c) 1996,1997,1998,1999,2000,2001,2004 Whitehead Institute for Biomedical Research. All rights reserved.
A copy of the modified Primer3 source that Geneious Prime runs is distributed with the plugin.
If you use the primer design feature of Geneious Prime for publication we request that you cite Primer3 as:
Steve Rozen and Helen J. Skaletsky (2000) Primer3 on the WWW for general users and for biologist programmers. In: Krawetz S, Misener S (eds) Bioinformatics Methods and Protocols: Methods in Molecular Biology. Humana Press, Totowa, NJ, pp 365-386 Source code available at http://sourceforge.net/projects/primer3/.
Further information can be found in the primer3 documentation available here: http://primer3.ut.ee/primer3web_help.htm. Please note that some controls have been changed, renamed or removed from Geneious, but most of the primer3 functionality is available.