Managing Your Local Documents
Organizing your local documents
Geneious documents are stored in a hierarchal arrangement of folders under the Local folder in the Sources Panel. Clicking on a folder will display its contents in the Document Table. Next to each folder name in the hierarchy is the number of documents it contains. When the Local folder or a sub-folder is collapsed (minimized), the number next to the folder shows how many files are contained in that folder as well as all of its sub-folders. In addition, if some of the documents in a folder are unread, the number of unread documents will also appear in the brackets.
To create a new folder, select the Local folder or a sub-folder icon in the Sources panel and either right-click (Ctrl+click on Mac OS X) and select New folder from the popup menu, or go to File → New → Folder or Add → New Folder. This will open a dialog where you can name your new folder. This folder will then be created within the folder you originally selected.
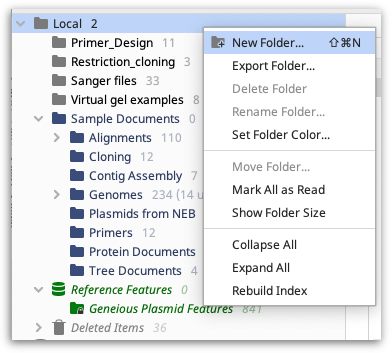
You can also delete, rename, move, export or change the color of a folder by right-clicking on the folder (or control-click on MacOSX) and selecting the option you require from the menu. These options are also available under the File menu.
Moving files around
Files can be moved between folders in a number of ways:
Drag and drop. This is quickest and easiest. Select the documents that you want to move. Then, while holding the mouse button down, drag them over to the desired folder and release. If you dragged documents from one local folder to another, this action will move the documents -- so that a copy of the document is not left in the original location. In external databases such as NCBI the documents will be copied, leaving one in its original location.
Drag and copy. While dragging a document over to your folder, hold the Ctrl key (Alt/Option key on Mac OS X) down. This places a copy of the document in the target folder while leaving a copy in the original location. This is useful if you want copies in different folders. Folders themselves can also be dragged and dropped to move them or instead copied by holding down Ctrl (Alt/Option on Mac OS X).
The Edit menu. Select the document and then open the Edit menu on the menu bar. Click on Cut (Ctrl+X/command+X), or Copy (Ctrl+C/command+C). Select the destination folder and Paste (Ctrl+V/command+V) the document into it.
Aliases
An Alias (AKA shortcut or symlink) is a lightweight document that references another document. By copying a document and using Edit → Paste Alias this allows you to effectively have the same document in multiple locations. Changes made to either the alias or the original (including setting the name of the alias) will modify the original version of the document.
You can also create an alias by dragging and dropping a document to another folder while holding down the Ctrl and Shift (Cmd and Alt on Mac OS X) keys.
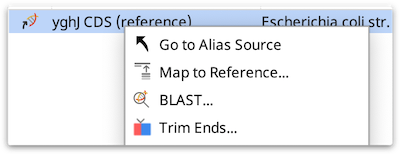
An alias appears in the document table with a little curved arrow on top of the normal document icon. To view the original that an alias was created from, right click and choose Go to Alias Source.
If you wish to turn an alias document into a full document and break the link to the original, select the alias go to File → Save As. This creates a new document from the alias.
Aliases have the following limitations:
-
When an alignment is built from an alias to a sequence, the sequences in the alignment will always refer back to the original sequence rather than the alias.
-
Aliases cannot be made between documents in different databases. (e.g. not between a shared database and your local documents)
Deleting Data and the Deleted Items folder
The Deleted Items folder is located underneath the local document folders in the Sources panel. When a folder or document is deleted, it is moved to the Deleted Items folder rather than erased immediately. This means the data can be recovered if it was deleted by mistake. Pressing the Delete key is the easiest way to move the selected folder or documents to the Deleted Items folder.
To recover documents or folders from Deleted Items you can either drag and drop them to another folder or use Restore from Deleted Items (Put Back from Deleted Items on Mac OS) in the File menu to automatically move them to folder they were deleted from.
The Deleted Items folder should be cleared periodically to keep hard drive space free. This can be done by selecting Erase All Deleted Items from the File menu. Geneious will warn you if the Deleted Items folder contains a large amount of data.
To erase a document immediately without moving it to Deleted Items, use Erase Document Permanently in the File menu (or press Shift+Delete).
Many of these actions can also be accessed by right clicking on a folder or document.
Adding note documents to folders
To create a notes file in your folder, click the Add button on the toolbar and select New Text Document or go to File → New → Text Document. This creates an empty text file in the document table, and the viewer below acts as a simple text editor where information can be typed in. To save the content you have entered, click Save.
Note documents can also be added by importing text or html files, using File → Import → Files.
Calculating folder size on disk
To calculate the size in MB of selected folders in your Sources panel, right-click on the folder and go to Show folder size. The size of the selected folder and all subfolders will be shown as a prefix to the folder name, and folders will automatically be sorted by decreasing size. Note that the size may include documents not visible in the folder. For example, referenced documents (e.g. sequences in alignments, or documents with aliases) are not removed from the database when deleted, until the documents which reference them are also deleted. The folder size will not automatically update with changes to folder contents and can be removed by unchecking Show Folder Size, or by restarting Geneious Prime.
Displaying the folder path
A navigation bar showing the file path to a selected document or folder can be optionally displayed above the Document Table. To turn on this feature, go to Tools→Preferences→Appearance and Behavior and select Show folder path. Elements in the path can be clicked to jump to that folder.
Searching and filtering documents and folders
Searching
The Geneious Prime database can be searched by entering the term you are looking for in the Search box at the top right of the tool bar.

The search field can be used to search for documents, folders and operations within Geneious.
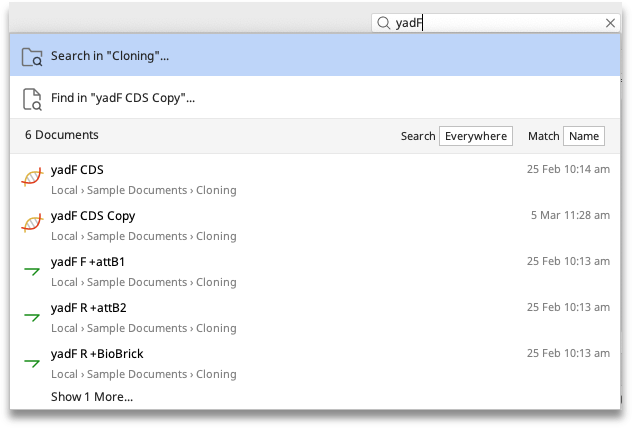
When the search field is selected, the search popup initially provides a list of recently browsed documents and folders for quick access. A timestamp will be shown to the right of each recent item, this represents the time this item was last opened. The search field can be opened at any time using the shortcut cmd/cntrl-shift-F.
As you enter the search query, matching results will be updated in real time. By default, all folders in both local and Shared databases will be searched. To restrict the document search results to the current folder, change the Search setting from "Everywhere" to "This folder". The Match option enables you to choose between searching all fields or just the document name. These settings will be remembered until either the search query is cleared or a highlighted item has been selected.
To filter the current folder according to your search query, just press enter after entering the query. This automatically opens the advanced search in the currently selected folder, and shows only matching documents in the table. For other filtering options, see Filtering.
If unexpected errors occur during the search process, an error status will be shown in red on the bottom of the popup. Click on Details for more information on the errors encountered. These should not be a common occurrence. If you experience errors consistently, consider contacting Support with the information in the error details dialog attached.
Advanced Search options
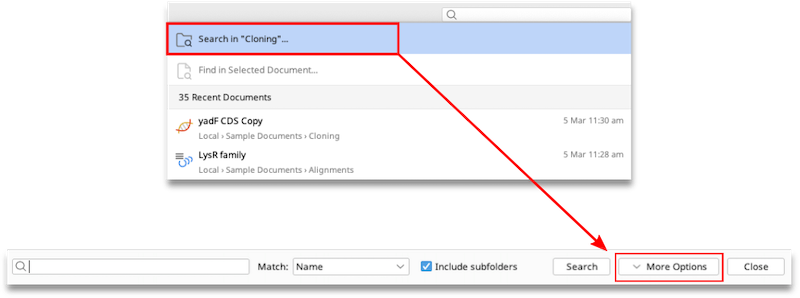
To search the selected folder with more filters, use the Search In "Selected Folder" search option, then click the More Options button.
The advanced search allows you to search for specific terms in specific fields of your documents. The fields available for a search can be found in the left-most drop-down box; all fields potentially available on your local documents are listed here. If you have defined a new type of meta-data in Geneious, and that meta-data field has been added to a document, then this field will also be available to search.
Advanced Search also provides you with a number of options for restricting the search on a field depending on the field you are searching against. For example, if you are using numbers to search for "Sequence length" or "No. of nodes" you can further restrict your search with the second drop-down box:
-
"is greater than" (>)
-
"is less than" (<)
-
"is greater than or equal to" (≥)
-
"is less than or equal to" (≤)
Likewise if you are searching on the "Creation Date" search field you have the following options
-
"is before or on"
-
"is after or on"
-
"is between"
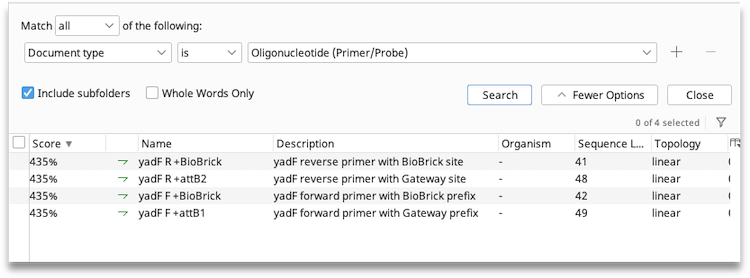
When searching your local folders you have the option of searching by "Document type". The second drop-down list provides the options "is" and "is not". The third drop-down lists the various types of documents that can be stored in Geneious such as "3D-Structure", "Nucleotide sequence", and "Oligonucleotide" .
And/Or searches
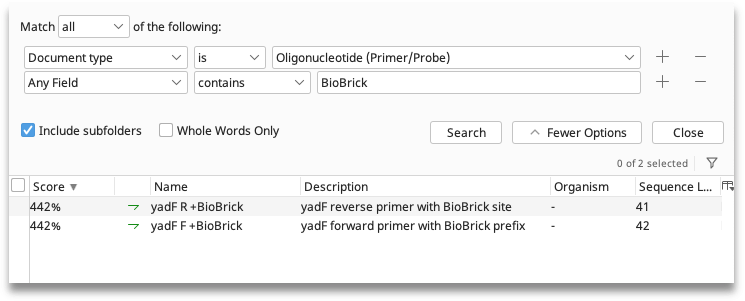
The advanced options lets you search using multiple criteria. By clicking the "+" button on right of the search term you can add another search criteria. You can remove search criteria by clicking on the appropriate "-" button. The "Match all/any of the following" option at the top of the search terms determines how these criteria are combined:
Match "Any" requires a match of one or more of your search criteria. This is a broad search and results in more matches.
Match "All" requires a match all of your search criteria. This is a narrow search and results in fewer matches.
Database searches and filtering (below) can also accept Boolean operators (AND, OR, NOT). Use these to broaden or limit your search. For example: (Type=CDS OR Type=gene) AND Name:yadF would include any annotation with a name that contains "yadF" and is either "CDS" or "gene" type annotation.
Filtering
Geneious Prime 2021.1 onwards includes a quick filter option above the document table. To use, click the filter icon and type in the text you are searching for. Geneious will display all documents in the table that match this text and hide all other documents. To go back to viewing all documents, clear or close the filter box.

This option can also be used for filtering on-the-fly while searching public databases such as NCBI. Type in the appropriate text in the filter box and only those documents that match both the original criteria (as specified by the search terms) and the filter text will be displayed.
Find in Document
The Find in Document option under the Edit menu allows you to search for a particular motif in your sequences, annotations or document names. For example, you can search for a particular string of nucleotides in sequences or alignments, or search for annotations and sequences by name or number. The search can optionally be made case sensitive. Matching regions are selected in the document at the end of the search.
The shortcut for this function is Ctrl+F. To find the next match for the text specified in the dialog you can use F3 or Ctrl+G, and to find the previous match use Ctrl+Shift+G or Shift+F3.
Nucleotide similarity searching and sorting
It is possible to search individual sequence documents not only for text occurrences but by similarity to sequence fragments. If you enter a nucleotide string 11 bp or longer, or an amino acid string 8 bases or longer into the Search Everywhere box the search mode will automatically change to Nucleotide or Protein similarity search.

The search locates documents containing a similar string of residues, and orders them in decreasing order of similarity to the string. The ordering is based on calculating an E-value for each match. The search does not work on sequence lists, alignment/assembly or tree documents.
Nucleotide and protein similarity searching can also be accessed via the Advanced Search by changing the "Match" field to Nucleotide or Protein similarity.
Similarity sorting
It is also possible to sort individual sequences documents in a given folder by their similarity. To use this function, select a single sequence in the document table and right-click, then choose Sort. Sort by similarity will rank all other sequences by their similarity to the selected sequence. The most similar sequence is placed at the top and the least similar sequence at the bottom. This also produces an E-value column describing how similar the sequences are to the selected one. The Remove Sort by Similarity option will remove the E-value column and return the table to its previous sorting.
Find Duplicates
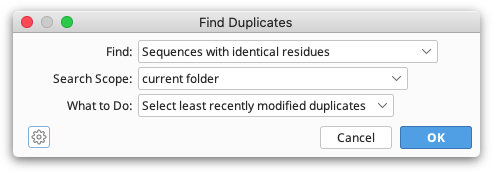
Find Duplicates, under the Edit menu, is used to identify duplicate copies of sequences and other documents. Duplicates can be identified by sequence name, database ID (e.g. accession) or by the residues/bases, and the Search Scope can be set so that it checks within either a selected set of documents, all documents in a folder or in the sequences of a single alignment or sequence list.
When searching for duplicates within sequences of a single alignment or sequence list, two options are available for displaying results once the search has run:
-
Select earlier duplicates in list: This will select all but one copy of a duplicated document, allowing the duplicates to easily be deleted or moved to another folder leaving one copy behind.
-
Extract unique sequences: Unique sequences will be extracted to a new sequence list, and the sequence names modified to show the duplicate count for that sequence. For large datasets, or removing duplicates in paired reads, or removing non-exact duplicates, see Remove Duplicate Reads using BBTools.
If you are searching for duplicates within a folder or multiple select documents, you can choose to select either the most recently or least recently modified copy.
Remove Duplicate Reads
For identifying non-exact duplicates, removing exact duplicates from large datasets, or removing duplicates on paired read datasets, use Remove Duplicate Reads... from the Sequence menu. This tool runs Dedupe from the BBTools suite.
For a detailed explanation of any Dedupe setting, hover the mouse over the setting, or click the help (question mark) button next to the custom options under More Options.
Batch Rename
Batch rename is located under the Edit menu and can be used to edit any field in multiple documents at once. It can also be used to batch edit any property of sequences within an alignment or sequence list.
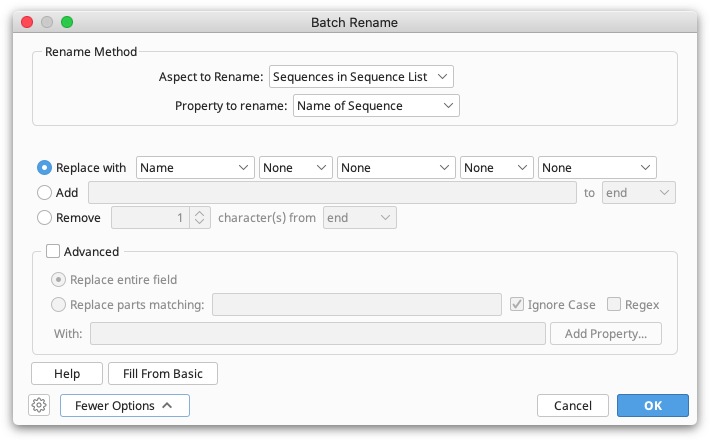
Existing fields can be replaced with a combination of values from other fields (e.g. Name replaced with Organism and/or Accession), and fixed text can be added to the beginning or end of existing fields.
The advanced options (under the More Options button) enables the use of regular expressions to replace a specific part of one field with another property or text string. Click the Help button in this section for more information on formatting expressions. It is also possible to batch rename from an Annotation name or property by selecting Add Property and choosing Annotation Name or Property.
Backing up your local documents
It is important to keep frequent back ups of your data because computers can fail suddenly and unexpectedly. A computer can be replaced, but your data is much harder to replace. The best way to back up all of your data and settings in Geneious Prime is to use the Geneious backup tool under File → Back Up Data.
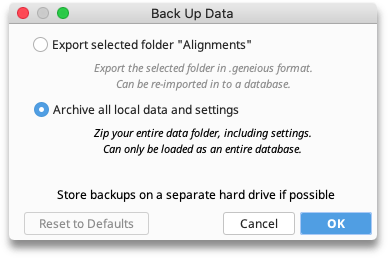
The back up command has two options:
-
Export selected folder: This will export the selected folder (including all subfolders) to a Geneious format file. This allows you to back up an individual project within your database. The backup can also be imported in to an existing database by drag and drop. If you have finished working on a project it is a good idea to back it up in this way then delete it from inside Geneious to keep the size of your database down and improve the performance of Geneious. You should keep archive backups in addition to these because this backup will miss your settings and data outside the selected folder.
-
Archive all data and settings: This is equivalent to creating a zip archive of your entire Geneious data directory which includes all your data, preferences, searches and agents. This option will cause Geneious to cease working on the local database while it creates the archive. This type of backup cannot be directly imported in to an existing database, when it is loaded everything in Geneious will revert to how it was when you took the backup.
Backups should be stored on another drive, or can be left to general system backups safely since they are made when Geneious is in a non-running state. These backups can also be safely moved around including to other machines.
Backing up your data directory manually is not recommended because the Geneious database structure is complex and many programs will fail to back it up properly. In addition, due to the way the local database works, it is important that Geneious is not accessing the database when a backup is taken. For example, Mac users with Time Machine will have backups taken during the day but if Geneious is running operations when those backups are taken, they may not be suitable for restoring from. However, backups taken overnight when Geneious isn't running should be fine.
Restoring a backup
-
Geneious format file: Files with the suffix .geneious can be imported like any other file type, either by dragging and dropping into your Geneious database or using the Import Files options in the Add or File menus. Alternatively you can use Restore Backup in the File menu and the file will be added under the Local folder in your current database.
-
Backup.zip file: This is an archive of all your data and settings and is an entire database in itself. These files cannot be imported into an existing Geneious database. To restore a backup.zip archive, go to File → Restore Backup and choose the backup.zip file you want to restore (do not unzip the file manually first). At the prompt, choose a new location to restore the backup to. This folder must either be empty, or must not currently exist on your drive (Geneious will create the folder as it restores the backup). After the backup has been extracted, Geneious will offer to load the restored data. If you choose not to load it immediately you can switch to the restored data directory by going to Preferences in the Tools menu and changing the Data Storage Location on the General tab.
Document History
The history of an document can be viewed by going to the Info tab above the sequence viewer, and choosing History. This displays information on how the document was created, plus a record of each time it has been modified. The exact information displayed is flexible, but is the entries will always include the time and user responsible for the edit. An entry may also reference other documents via hyperlinks, and has the ability to display a re-creation of the options used.
Saving of history can be disabled for performance or privacy reasons by going to the Appearance and Behaviour tab in Preferences.