Cloning
The cloning features in Geneious Prime allow you to simulate several different types of cloning, including Restriction cloning, Golden Gate cloning, Gibson Assembly, Topo cloning and Gateway cloning. You can also create enzyme lists, find restriction sites on your sequence of interest, and simulate digestion and ligation reactions.
The following sections give more detail on each option.
Find Restriction Sites
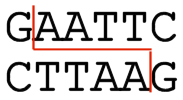
Restriction Enzymes cut a nucleotide sequence at specific positions relative to the occurrences of the enzyme's recognition sequence in the sequence. For example, the enzyme EcoRI has the recognition sequence GAATTC and cuts both the strand and the antistrand sequence after the G inside the recognition sequence, leaving a single-stranded overhang (sticky end (overhang)):
The restriction enzyme information included in Geneious Prime was obtained from Rebase, available for free at http://rebase.neb.com.
To find and annotate restriction sites on a nucleotide sequence, go to Find Restriction Sites... under the Tools → Cloning menu or open the  Restriction Analysis tab to the right of the sequence viewer.
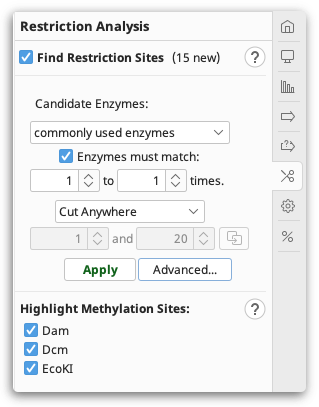
You can configure the following options:
-
Candidate Enzymes lets you select a set of restriction enzymes from which you want to draw the ones to use in the analysis. This includes the options to use commonly used, or all known commercially available restriction enzymes. If you have created your own restriction enzyme set from your local database then this will also be listed. To select specific enzymes from a particular enzyme set, click the Advanced button (see below).
-
Enzymes must match X to Y times: only returns restriction enzymes which cut the sequence X to Y times. Results for enzymes that cut the sequence more or less than this will be discarded. If you set X to be 0, when this operation is complete, it will report which candidate enzymes do not cut the sequence.
-
Specifying cut regions: To specify a region of sequence where you want the enzyme to cut or not cut, choose one of the options below, and use the base counters to specify a sequence range that the options apply to. If you have selected a region of sequence in the sequence viewer, clicking the refresh arrow next to the base number counters will copy the selected region to this setting. The following options are available:
-
Cut Anywhere: Returns enzymes which cut anywhere in the entire sequence. It is not possible to select a subregion with this setting.
-
Must only cut between: Returns enzymes which only cut between the specified bases.
-
Must cut between (may cut outside): Returns enzymes which cut between the specified bases, and may also cut outside that region.
-
Must not cut between: Returns enzymes which only cut outside the specified bases.
-
-
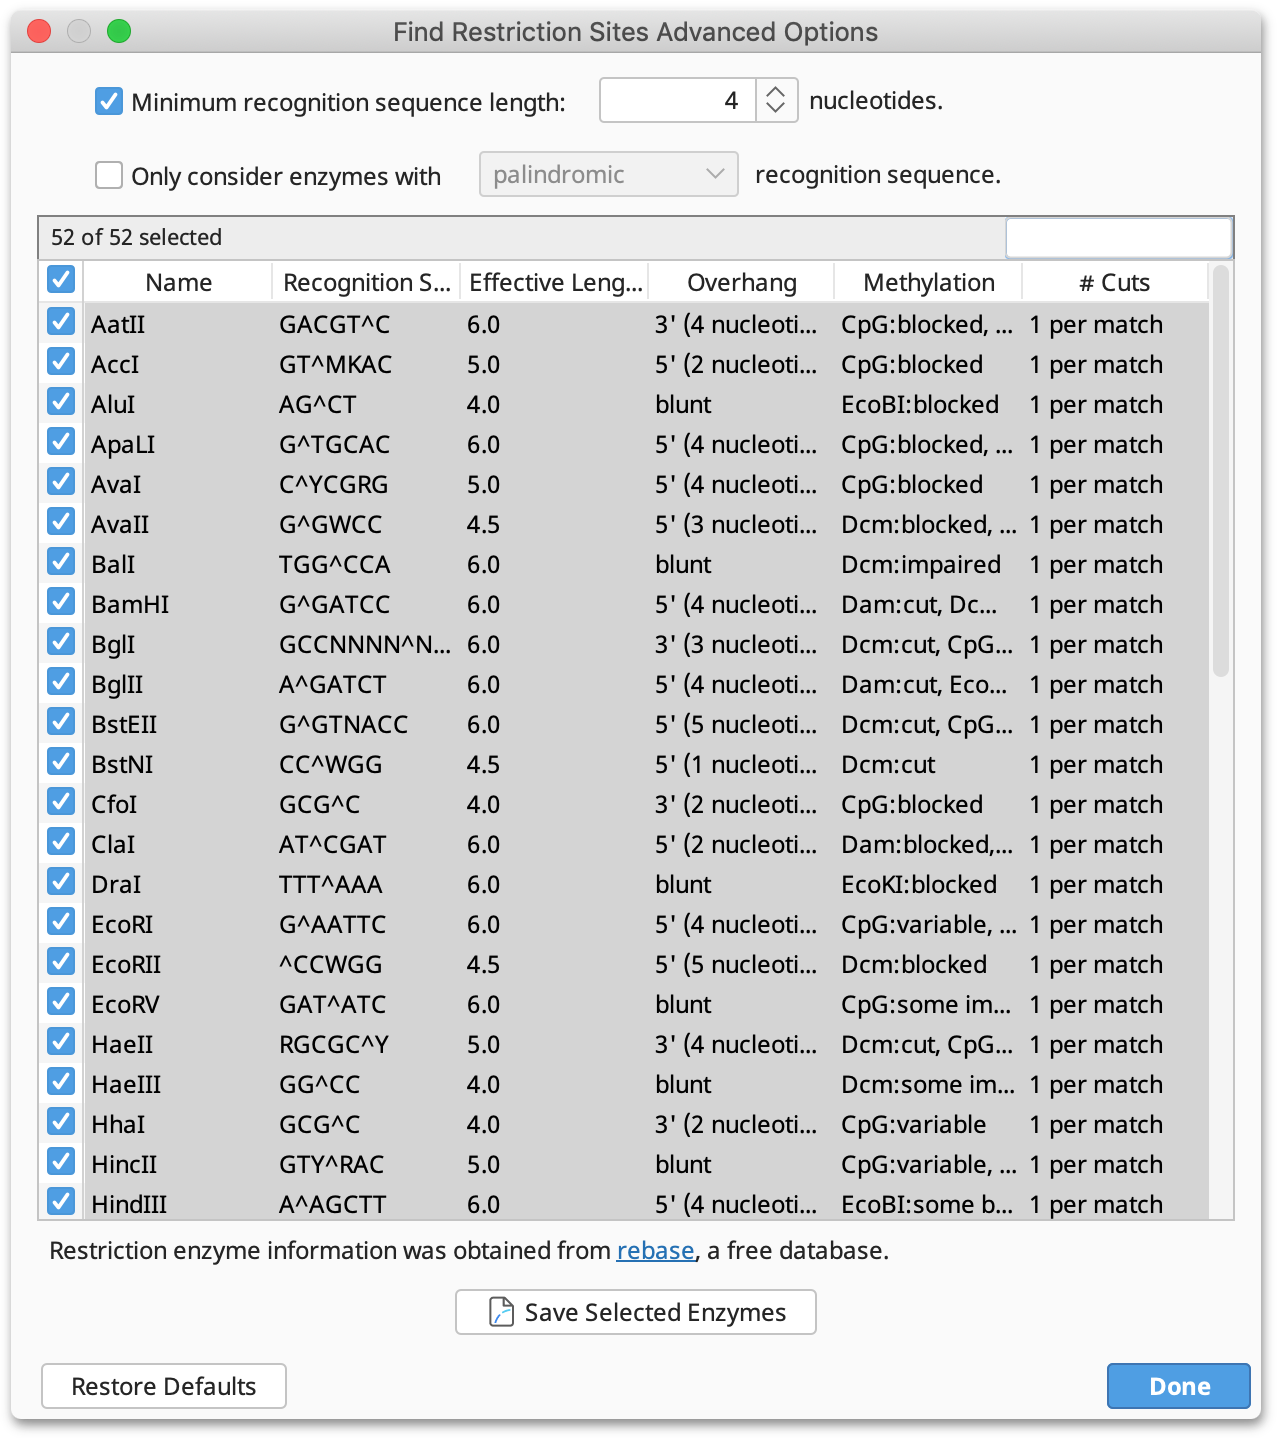
Advanced: This displays a table of all enzymes in your candidate set, including their recognition site, overhang, effective length and methylation information. Only the enzymes selected in this table will be considered in the analysis; initially, all rows are selected. You can click on the column headers to sort the table ascending or descending by that column, and you can Shift+click and Ctrl+click to select a range of rows and to toggle the selection of a row, respectively.
After configuring your options, click Apply to record the restriction enzyme site annotations on the sequence. The annotation shows the enzyme's recognition site, cut site and methylation sensitivity. If Highlight Methylation Sites is selected, restriction sites which would not be cleaved due to the presence of methylation by Dam, Dcm or EcoKI are greyed out and marked with an asterisk (for further information on Highlight Methylation Sites see below).
Once the document is saved, two new tabs will appear above the sequence view: Enzymes displays the list of enzymes and their cut positions; Fragments displays a list of fragments that would be produced from the restriction digests. These tables can be exported as .csv files for subsequent processing with other software such as e.g. Microsoft Excel.
To select the region between two cut sites on a sequence, Shift+click on the two restriction site annotations in the sequence view.
To find enzymes that do not cut a particular sequence, use Find non-cutting enzymes under the Cloning menu.
Highlight Methylation Sites
In Geneious Prime 2021 onwards, Geneious will flag restriction sites where restriction enzyme cleavage ability may be affected due to the presence of methyl groups added by methyltransferases Dam, Dcm, and EcoKI.
This is determined by experimental validation according to rebase.neb.com, which uses the following terms to describe the effect of methylation:
Cut: Not sensitive to methylation at the overlapping site Impaired: Rate of cleavage is lower than for unmethylated overlapping site Blocked: Will not cleave when overlapping site is methylated Some blocked: Blocked by methylation of the overlapping site in some but not all flanking DNA contexts Variable: Conflicting reports of sensitivity to methylation at the overlapping site Untested: Effects of methylation at the overlapping site have not been tested
Restriction sites are greyed out and marked with an asterisk if the ability of the restriction enzyme to cleave at the restriction site is variable, impaired or blocked. Methylated restriction sites where cleavage has not been experimentally validated, or might be methylated but have ambiguities in the target sequence, are highlighted with an asterisk but not greyed out.
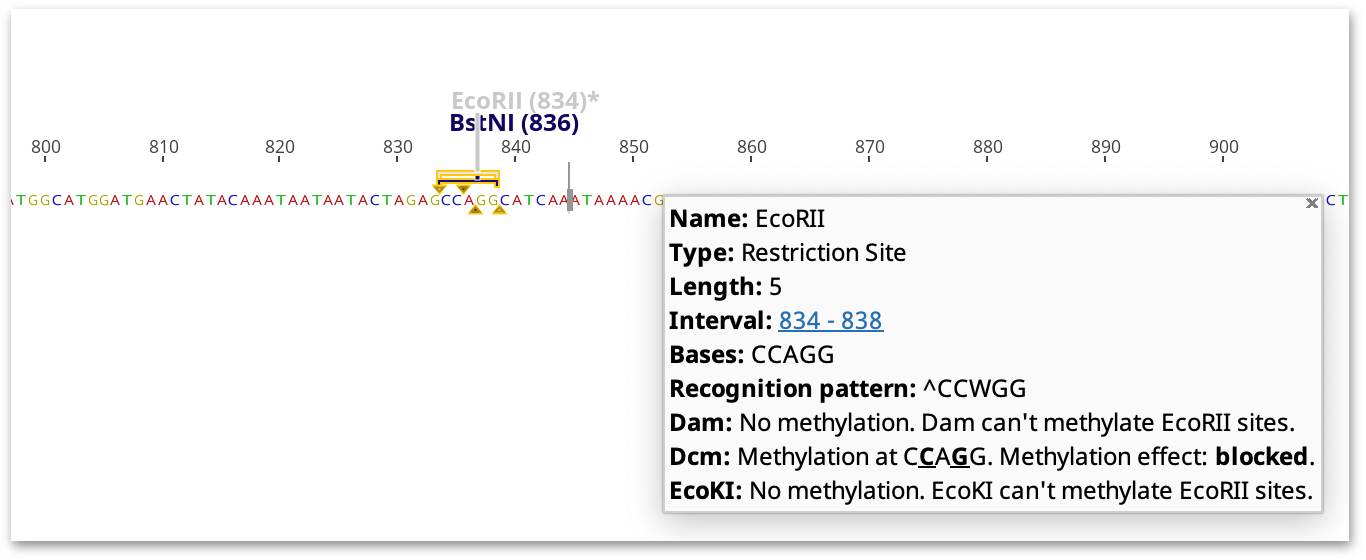
The highlighted restriction sites and indicated methylation effect takes into consideration the neighboring sequence. For example, cleavage by XbaI is only blocked by dcm methylation if the recognition site (TCTAGA) is preceded by GA or followed by TC. If these flanking bases are not present, the site will not be marked as affected by methylation, but a note on the restriction site annotation will say what the effect of methylation would be if the correct bases were present.
Restriction Enzyme effective length
Effective length for restriction enzymes is displayed in both the Advanced table of enzymes, and in the Enzymes tab on the sequence viewer.
Effective length is a measure of how frequently an enzyme will cut, taking into account both sequence length and ambiguities. In other words, lower effective length means an enzyme is expected to cut more frequently. Because ambiguous bases are more likely to match a sequence by chance, they contribute less than 1 to the effective length.
Effective length is calculated as the sum of the following formula across all symbols in the recognition sequence, where n is the number of nucleotides each symbol represents.
1 - log(n) / log(4)
I.e. 1 for a ACGT, 0.5 for 2-ambiguity (MRWSYK), .208s for 3-ambiguity (VHDB) and 0 for N.
Note: The sum displayed in Geneious is rounded down to nearest .0 or .5
See http://search.cpan.org/dist/BioPerl/Bio/Restriction/Enzyme.pm#cutter for a little explanation of why you would use this.
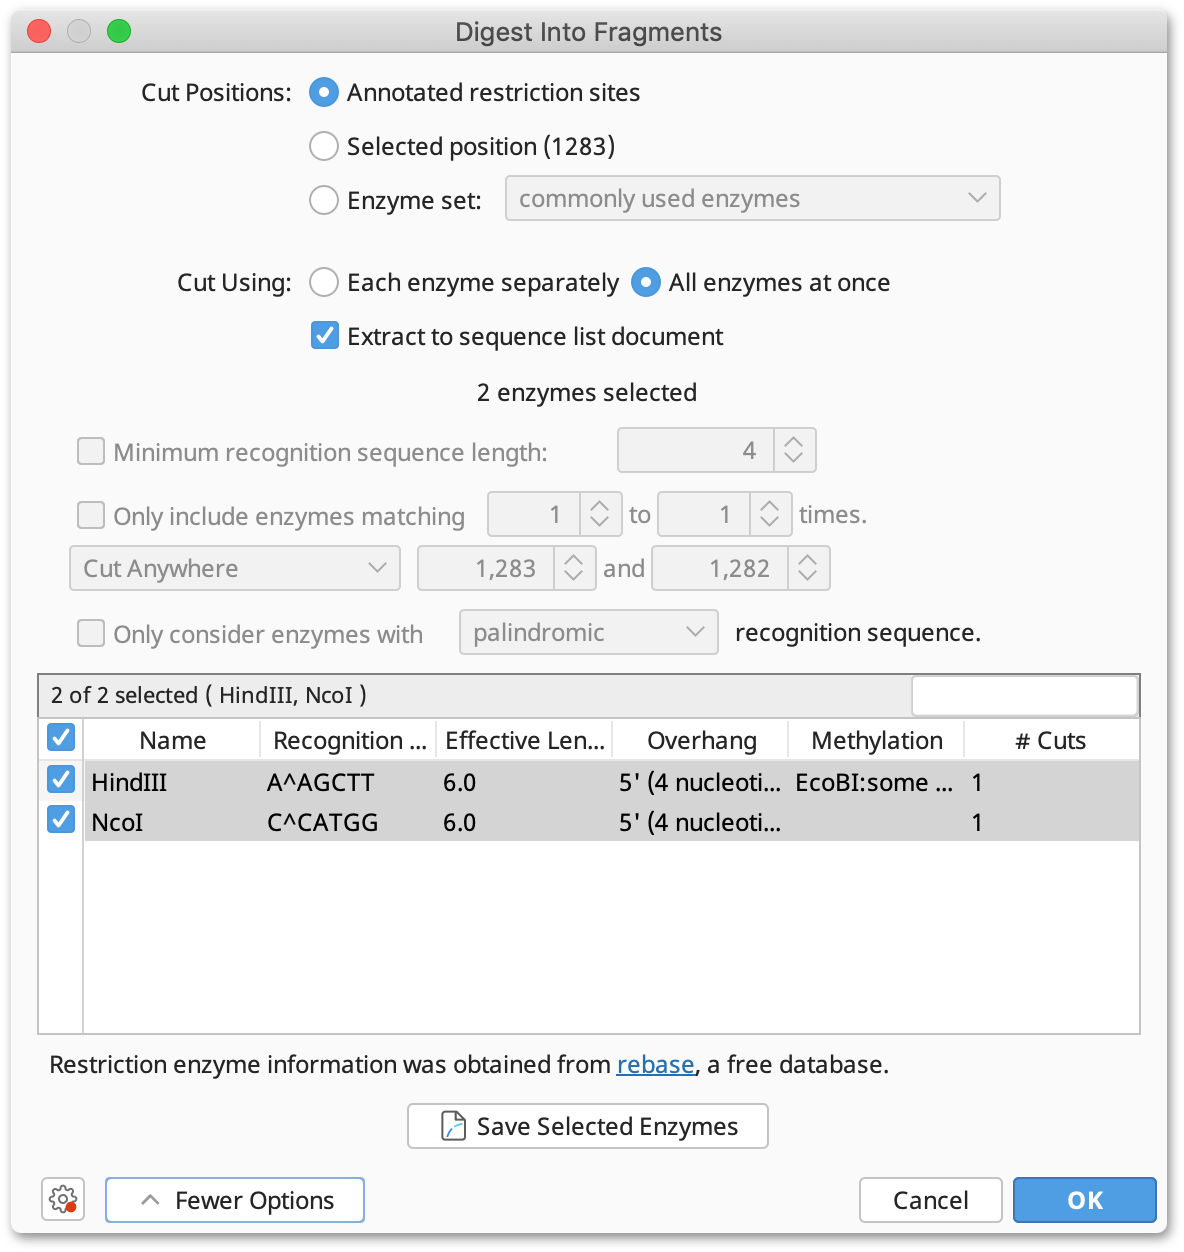
Digest into fragments
The option Digest into fragments... from the Tools → Cloning menu or the context menu allows you to generate the nucleotide sequences that would result from a digestion experiment. You can digest multiple nucleotide sequences at a time. If the digestion results in overhangs, these will be recorded as annotations on the fragments.
-
If you have selected only one nucleotide sequence document and it has annotated restriction sites, you can select Annotated cut positions to cut the document on these sites. When this option is selected, the options to filter the enzymes by their effective recognition sequence length or number of hits are disabled. You can select a subset of the annotated enzyme sites under More Options.
-
If you do not have annotated cut sites already on your document, you can choose Enzyme set and select which enzyme(s) you wish to use. This runs Find Restriction Sites first, but does not generate restriction site annotations on your original sequence.
-
Where multiple enzymes are selected, you can either digest the original sequence by Each enzyme separately, which returns a separate sequence list of the fragments produced for each enzyme, or by All enzymes at once, which digests by all selected enzymes in one operation.
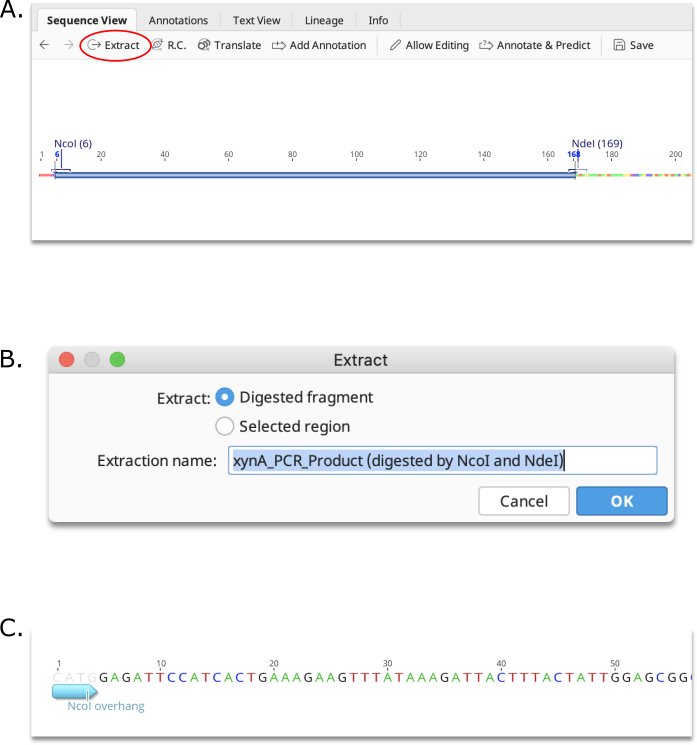
Direct extraction of restriction fragment
To extract the restriction digest product between two cut sites, click on the first site, then hold down the shift key and click on the second site. This will select the region between the sites. Then click the Extract button. You will be given the option to either extract the Digested fragment, or the Selected region. If Digested fragment is selected, the resulting product will contain the restriction site overhangs produced by the digestion.
Creating a custom enzyme set
If there is a specific set of enzymes that you want to use repeatedly, you can create a custom enzyme set. There are two ways to do this:
-
In the Find Restriction Sites interface, click Advanced and select the enzymes you want in your set. Then click Save Selected Enzymes and give the set a name. This set will then be available in the Candidate Enzymes lists.
-
Go to New Enzyme Set under Cloning or File → New. Give your set a name and click OK. This will create a new, empty enzyme set document. To add enzymes to the set, click Add Enzymes and select the ones you want from the list.
New enzyme sets are created as documents with the  icon. These are created in whatever folder you are working in, but all enzyme sets in your database are available in the Candidate Enzymes drop down list, in the Find Restriction Sites interface.
To create an enzyme set containing restriction enzymes which do not cut a particular sequence, select your sequence and go to Cloning → Find non-cutting enzymes. Select the criteria and the candidate enzymes you wish to test, and click OK. A new enzyme set document will then be created containing the enzymes which do not cut your sequence.
Introduction to the cloning interface
Tools for Restriction Cloning, Golden Gate, Gibson Assembly and Parts cloning can be found under the Cloning menu. These tools share a common interface which differs only in options specific to each cloning tool. Input sequences may be selected prior to launching the operation, or may be selected or removed from within the cloning options.
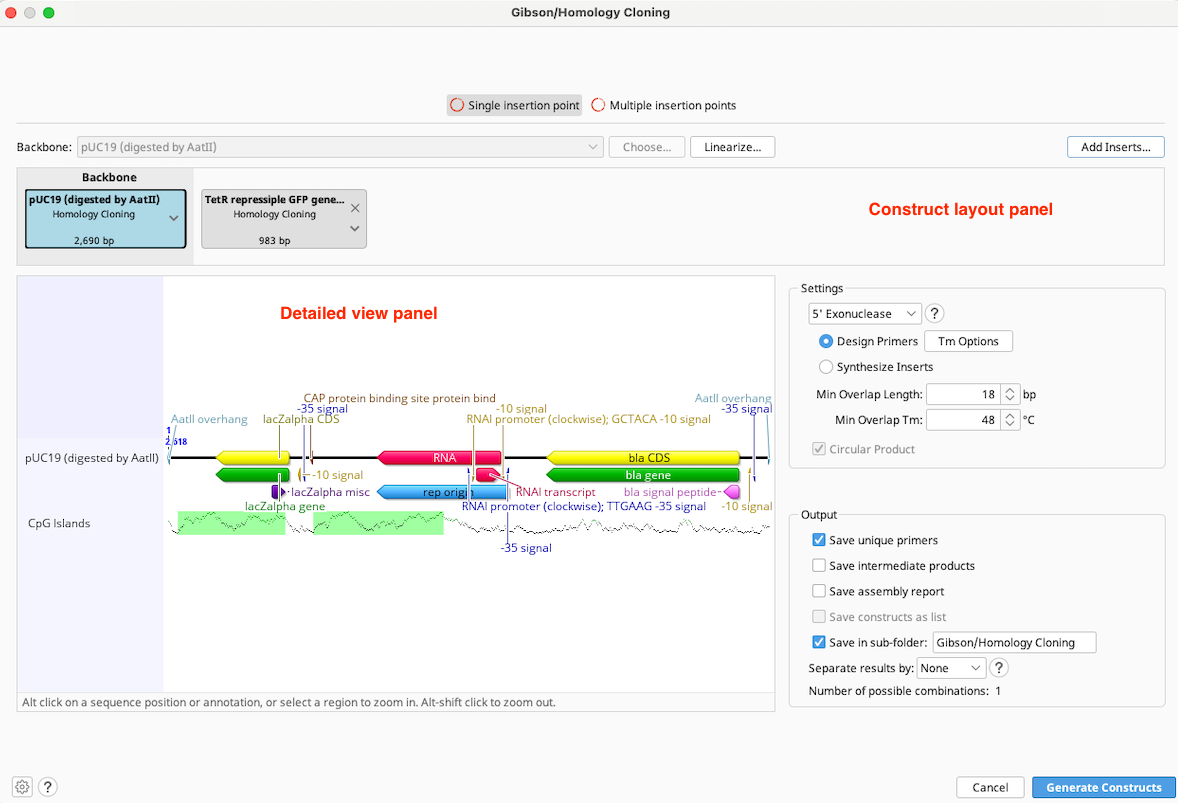
Configuring Options
Backbone: Use this option to choose a sequence that will serve as the vector in your cloning reaction. When the cloning dialog is first opened, this will show Use Leftmost, which refers to the sequence represented in by the leftmost tag in the Construct Layout panel. Geneious will automatically choose the longest (preferably circular) sequence as the backbone. The backbone can be manually changed either by using the dropdown to choose from selected sequences or recently used backbones, by selecting a backbone with the Choose... button, or by dragging and dropping the tags within the Construct Layout panel to the desired position. The sequence chosen as the backbone is always in the leftmost position in the Construct Layout panel and has blue background shading. If a backbone is selected it will always result in a Circular Product. Nucleotides in the final construct will be numbered beginning with the origin of the backbone sequence.
Enzyme or Exonuclease: Set the enzyme(s) to consider for your reaction. Geneious will automatically try to use the best reaction setup with the specified enzyme(s), and you can manually adjust the reaction setup in the Construct Layout Panel. The enzyme options differ between the individual cloning operations - information specific to each cloning tool can be found in the relevant sections of this manual.
Circular Product: Select this option to create a circular product when no Backbone is specified.
Construct Layout Panel: Each sequence or sequence list (where available, these are shown in gold), is represented as a sequence tag in the upper Construct Layout Panel, in the order in which they will be ligated. You can rearrange inserts by dragging and dropping the sequence tags, remove them by clicking on the in the top corner, or select additional inserts using the Add Inserts... button. If you have designated a sequence as the Backbone (vector), it will appear in green to the left of any other sequences.
Tags: show the following information:
- Sequence Name (highlighted in blue if reverse complemented)
- Reaction Type
- Additional Information (such as extracted region, length, or number of sequences)
- Warnings (for sequences in an error state, shown in red. Additional details about these warnings can be found below the Detailed View Panel).
- Dropdown Arrow ▾ (to adjust individual reactions or modify the sequence)
Detailed View Panel: Click on a sequence tag in the Construct Layout Panel to display the annotated sequence for that tag in the Detailed View Panel. The region of your sequence that will be included in the final construct will be highlighted by blue shading, and enzymes used will be written in purple. You can adjust the zoom level in the detail view using the keyboard and mouse as described in this section. It is not possible to edit sequences in the Detailed View Panel - if you wish to edit your sequence, you will need to close the cloning dialog and edit the sequence directly in the sequence viewer.
Save used primers: Creates a primer document for each of the primers used in the operation (where applicable). For batch cloning reactions, the set of primers for each ligation product will be saved in a sequence list.
Save intermediate products: Saves intermediate products of the cloning reaction (where applicable).
Save in sub-folder: Create a new sub-folder within the current directory to save result documents to. If another folder with the specified name already exists, a new folder with that name and an incrementing number will be created.
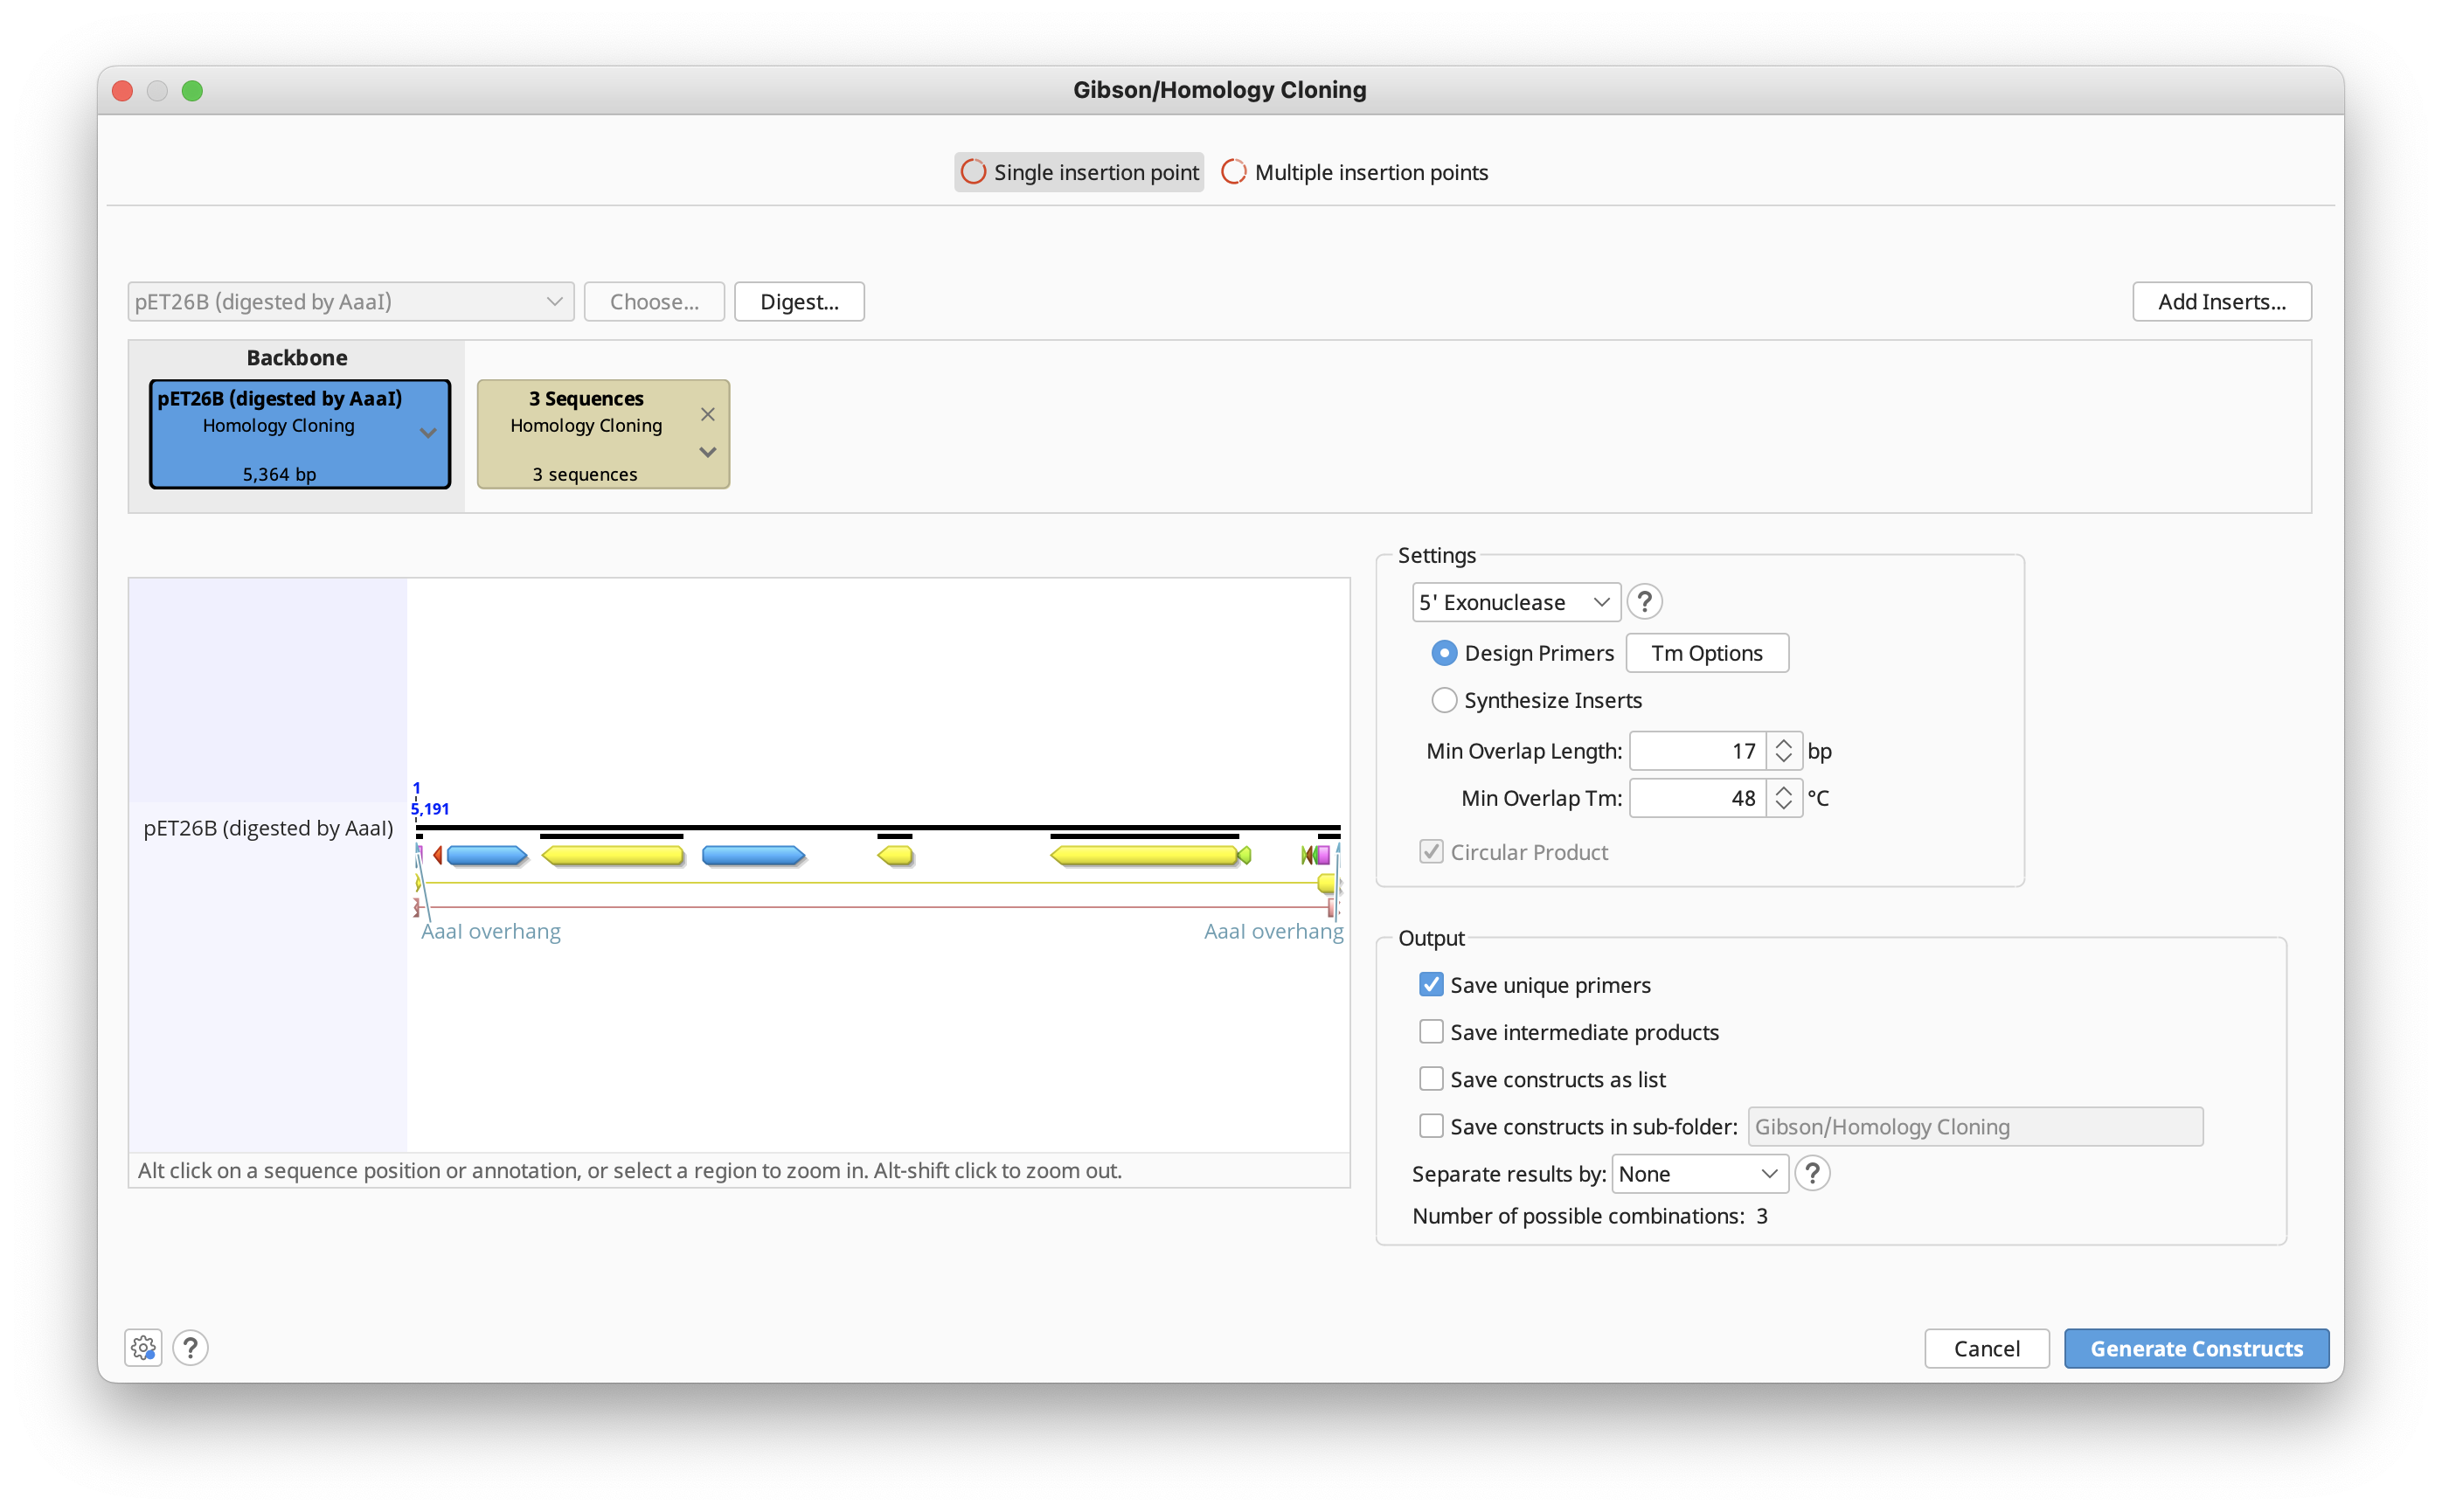
Multiple-Insertion Point Cloning (Academic/Enterprise Only)
Stating with Geneious Prime 2026.1.1, one-step multiple-insertion point cloning allows for quickly building constructs with fragments inserted at multiple locations within your backbone vector through Gibson, In-Fusion, Golden Gate cloning and Parts Cloning. Circular backbones can be digested at different locations to create multiple insertion points.
When starting from a circular backbone, options for single or multiple insertion points will appear at the top of the cloning interface. Click "Digest..." to choose your enzyme and digest the backbone, then order the parts as needed. Any sequence lists (grouped sequence documents) will appear in the cloning interface together with a brown label. Each of the individual nucleotide sequences from a list will be inserted into a separate product at the same insert position (for details, see "Batch Cloning" under your desired cloning method).
Adding short sequences when simulating Gibson/In-fusion Cloning (Academic/Enterprise Only)
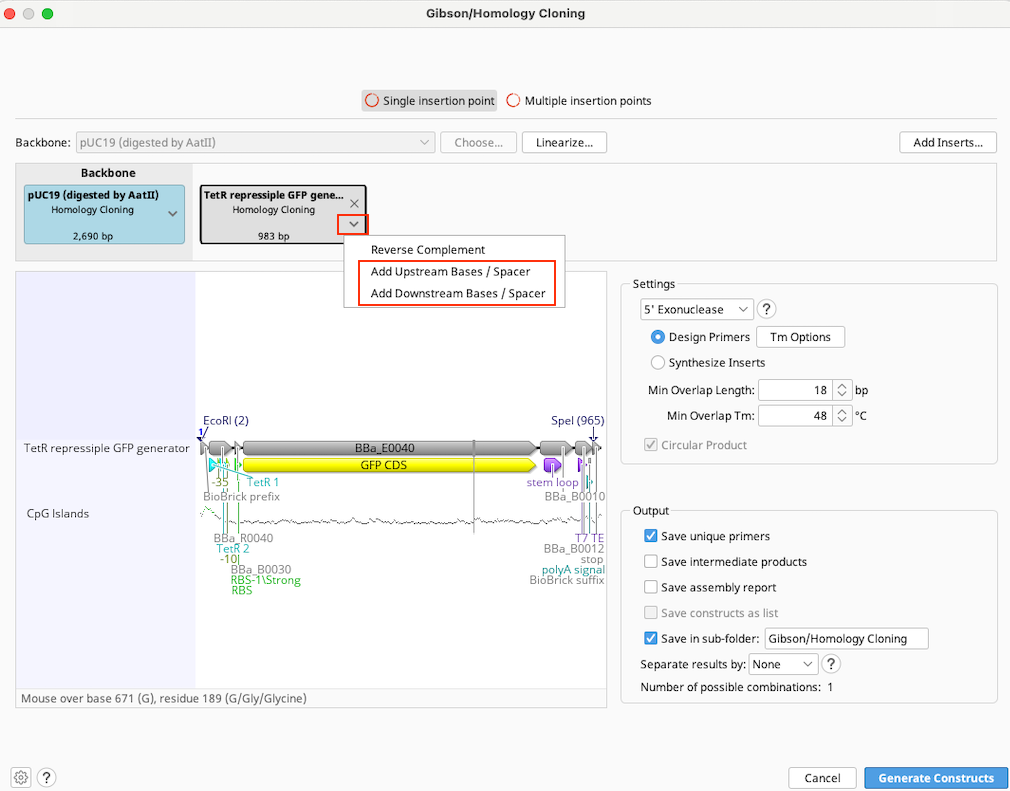
Starting Geneious Prime 2026.1.1, you can add short sequences between inserts when simulating Gibson / In-Fusion cloning. You can choose to Add Upstream and/or Downstream bases to inserts, enabling quick and easy addition of short sequences like spacers, tags and restriction enzymes, which can be built ad hoc or from sequences saved in your database. Spacers are automatically incorporated into primer design for the cloning simulation, or added to insert sequences for ordering.
Restriction Cloning
Use the Restriction Cloning operation to ligate two or more linear or circular nucleotide sequences. See Introduction to the cloning interface for an overview of the Restriction Cloning interface.
To run a Restriction Cloning operation, optionally select a Backbone sequence, along with one or more Insert sequences, and then specify the enzymes you wish to consider for the reaction. You can adjust the order in which the sequences will be ligated, and the cut sites to be used for the ligation in the Construct Layout Panel. Sequences do not need to be pre-digested.
Candidate Enzymes: Select Annotated Enzymes if the restriction sites for your reaction are already annotated on your sequences. Enzymes annotated on any of the selected sequences will be available for all sequences in your reaction. To also use restriction enzymes which have not been annotated on your sequences, select Enzyme Set. If None is selected, only blunt end ligation or annotated single-stranded overhangs ('sticky ends') will be available. Annotated overhangs and blunt end ligation will remain available if either Annotated Enzymes or Enzyme Set are selected. Restriction enzymes with recognition sites shorter than 5 bp will only be considered if they have been annotated. Contact Geneious Support if you want to change this minimum recognition site length.
Enzyme Set: This option is enabled when Enzyme Set is selected under the Candidate Enzymes option. All enzyme sets in your database will be available here. You can create new enzyme sets from the Enzymes tab in the Sequence Viewer. If you wish to only use specific enzymes from within your chosen Enzyme Set, click the Choose button and select the enzymes you require.
Construct Layout: Sequences will be displayed as Tags in the Construct Layout Panel, in the order in which they will be ligated. Overhangs for each sequence, corresponding to the selected restriction enzymes, will be displayed between sequence tags. Pairs of overhangs will be green if they are compatible or red if they are not. Unused overhangs that will be generated at either end of a linear construct will be shown in grey.
To change ligation reactions or reverse complement a sequence, click on the ▾ at the right of the sequence tag:
- 5′ Reaction / 3′ Reaction: Enzymes from the specified Candidate Enzymes will be shown in the appropriate section, if they have cut sites that are compatible with a neighbor. If more than 30 restriction sites are available, click on Choose enzyme cut site... to select from the available restriction sites. Sites shown in grey italics can be selected, but will require further changes to create a valid reaction. Predigested overhangs and blunt ends are also shown.
- Reverse Complement: Select this option to reverse complement the current sequence, and recalculate possible compatible cut sites on the current sequence and its neighbours. The original sequence will not be altered. Names of reverse complemented sequences appear in blue.
- Modify Overhangs: Select this option to modify overhangs after choosing restriction sites. This allows you to simulate end repair by polymerase-mediated backfilling or nuclease-mediated overhang removal (blunting). Modified overhangs will be retained until you select a new restriction enzyme or use the Reverse Complement option.
Gibson Assembly and In-Fusion Cloning
Gibson Assembly or Gibson Cloning is a method for seamless ligation of multiple sequences in a single reaction, without the need for restriction sites. The Gibson Assembly operation allows you to simulate cloning reactions that use an exonuclease to generate overlapping fragments for ligation, including Gibson Assembly, GeneArt Seamless Cloning (5 ′ exonuclease), SLIC and In-Fusion Cloning (3′ exonuclease). It can also be used to simulate cloning operations that do not use exonuclease such as CPEC and SLiCE. Starting with version 2026 Gibson/Homology cloning supports ultiple-insertion point assembly (Enterprise only feature)
Note that In-Fusion cloning can also be run from the In-Fusion cloning option under the Cloning menu. With this option, 3' exonuclease will automatically be used and the primer overhang length is automatically set to 15 bp.
To run a Gibson Assembly operation, optionally select a Backbone sequence, along with one or more Insert sequences, and then specify the type of exonuclease you wish to use for the reaction. See Introduction to the cloning interface for an overview of the interface.

You can adjust the order in which the sequences will be ligated in the Construct Layout Panel by dragging the parts into the desired order. Backbone sequences can be linear or circular for most operations, but must be circular for ultiple-insertion point assembly.
Batch cloning with alternate sequences can be performed using sequence lists. Lists will appear in the cloning interface together with a brown label. Each of the individual nucleotide sequences in a list will be inserted into a separate product at the same insert position.
Exonuclease: The exonuclease activity defines which strand (if any) gets digested to expose complementary overhangs:
-
5′ exonuclease (Gibson & GeneArt Seamless Cloning): The enzyme chews back bases from the 5′ end to expose complementary overhangs. GeneArt Seamless Cloning recommends a 15 bp overhang, while to perform a Gibson assembly a longer overhang of 25 to 40 bp is used in many protocols.
-
3′ exonuclease (SLIC & In-Fusion Cloning): The enzyme chews back bases from the 3′ end to expose complementary overhangs. A 15 bp overhang is recommended for In-Fusion Cloning, while for SLIC a 25 bp overhang is recommended.
-
None (CPEC & SLiCE): These two methods don't use a specific exonuclease. Instead, CPEC amplifies the whole strand with a polymerase, and SLiCE uses a cell extract to recombine DNA molecules using short-end homologies.
If there are existing, compatible, overhangs annotated on the selected sequences (e.g. those derived from restriction digest), they will be used for the ligation reaction. If existing overhang annotations are not compatible, or do not meet the specified requirements, the overhangs will be removed or filled in (depending on the overhang and the exonuclease chosen) prior to primer design.
Primer Options: Here you can adjust parameters that influence creation of primers and overhangs:
- Tm Options
-
Tm Calculation: Additional settings required by Primer3 to calculate the melting temperature. These settings are applied to both the overhang Tm calculation as well as to the primer Tm calculation.
-
Synthesise Primers: You can choose to skip the Design Primers function if you plan to synthesize the inserts.
-
Min Overlap Length: The minimum length of the complementary overhangs between two adjacent sequences. Usually half of this length is added via primer extension to each sequence. For sequences flanking the backbone, the full Min Overhang Length will be added to the insert sequence.
- Min Overlap Tm: The minimum melting temperature allowed for the annealing region between two adjacent sequences. The overhang length will be increased until the melting temperature satisfies this condition.
- Circular Product: Toggle this option to circularise the final construct.
Extension primers for creation of complementary overlaps
For sequences without existing complementary overlaps on both ends, a pair of primers will be created to generate complementary overlaps via Primer Extension PCR, as required. If both ends are complementary no primers will be generated. Primer design uses non-stringent conditions which may result in poor quality primers - we recommend that you check the generated primers before ordering them.
Extensions will be added to the primer corresponding to the neighboring sequence, to generate complementary overhangs. Primers are generated only for insert sequences, as it is assumed that the vector should stay unmodified. For this reason the extension length of primers extending to the vector will be the full specified minimal overlap length, whereas extensions on primers between two inserts, will each be half of the total overlap length. If you wish to manually add modifications to primer extensions, these must be annotated onto the insert sequence as type 'Gibson Primer Extension', otherwise they will be included within the binding region.
The melting temperature (Tm) for the annealing region between the neighbouring sequences is calculated using the Tm characteristics setting in Primer Options. In many cases the Phusion DNA polymerase is used, for which it is recommended to use the Tm formula of Breslauer et al. 1986.
For very short or long extensions, Primer3 might be unable to calculate a Tm. If Primer3 fails, Geneious will calculate the Tm using rough Tm formulas shown in the General Statistics section.
The primers generated in your Gibson Assembly will be listed in the Report Document, along with the calculated characteristics and any errors that occurred during the primer generation process. Furthermore any modifications (recession or maintaining overhangs, adding extensions to primers) are shown at the beginning of the document.
Parts Cloning
Parts, or combinatorial cloning refers to the generation of multi-part constructs from libraries of genetic elements, such as regulators, gene coding regions and terminators.
The Parts Cloning tool in Geneious will concatenate libraries of genetic elements outputting all possible combinations. Each library of genetic elements must be contained in a separate sequence list. Parts cloning can be run on either nucleotide or protein parts, but all parts must be of the same type - you cannot mix protein and nucleotide parts.
To simulate Parts cloning in Geneious, select all sequence lists and individual sequences you wish to include, then select Parts Cloning under the Cloning menu.
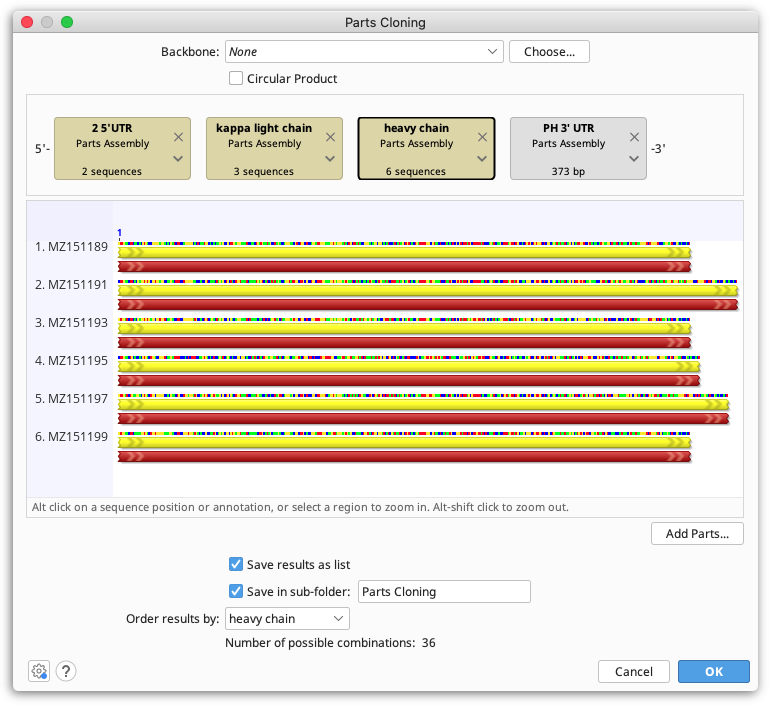
Each part is represented by a tag in the construct layout panel - drag and drop these into the order you wish you ligate them. Sequence lists are shown as brown boxes, and individual sequences are grey.
If your assembly includes a vector, set this under Backbone and tick the Circular Product box if your final product will be circular.
Parts cloning accepts circular backbone vectors which can be linearised by selecting a point to cut at, or one or more annotations or intervals to excise.
The bottom panel shows the number of combinations that will be output from the assembly of parts. If Order results by is set to None, all combinations will be output into a single sequence list. If Order results by is set to a particular part, a separate sequence list will be created per specified part, with all constructs containing that part.
Gateway Cloning
Geneious Prime contains three operations to assist with Gateway cloning. Gateway is a registered trademark of Invitrogen Corporation. The Gateway option under the Cloning menu will perform a BP reaction and/or an LR reaction on the selected documents. If there are a mixture of AttB/AttP and AttL/AttR sites on the input documents, it will perform a BP reaction on all documents with AttB/AttP sites, followed by an LR reaction on the results of the BP reaction and any input documents with AttL/AttR sites.
For example, to insert a PCR product with attB sites directly into a destination vector, select the PCR product, a donor vector, and a destination vector. Geneious will first produce an entry clone from the PCR product and donor vector, then react this entry clone with the destination vector to produce an expression clone.
Annotate att sites...
This operation searches for AttB, AttP, AttL and AttR sites and annotates them on your sequence.
Add AttB Sites to PCR product
This operation allows you to add AttB sites to a PCR product. It will work on the following types of document:
-
A PCR product. AttB sites will be appended to the PCR product.
-
A document with primer binding sites annotated. If there is more than one pair, Geneious will ask you which pair to use. The PCR product will be extracted and AttB sites appended.
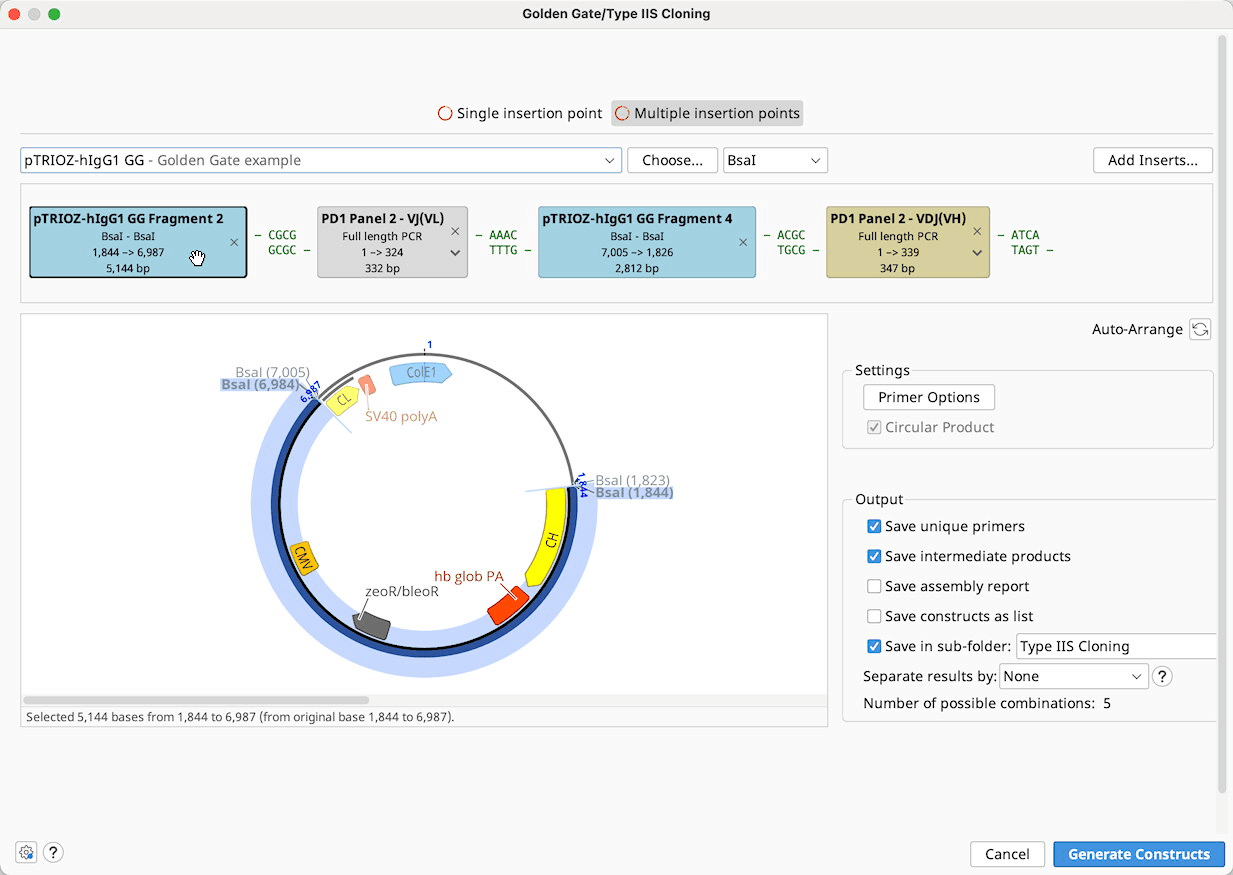
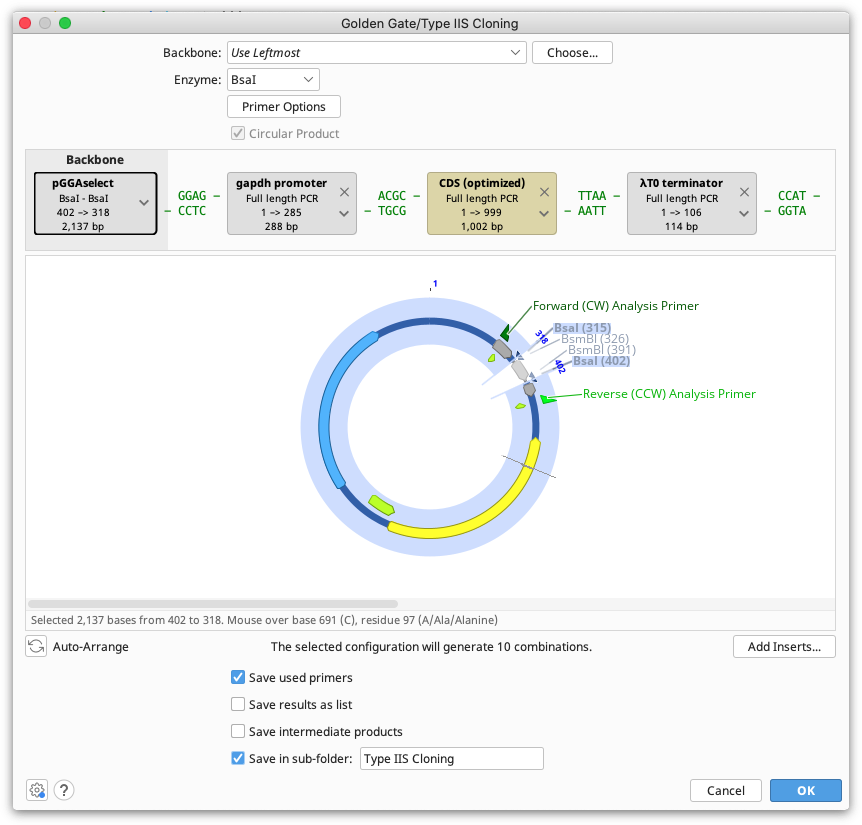
Golden Gate / Type IIS Cloning
Golden Gate is a method to conveniently digest and ligate multiple sequences with the same Type IIS enzyme in a single reaction.
To run a Golden Gate cloning operation, optionally select a Backbone sequence, along with one or more Insert sequences, and then specify the enzyme you wish to use for the reaction. See Introduction to the cloning interface for an overview of the interface.
You can adjust the order in which the sequences will be ligated and optionally select primers for use in the ligation reaction in the Construct Layout Panel.
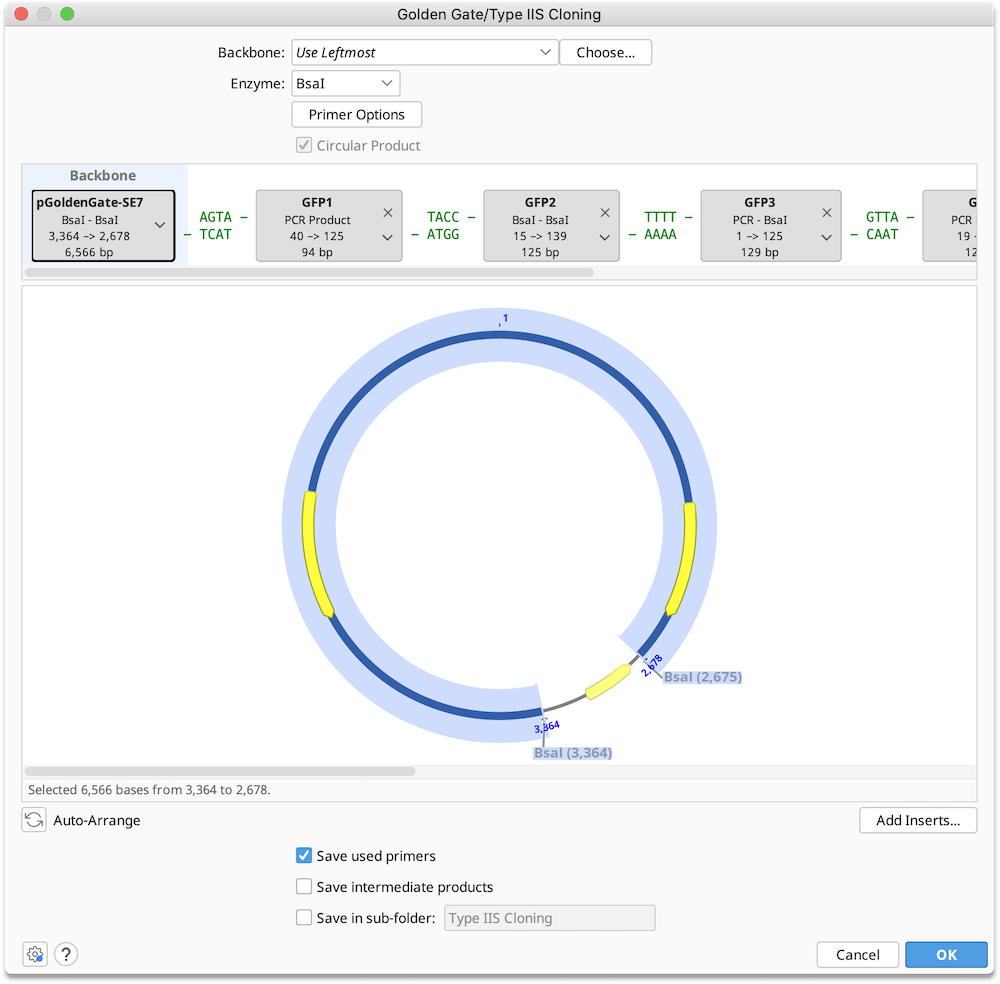
Enzyme: Select a single Type IIS restriction enzyme to use in the ligation reaction. The set of available enzymes includes those commercially available Type IIS enzymes with an effective recognition site of at least 4 bases which produce an overhang of at least 3 bases on either strand. Only enzymes with 2 or fewer cut sites in each of the selected sequence may be used.
Construct Layout: Sequences will be displayed as Tags in the Construct Layout Panel, in the order in which they will be ligated. Overhangs for each sequence, corresponding to the selected restriction enzymes, will be displayed between sequence tags. Pairs of overhangs will be green if they are compatible or red if they are not. Unused overhangs that will be generated at either end of a linear construct will be shown in grey.
To select primers or reverse complement a sequence, click on the ▾ at the right of the sequence tag.
Ligation reactions will be shown on the sequence tags as follows:
- Predigested if the sequence has existing overhangs on both ends
- Cut by [enzyme] if the sequence will be cut with the selected enzyme
- PCR Product if restriction sites for the chosen enzyme will be introduced via PCR and at least one of the existing primers on the sequence is used
- Full-length PCR if newly generated primers will amplify the full sequence and append restriction sites at both ends
- Where different reaction types are used at either end (Overhang, Enzyme or Primer), this will also be indicated
Sequence ordering, rules and assumptions
When the Golden Gate options are launched, or Auto-arrange is clicked, Geneious will detect existing type IIS restriction sites, overhang annotations, primer annotations and blunt ends on the selected sequences, and will try to produce the optimal arrangement based on the available overhangs. Geneious will only consider cut sites where the recognition site will be cut out, or primers that point towards each other. The ligation order and selected primers may be changed manually in the Construct Layout Panel.
Geneious will automatically arrange sequences using the following rules, in order of precedence:
-
Existing type IIS cut site(s): If Geneious detects a pair of appropriately orientated type IIS sites with unique overhangs, these will be selected and no PCR primers will be designed. If only one type IIS cut site is detected, then Geneious will design a PCR primer that incorporates the site, and will design a second primer to introduce a compatible opposite orientation restriction site based on rules 3-6.
-
Existing Overhang(s): If Geneious detects a pair of valid overhangs compatible with the specified type IIS site, then these will be selected. No PCR primers will be designed.
-
Existing Primer Bind annotation(s) with valid type IIS cut site(s) on the extension: If Geneious detects a pair of inward facing Primer Bind annotations with extensions that produce valid, compatible, type IIS restriction sites, these will be used. New primers will not be designed. If Geneious detects a single Primer Bind annotation with a suitable type IIS site Geneious will use this, and will design a second primer to introduce a compatible opposite orientation restriction site based on rules 4-6.
-
Existing Primer Bind annotations with other extensions: If Geneious detects a Primer Bind annotation with an extension which does not contain a valid type IIS site, this primer will be used with an addition to the primer extension to introduce a cut site for the selected type IIS restriction enzyme. This will be done by further extension to the 5′ terminus of the existing primer.
-
Existing Primer Bind annotation(s) without extension(s): If a primer bind annotation without an extension is found, then an extension will be appended to introduce a cut site for the selected type IIS recognition enzyme, resulting in a new primer sequence.
-
Blunt ends: If Geneious finds a blunt end, and no suitable type IIS sites or Primer Bind annotations are present, then a primer with an appropriate type IIS site extension will be designed. The fusion point will be the termini(us) of the blunt end fragment.
Important:
- Removal of unwanted internal Type IIS sites: If one or more sequences have cut sites for the specified type IIS restriction enzyme, then Geneious will assume that these sites should be used in the assembly process and design a strategy accordingly. If any of the sequences contain type IIS restriction sites that should not be used in the assembly then these will first need to be engineered out of the fragment using PCR.
Batch cloning
Batch Golden Gate cloning can be performed where one or more parts to be cloned is a list of sequences. Each of the individual nucleotide sequences in the list will be inserted into a separate product at the same insert position. If multiple sequence lists are used, all possible combinations of products will be output.
Note that the sequences within each list must be in the same orientation and must use the same overhangs.
Sequence lists are represented by the brown tags in the construct layout panel, and the number of products that will be generated is listed below the viewer window. Products can optionally be saved in a sequence list, by ticking the option save results as list.
TOPO Cloning
TOPO Cloning lets you ligate a single fragment into a Vector within only 5 minutes using the natural activity of Topoisomerase I which recognizes a specific motif 5′ - (C/T)CCTT - 3′ on the DNA. TOPO is a registered trademark of Invitrogen Corporation.
The TOPO cloning function under the Cloning menu allows you to insert linear fragments into either linear TOPO vectors (when a TOPO-site is present at the extremities) or into circular TOPO vectors. You can select as many sequences at once as you like, they will be ligated into each other in a batch operation.
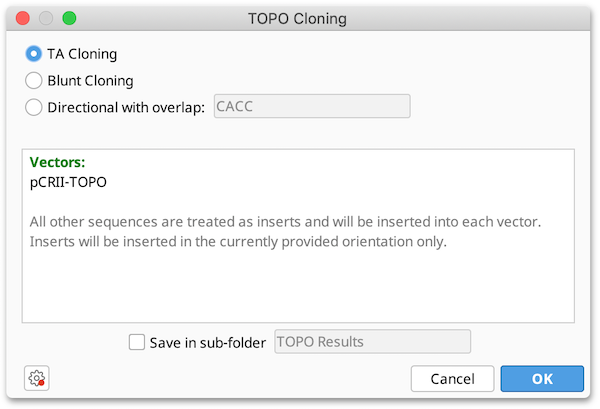
-
Three different options (TA- Blunt- or Directional cloning) are shown on the top. If Directional is selected the user can define an overlap sequence. If this field is blank it has the same effect as Blunt cloning.
-
The field below shows which of the selected sequences have been detected as vectors, all other sequences are inserts.
-
If any complications occur, eg. when more than one TOPO site is detected or when a linear sequence with TOPO site is selected it will print a message in this box, also showing how the corresponding sequence is processed if the user clicks OK.
-
The resulting sequences will be optionally saved in a sub-folder.
Copy-paste cloning
Cloning reactions can also be simulated using basic copy and paste functions in Geneious Prime. To use this, select the region you wish to insert into your vector and use command/cntrl-C or Edit → Copy to copy it. Then select the region in the vector to be replaced, right-click and choose Paste with Active Link or use the shortcut key Ctrl-Alt-Shift-V (Command-Alt-Shift-V on Mac).

A new document containing the product of the copy-paste will then be created, and this document will be actively linked to the two parent documents (see Parent / Descendant Tracking).
Note: Paste with Active Link does not check for compatible overhangs. It is up to you to ensure these are correct.
Analyze Silent Mutations
Analyze Silent Mutations under the Cloning menu finds restriction sites that could be introduced by one or more synonymous mutations to a coding sequence.
To specify the set of restriction enzyme sites you want to introduce, first create a new enzyme set containing the restriction enzymes you require. Then open the Analyze Silent Mutations options and select this list in the Restriction Enzymes drop down.
To limit the number of substitutions required to generate a restriction site, check Limit maximum substitutions to and set it to the number you require.
Analyze Silent Mutations can be run on either the entire sequence, or a selected region. If no region is selected, Geneious will use the first reading frame starting from base 1 of the sequence to determine the synonymous substitution sites. If you use a selected region of sequence, Geneious will use frame 1 of the selected region, unless you select an annotation with a different frame specified in the annotation properties (e.g. a CDS annotation with the qualifier codon_start=2 will use frame 2).
Once the analysis has run, green Potential Restriction Site annotations will be generated on the sequence. To see the modification required to create a particular restriction site, mouse over the annotation. To apply the modification to the sequence, first click Allow Editing. Then click on the potential restriction site annotation to select it, right click and choose Apply potential restriction site from the drop down menu. The sequence will then be edited with the modification required, and the potential restriction site annotation will be changed to a regular restriction site annotation. The figure below shows an example site before (A) and after (B) applying the change to create the new site.

Note that if an intact restriction site is present in the selected region then a blue Restriction Site annotation for the site will be added to the sequence.
To remove existing restriction sites from a sequence using synonymous substitutions, use Optimize Codons.
Optimize Codons
The Optimize Codons... operation is accessed via the Cloning button on the Toolbar, or via Tools → Cloning in the main menu. This tool allows you to adapt a nucleotide sequence to the genetic code and "preferred" synonymous codon usage of a particular expression host.
The resulting sequence is optimized to avoid or reduce the use of codons that rarely occur in the highly expressed genes of the expression host, increasing the likelihood that the gene product will be expressed at a higher level if the optimized sequence is synthesized and recombinantly expressed in the expression host.
In addition, the tool can introduce synonymous codon changes to eliminate "forbidden" sequence motifs, such as homopolymers, recognition sites for a specific set of restriction enzymes, or other undesirable sequences. Simultaneous sequence optimization while avoiding including or introducing forbidden motifs uses the algorithm described by Condon and Thachuk 2012.
"Preferred" codons are specified using an appropriate codon usage table (CUT) that reflects synonymous codon frequencies for coding sequences known (or predicted) to express at high levels in the expression host.
Geneious Prime provides a number of CUTs you can use, or you can import and use your own custom CUT, see How do I import a custom codon usage table?. We recommend users consult the literature for advice on appropriate CUTs to use for a particular expression host. In most cases you should not use CUTs compiled from whole genome data, such as those obtained from https://www.kazusa.or.jp/codon/. In general, "whole genome" CUTs are biased towards codons used by poorly expressed proteins and will be less likely to yield a CDS that will give optimal high-level expression.
This tool outputs either the Fraction (frequency) or relative adaptiveness (w) of each optimized codon, calculated based on the select CUT (see Sharp and Li, 1987). In Geneious Prime 2020 and onwards, optimized codons are selected in proportion to their relative frequencies among synonymous codons (i.e., fraction entries in the chosen CUT).
You can configure the following options, shown in the figure below:
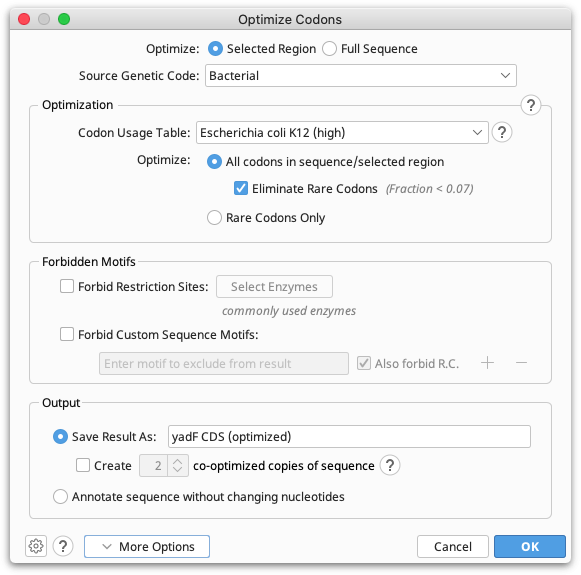
Optimize Selected Region or Full Sequence: Select Full sequence to optimize the full length sequence. If you wish to optimize a portion of a sequence, for example a CDS annotated as part of a larger sequence, then select the CDS annotation prior to running Optimize Codons.... If you manually select a region, you must ensure the selection is in-frame with the coding sequence.
Source Genetic Code: Lets you select the genetic code to be used when translating the source sequence/s. If you have selected multiple source sequence documents with different genetic codes, the choice "Multiple Values" will be available to indicate that the genetic code associated with each document should be used. You can select a genetic code other than the one that is shown as the default for the selected input documents if you want to override the default.
Codon Usage Table: Lets you select a CUT for the target expression host. You can import custom codon usage tables in GCG CodonFrequency and EMBOSS cusp formats. See How do I import a custom codon usage table?. CUT formats supported by Geneious include amino acid translations for each codon. If this information does not correspond to the genetic code of expression host, you can specify an Override Genetic Code in the Advanced options.
Optimize All codons in Sequence/Selected Region: Select this option to generate a new sequence by randomly choosing among synonymous codons according to the specified codon usage table. If you choose to Eliminate Rare Codons, codons with relative adaptiveness or fraction values above the threshold will be randomly sampled according to their relative usage fraction. The rare codon threshold can be set in the Advanced options.
Optimize Rare Codons Only: Select this option to optimize only rare codons with relative adaptiveness or fraction values below the threshold by randomly sampling among synonymous codons with values above the threshold according to their relative usage fraction.
Forbidden Motifs: Lets you specify sequences to avoid including or introducing in the result. If you choose to Forbid Restriction Sites, the result will not include any sites that match recognition sequences of the selected enzymes. Select Forbid Custom Motifs to specify arbitrary sequence motifs to forbid in the result.
Save Result As: Creates a new sequence containing the optimized bases plus an annotation track detailing the change at each optimized codon. If you choose to create two or more co-optimized copies, a sequence list containing multiple different optimized sequences will be generated.
Annotate Sequence Without Changing Nucleotides: Does not change the sequence, but adds an annotation track on the selected sequence with an annotation on each codon that would be changed by optimization.
Advanced Options:
Override Genetic Code: Lets you specify the genetic code of the target organism, if it differs from the genetic code implied in the CUT. Ensure you select the correct genetic code for your target expression host.
Rare Codon Threshold: A number between 0 and 1. Set whether you wish to use the frequency (Fraction) or Relative Adaptiveness of a codon as a threshold; codons with values less than this threshold are candidates to be replaced by higher-value codons that translate to the same amino acid. If a fraction threshold is specified and no codons with high enough values translate to the correct amino acid, the highest fraction synonymous codon will be used even though it falls below the threshold.
Restrict Maximum Length of Homopolymer Repeats: Specify the maximum allowable length of repeats of the same nucleotide.
Maximize Distance Between Co-optimized Copies: When generating two or more co-optimized result sequences, this option attempts to use a different codon in each result whenever possible. Rare codons will not be introduced, but this option will cause codon usage frequencies to deviate from the target distribution.
Specify Random Number Seed: By default, Optimize Codons will normally produce a different sequence each time it is used on the same input sequence. Use this option to override this behavior: If the same seed is used Optimize Codons will generate the same result each time for the same input sequence (providing all the same options are used). The seed used for Optimize Codons can be found in the annotation track properties (visible when mousing over the track name) or, if saving a new document, in the Document History, in the Info tab above the Sequence View.
Results display
After the analysis has finished, either a new document will be created containing the optimized bases (if you choose to save the result as a new document), or optimized codons will be annotated on the original sequence (if you chose to annotate sequence without changing the nucleotides). With either option, an annotation track on the sequence contains the details about each optimized codon, including the codon change, synonymous codons and the Fraction or Relative Adaptiveness values for those codons (depending on what was set in the Rare Codon Threshold option).

If you have chosen to annotate the sequence but not change the nucleotides, you can change the sequence to the optimized codon at a later time by right clicking on the annotation and choosing Apply Optimized Codon. Optimized codons applied to the sequence can also be reverted to the original by right-clicking the annotation and selecting Revert Optimized Codon.
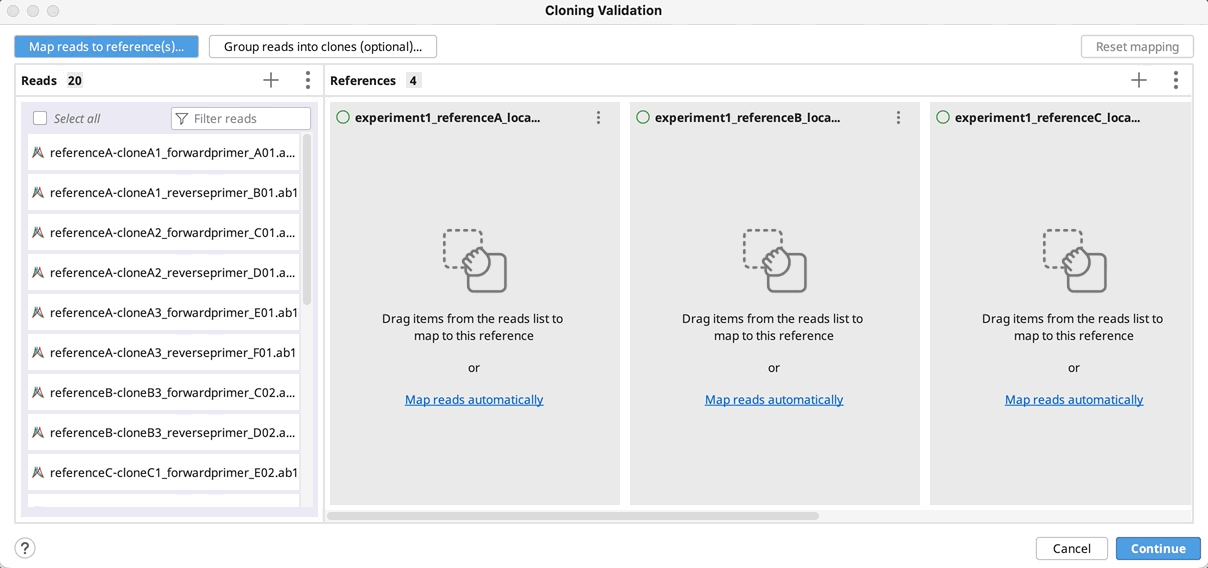
Cloning Validation
The Cloning Validation operation can be accessed via the Cloning button on the Toolbar, or via Tools → Cloning → Cloning Validation in the main menu. This tool allows you to automate sequence alignment for batch plasmid validation.
To run Cloning Validation, first select all your reads and reference sequence(s) and start the tool. Next (optionally) group your reads into clones and map to the references in batch. You can automate this process using the supported naming format. Grouping and mapping can also be done manually (by drag-and-drop) or via a combination of manual and automatic methods.
Automatically group clones and/or map to reference(s): You can optionally group reads into clones by clicking on Group reads into clones (optional)…, and then select the part(s) of your reads name that specifies how to group them and click OK. You will see a preview of the groupings as indicated by the color coding on your read names.
If you do not have a unique identifier for all your selected clones, you can instead select the part of your read names that defines the reference to map to.
To map reads/clones to their reference(s), click on Automatically map by…, select the part(s) of your reference name that match the part of a name in your reads/clones and click OK. Click Continue, configure alignment settings if required, and click OK to run the alignment.
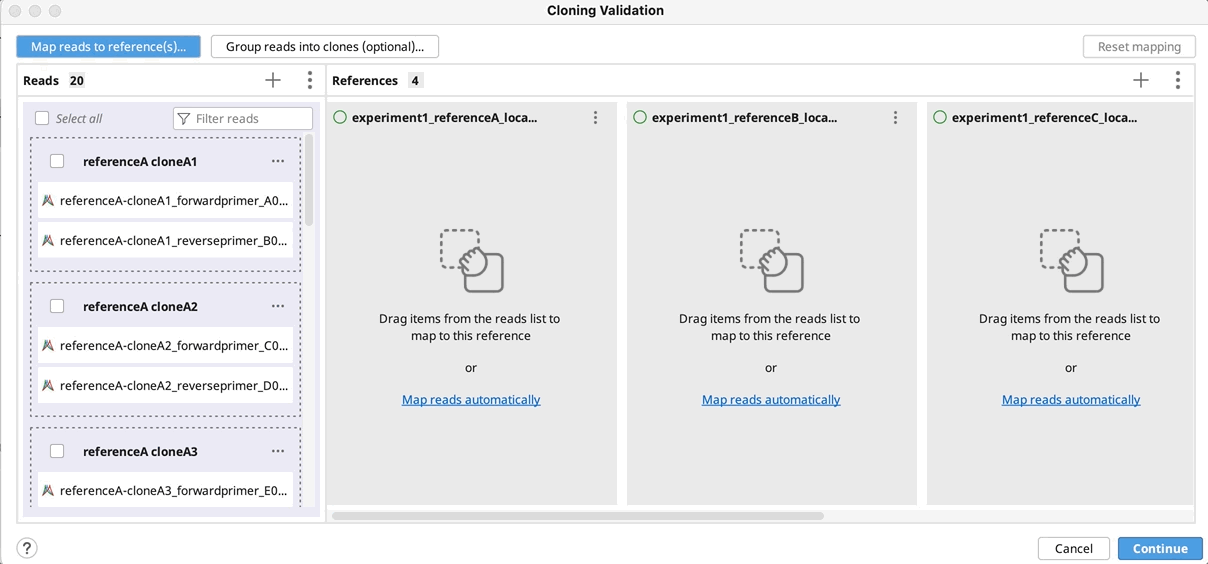
Manually group clones and/or map to reference(s): If you want to manually setup the validation - Drag and drop your reads to their references and/or group them into clones by selecting your reads and using the "Actions" button in the reads column or the "…" button in the reference(s) column. Click Continue, configure alignment settings if required, and click OK.
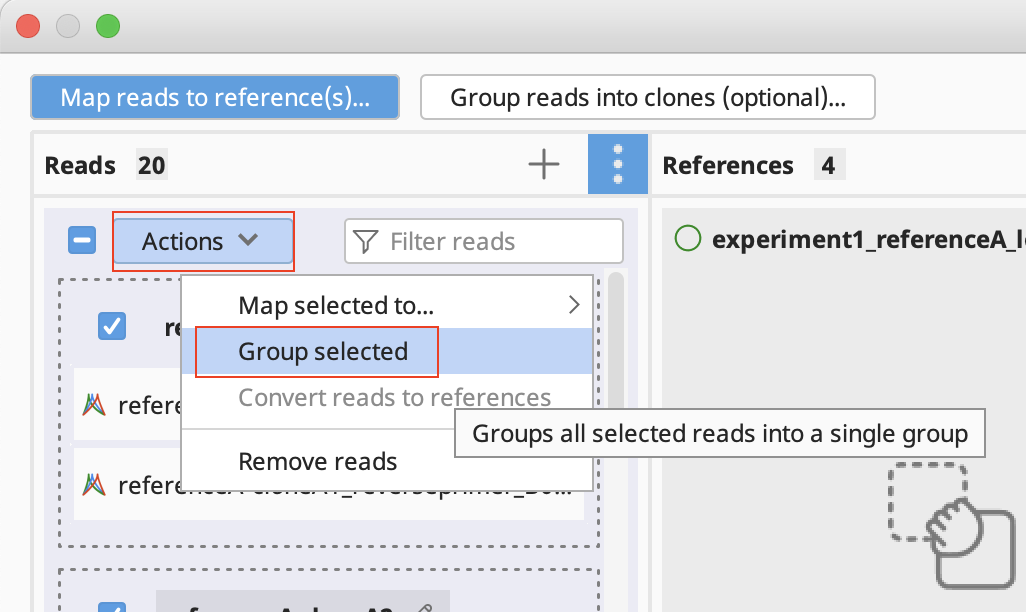
- To reset all groupings, select all, click on the Actions button and select Ungroup all.
- To reset mapping to references click the Reset mappings button
For further guidance and examples using the Cloning Validation tool, see our Knowledge Base article, here.